flexiCLINIC User Guide
How to use flexiCLINIC day to day, screen by screen: registering and booking patients, the live queue, consultations, laboratory, inpatient wards, pharmacy, billing and payments, and running your clinic's settings. Each section says which roles use it.
Signing in
You sign in with three things: your clinic's short name (for example riverside-family-clinic) or its Clinic ID, your work email, and your password.
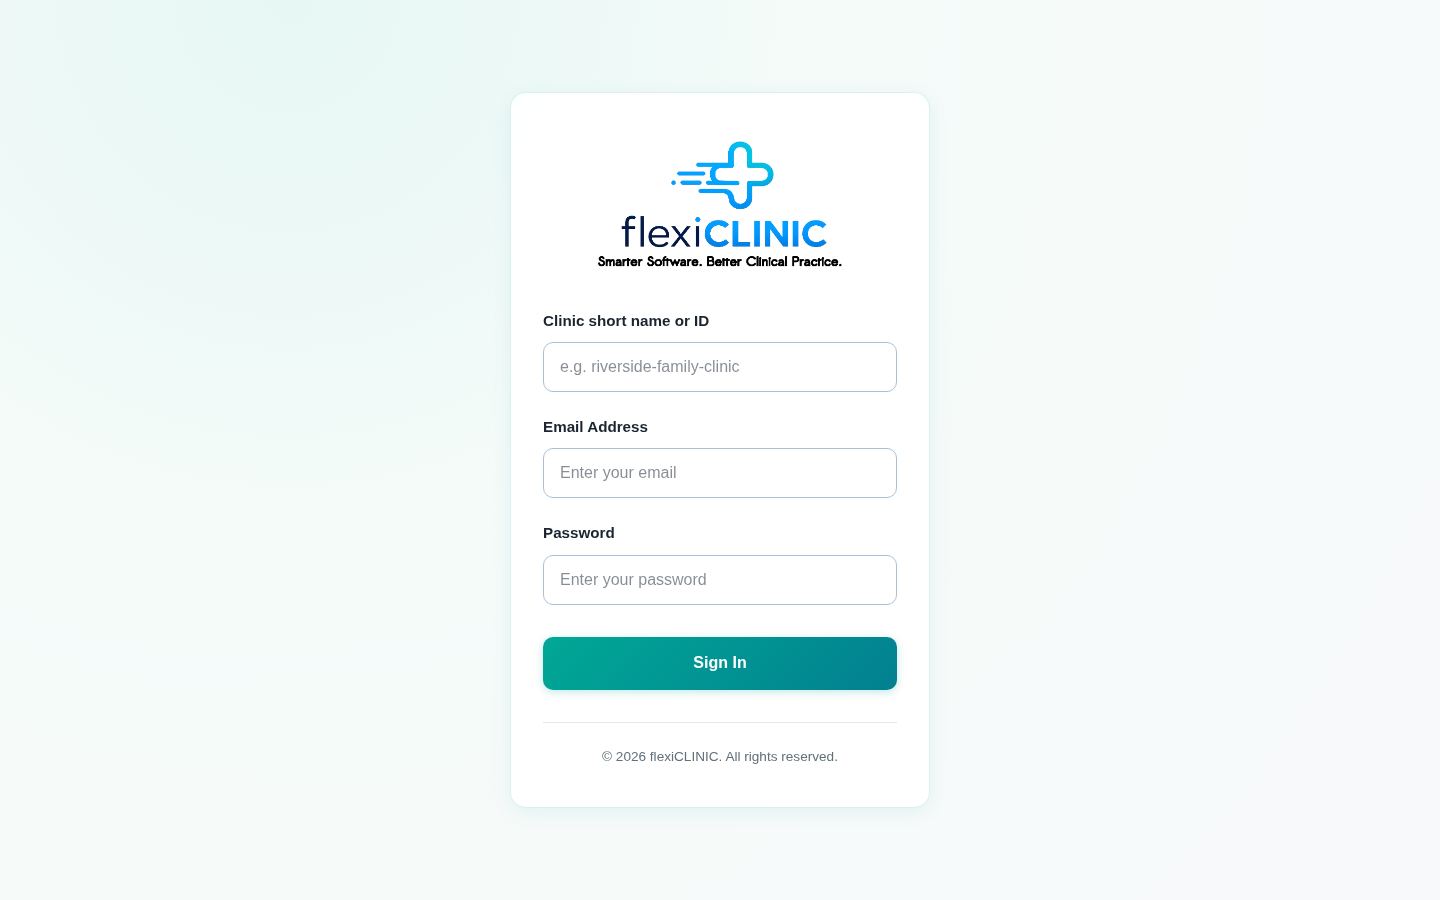
Your first sign-in
- Open the invitation email from your clinic administrator and select the activation link. It works once and expires after 48 hours.
- Enter your full name and choose a password.
- Sign in with the clinic short name, your email and that password.
Forgotten password
Select Forgot password on the sign-in page, then enter your clinic short name and email. A reset link arrives by email and works for one hour.
Registering a new clinic
A clinic can start its own free trial from the flexiCLINIC website. The trial includes every module for 14 days, and no card is needed.
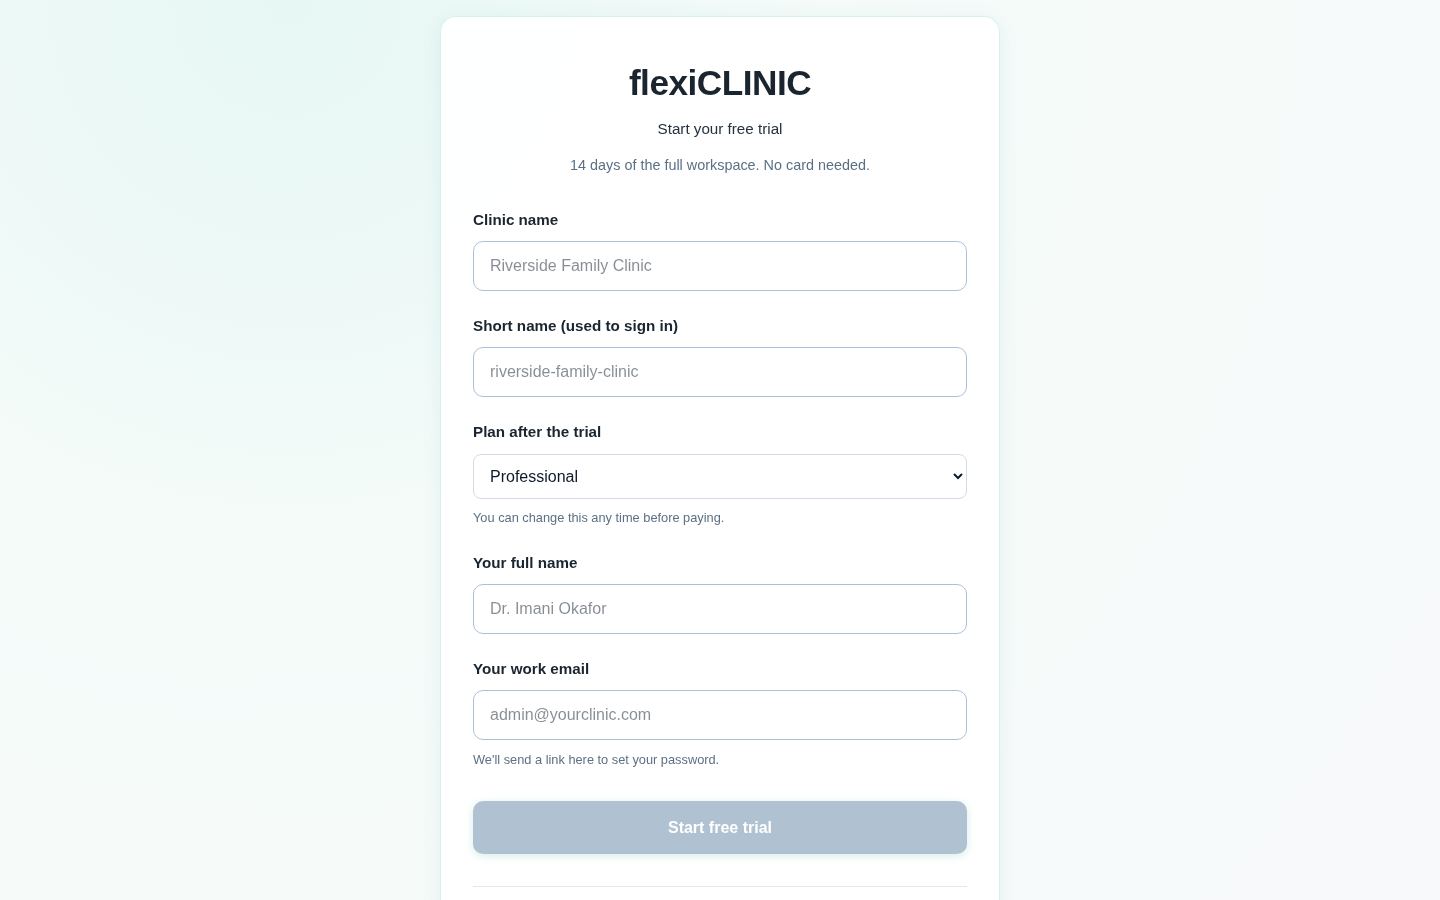
- Select Start free trial on the website, or a plan's button on the pricing page.
- Enter the clinic name. A short name is suggested from it; change it if you like. It can only use lowercase letters, numbers and hyphens.
- Choose the plan you expect to use after the trial. You can change it any time before paying.
- Enter your full name and work email, then select Start free trial.
- Open the welcome email and select the activation link to set your password. It expires after 7 days.
- Sign in. The setup wizard asks for your practice address, registration or licence number, currency, tax rate, logo, departments and opening shifts. The rest of flexiCLINIC opens once it is complete.
Next steps for a new clinic: invite your team (Team & access), set up wards and lab tests if you use them, and add your corporate clients.
Your workspace
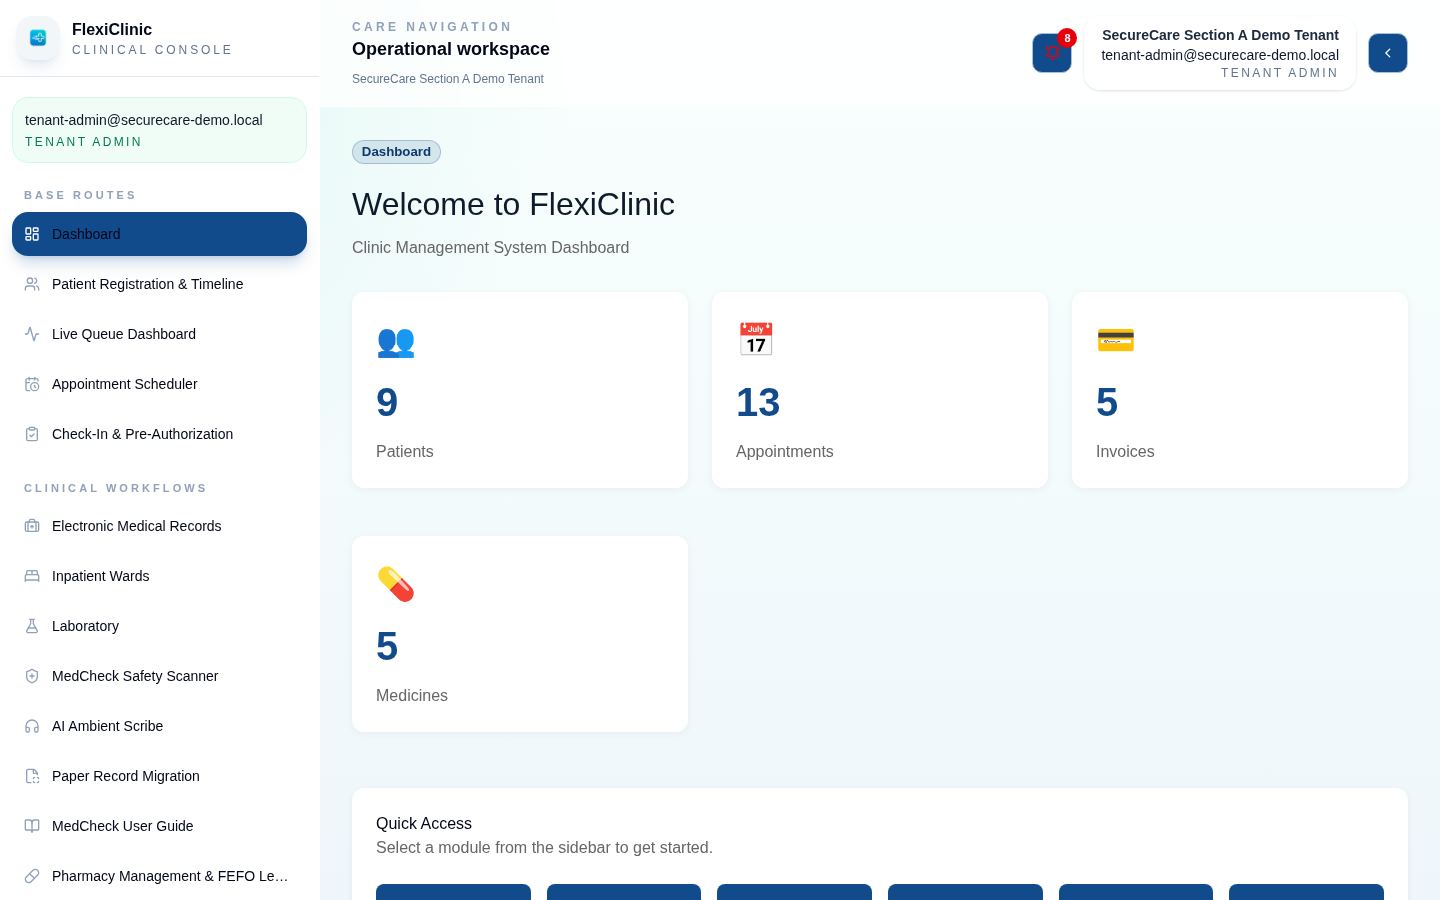
After signing in you see the dashboard: counts of patients, appointments, invoices and medicines, and shortcuts to the screens you use most. The sidebar only shows the screens your role can use and your clinic's plan includes. Laboratory staff go straight to the lab worklist.
Alerts bell
The bell at the top right collects what needs your attention now, and urgent items also pop up in the corner of the screen. What you see depends on your role:
| Alert | Who sees it |
|---|---|
| A ward dose is due or overdue | Nurses, Tenant Admin |
| A dose was not given more than 2 hours after it was due | The prescribing doctor, Tenant Admin |
| A dose was held or refused | The prescribing doctor, Tenant Admin |
| A ward medication order has no pharmacy supply | Nurses, pharmacists, Tenant Admin |
| A medication order ends within 24 hours | The prescribing doctor, Tenant Admin |
| A lab result is ready to review (flagged when abnormal) | The requesting doctor, Tenant Admin |
| A deposit refund is waiting for approval or payout | Tenant Admin, accountants |
Select Dismiss on an alert once you have dealt with it. To get the most urgent ones by text message as well, see Reminder texts.
Subscription banner
A coloured strip at the top of each page appears when your clinic's subscription needs attention: blue in the last 7 days of the free trial, amber when payment is due, and red when the workspace has become read-only. See Subscription & plan.
Who does what
Every account has one role. The table shows what each role can do by default. A Tenant Admin can switch off modules for a role in the Role Access Matrix, and your plan decides which modules the clinic has at all.
| Area | Reception | Nurse | Doctor | Lab | Pharmacist | Accountant | Corporate coordinator | Tenant Admin |
|---|---|---|---|---|---|---|---|---|
| Register and edit patients | ✓ | view | view | – | view | – | – | ✓ |
| Book appointments and walk-ins | ✓ | ✓ | view | – | – | – | – | ✓ |
| Move patients through the queue | check in | check in, to triage | to consultation, done | – | – | – | – | ✓ |
| Document consultations and prescribe | – | view | ✓ | – | – | – | – | ✓ |
| Request lab tests | – | – | ✓ | – | – | – | – | ✓ |
| Collect samples | – | ✓ | – | ✓ | – | – | – | ✓ |
| Enter lab results | – | – | – | ✓ | – | – | – | ✓ |
| Admit and discharge | – | – | ✓ | – | – | – | – | ✓ |
| Record vital signs (triage, consultation, ward) | – | ✓ | ✓ | – | – | – | – | ✓ |
| Write ward progress notes | – | ✓ | ✓ | – | – | – | – | ✓ |
| Chart ward doses and observations | – | ✓ | ✓ | – | – | – | – | ✓ |
| Receive stock and dispense | – | – | dispense | – | ✓ | – | – | ✓ |
| Dispense prescriptions | – | – | – | – | ✓ | – | – | ✓ |
| Supply ward requests | – | – | – | – | ✓ | – | – | ✓ |
| Create invoices | – | – | – | – | – | ✓ | view | ✓ |
| Take payments, print receipts | ✓ | – | – | – | – | ✓ | – | ✓ |
| Inpatient deposits | ✓ | – | – | – | – | ✓ | – | ✓ |
| Finalise inpatient bills, refunds | – | – | – | – | – | ✓ | – | ✓ |
| Company statements and payments | – | – | – | – | – | ✓ | view | ✓ |
| Decide pre-authorisations | – | – | – | – | – | ✓ | ✓ | ✓ |
| Settings, staff, subscription | – | – | – | – | – | – | – | ✓ |
A walk-in visit, start to finish
How a typical outpatient visit is captured, from arrival to receipt. Every step lands on the patient's timeline.
| Step | Who | Where | What is recorded |
|---|---|---|---|
| 1. Confirm the patient is registered | Reception or nurse | Patient Registration & Timeline → search | Nothing yet (register them if not found) |
| 2. Book and check in now | Reception or nurse | Live Queue → + Walk-in → patient, doctor → Check in now | A visit, already in the waiting room |
| 3. Triage and vital signs | Nurse | Live Queue → Move to TRIAGE, then Record vitals | Vital signs linked to the visit, with the nurse's name |
| 4. Call the patient in | Doctor | Live Queue → Move to CONSULTATION (or Open in EMR) | Visit in consultation |
| 5. Review and retake vitals | Doctor | EMR → Vital signs panel → + Record vitals | A second reading, with the doctor's name |
| 6. Complaints and findings | Doctor | EMR → Chief Complaint and the note (template gives Subjective, Objective, Assessment, Plan) | The consultation note |
| 7. Prescribe | Doctor | EMR → Prescriptions (MedCheck checks each medicine) | Prescriptions, sent to pharmacy's list |
| 8. Book the follow-up | Doctor | EMR → Follow-up visit → date and doctor | A future appointment |
| 9. Save and finish | Doctor | EMR → Commit Encounter; Live Queue → Move to DONE | The final consultation, with the visit's latest vitals |
| 10. Dispense | Pharmacist | Prescriptions to Dispense → Dispense | Medicine issued from the earliest-expiring batch, linked to the visit |
| 11. Bill | Accountant | Billing → + New Invoice → the visit → Add dispensed medicines and the consultation fee → Generate Invoice Split | The invoice, split with the patient's HMO or employer if any |
| 12. Take payment | Accountant or reception | Payments & Receipts → the invoice → Process Payment → Print Receipt | Payment and a numbered receipt |
Patients
Patient Registration & Timeline is the directory of everyone your clinic has registered. Search by name, phone number or Patient ID, then view or edit a record. Doctors, nurses and pharmacists can look patients up but not change them.
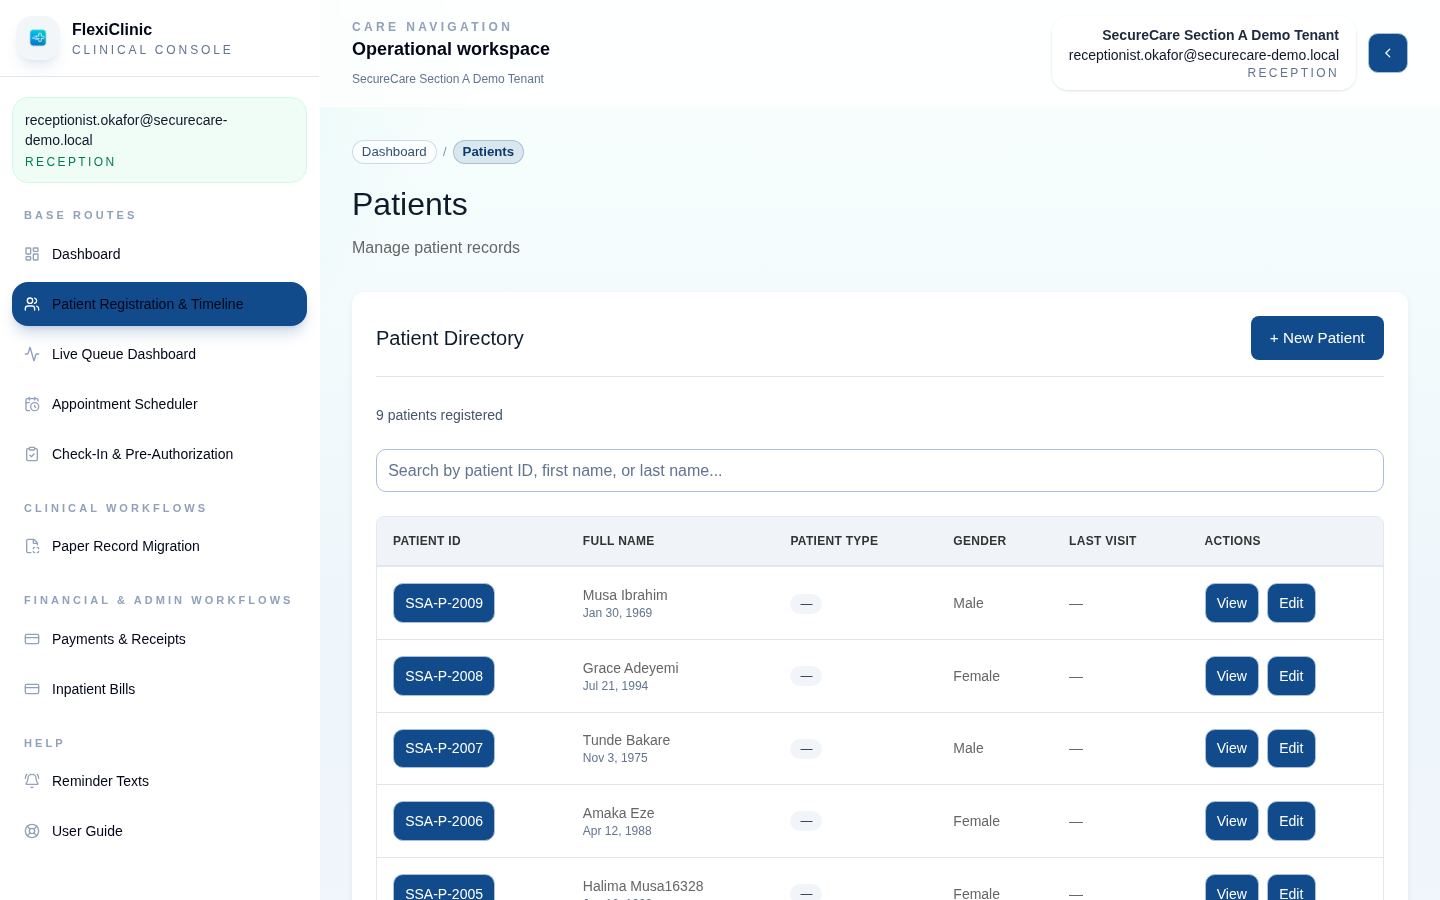
Registering a patient
Always search first, so the same person is not registered twice.
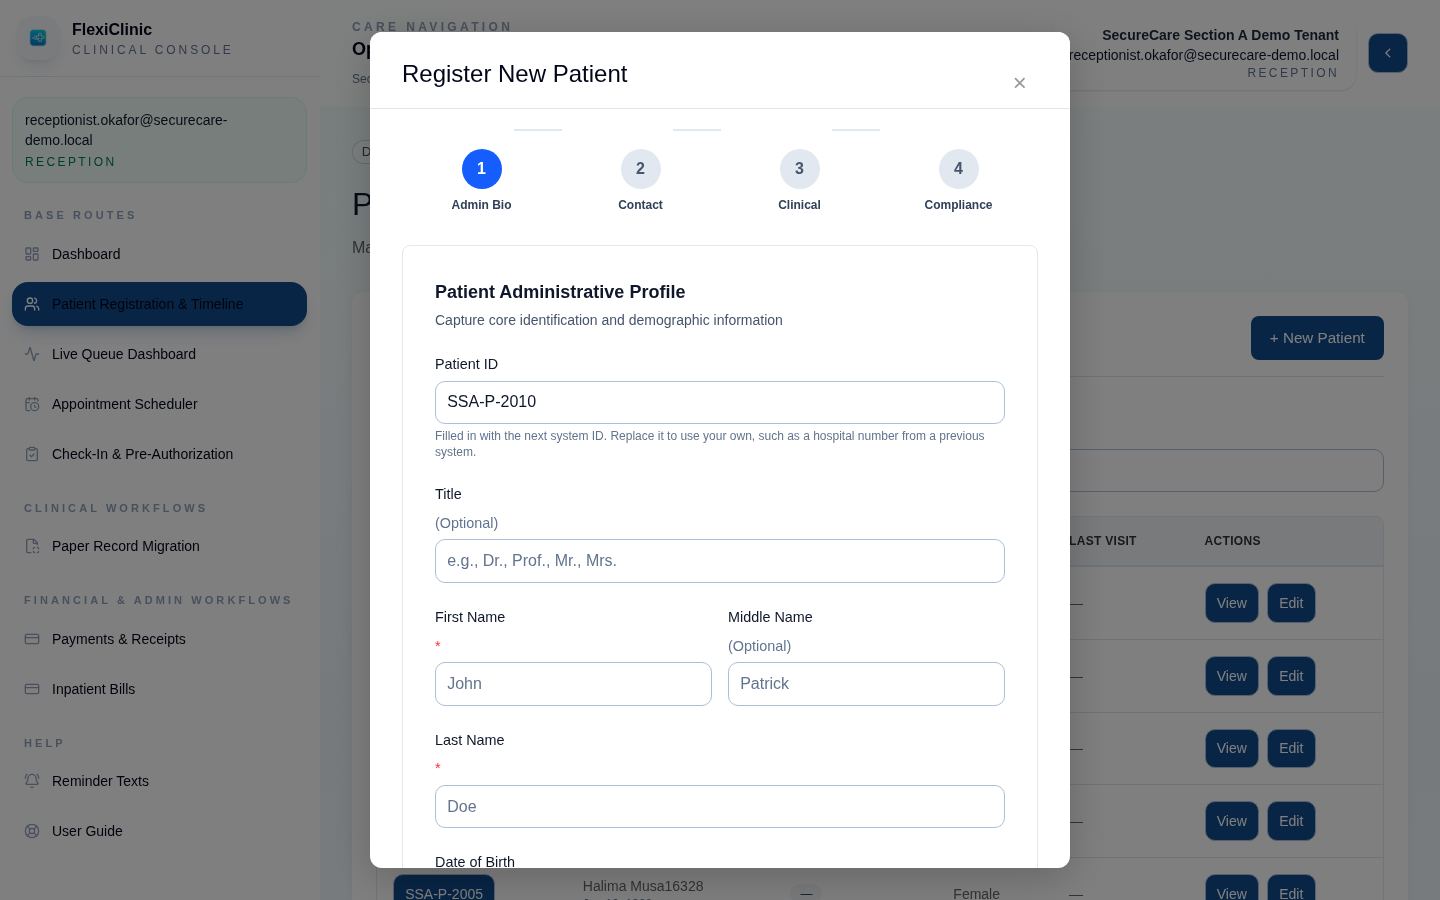
- Select + New Patient.
- Patient ID: leave the suggested ID, or replace it with your own, such as the number on an old paper folder. Your own IDs are saved in capitals, and an ID already in use is refused.
- Enter title, names, date of birth, gender, marital status and patient type.
- Continue through the steps: contact and address, clinical profile (blood group, genotype, allergies flag) and corporate details. For a patient covered by a corporate client or HMO, choose the institution and enter their staff or enrolment number so billing splits correctly.
- Save. The patient can now be booked.
Patient timeline
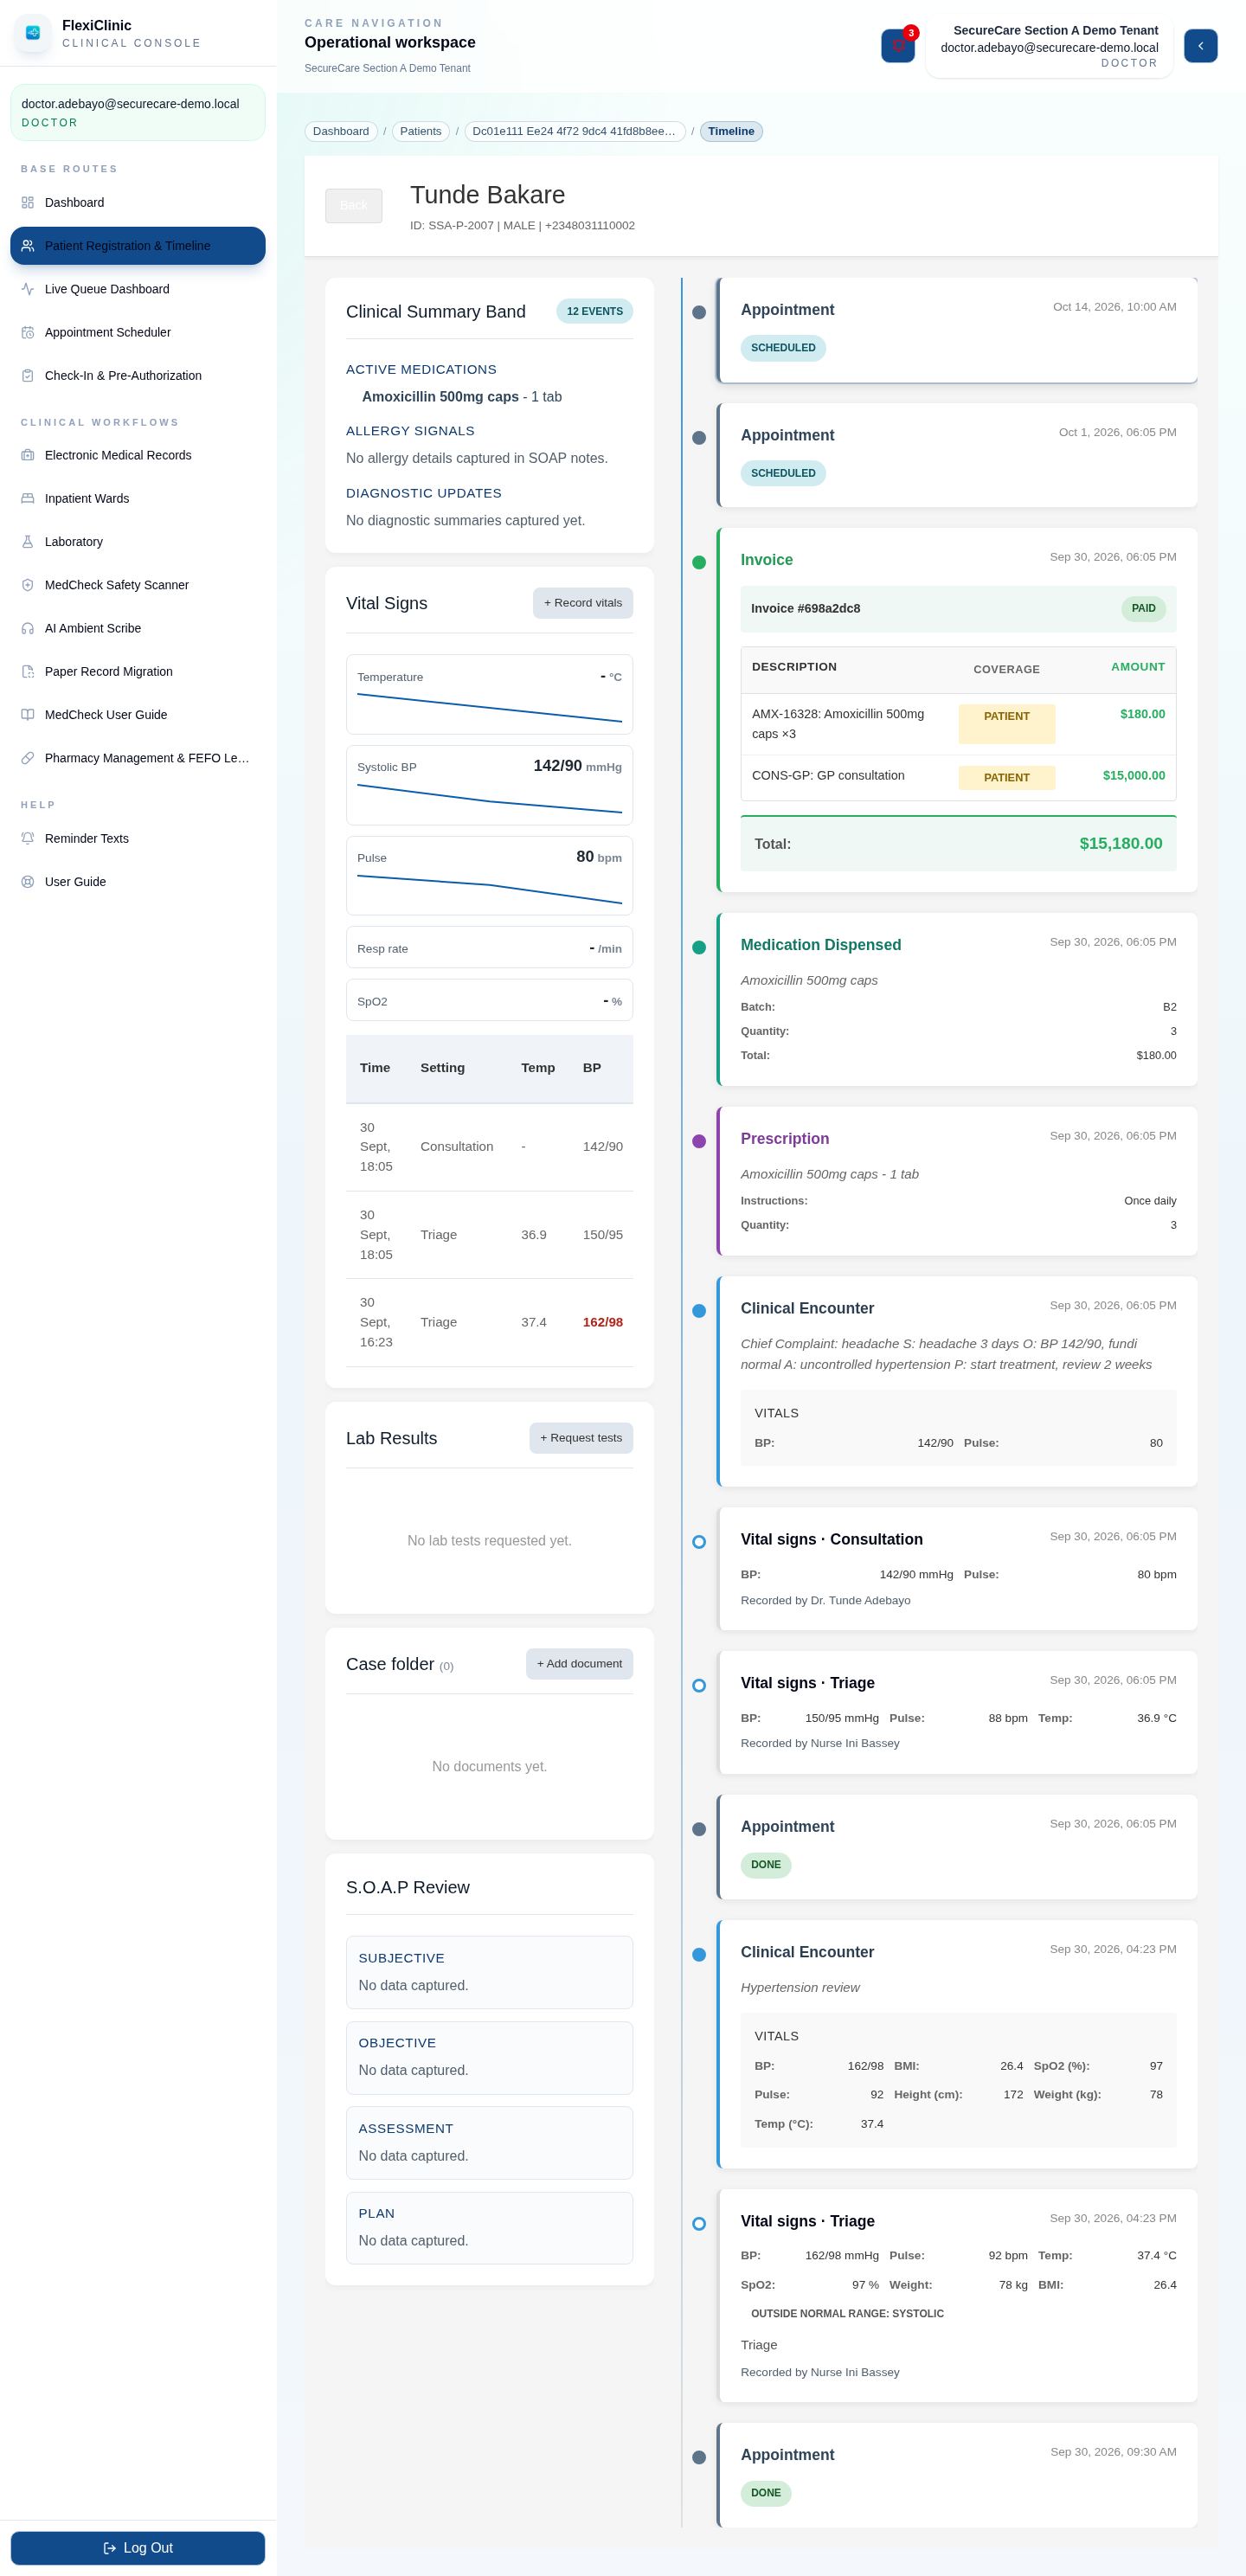
Select a patient and open Full timeline (also on the EMR screen) for one chronological record of their consultations, vital signs, ward progress notes, prescriptions, dispensed medicines, invoices, appointments and scanned records, with a summary of active medications, allergies and diagnoses, their vital-sign trends, lab results and case folder alongside.
Appointments
Appointment Scheduler shows bookings by day, week or month. Reception, nurses and admins book; doctors view it and book follow-ups from the EMR. For someone who has just walked in, use + Walk-in on the live queue instead.
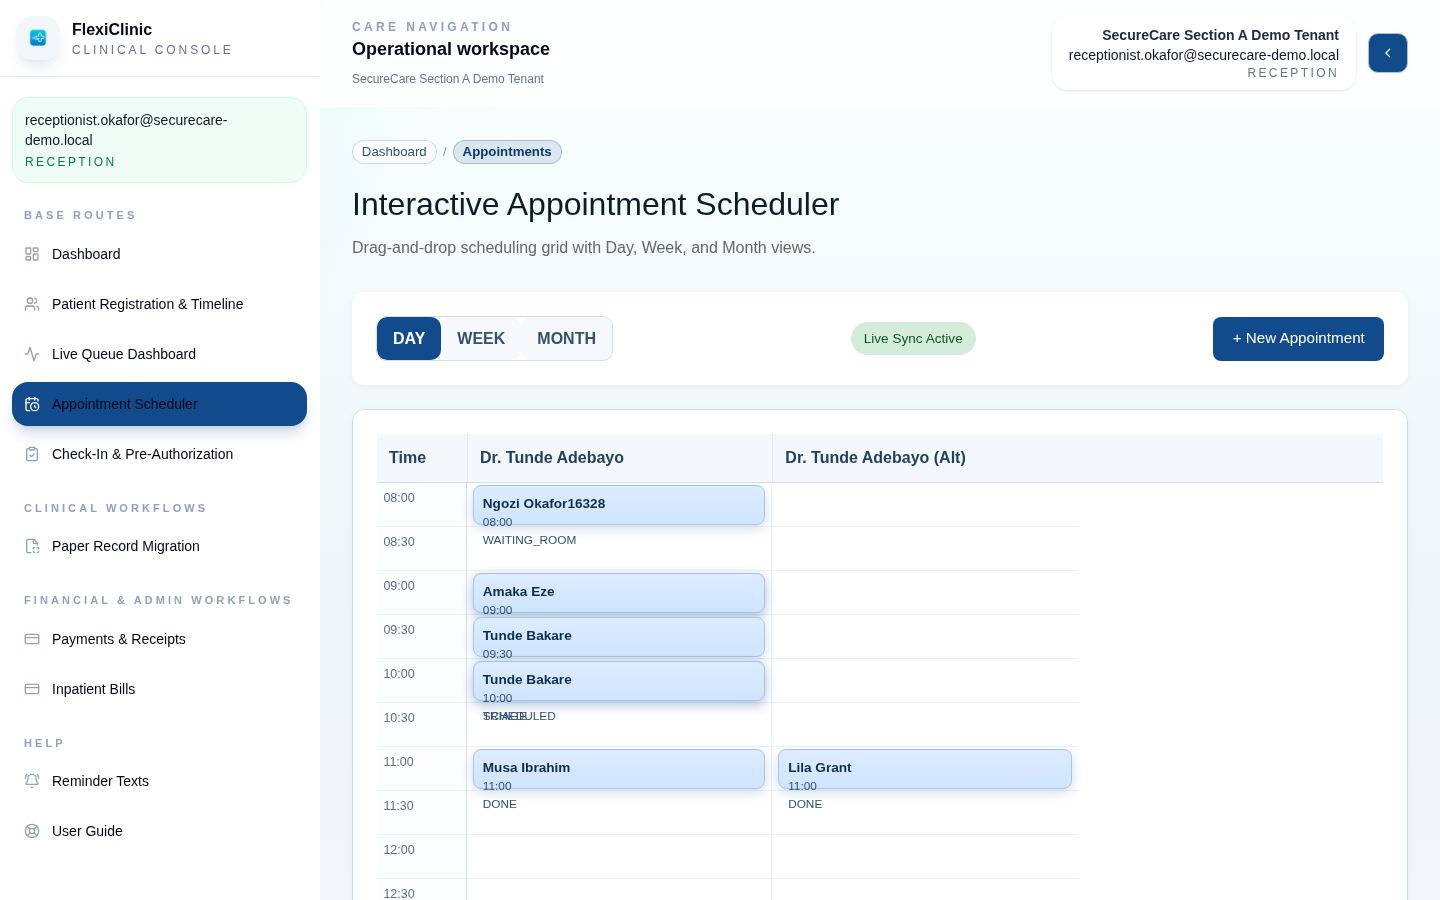
- Select + New Appointment.
- Choose the patient, the doctor, and the date and time. For walk-in sessions where whoever is free sees the patient, choose Any available doctor.
- Book. The appointment appears in the calendar and in the first column of the live queue.
Live queue
Live Queue Dashboard shows every appointment today as it moves through five stages. Each role sees the stages it works on and moves patients to the next one.
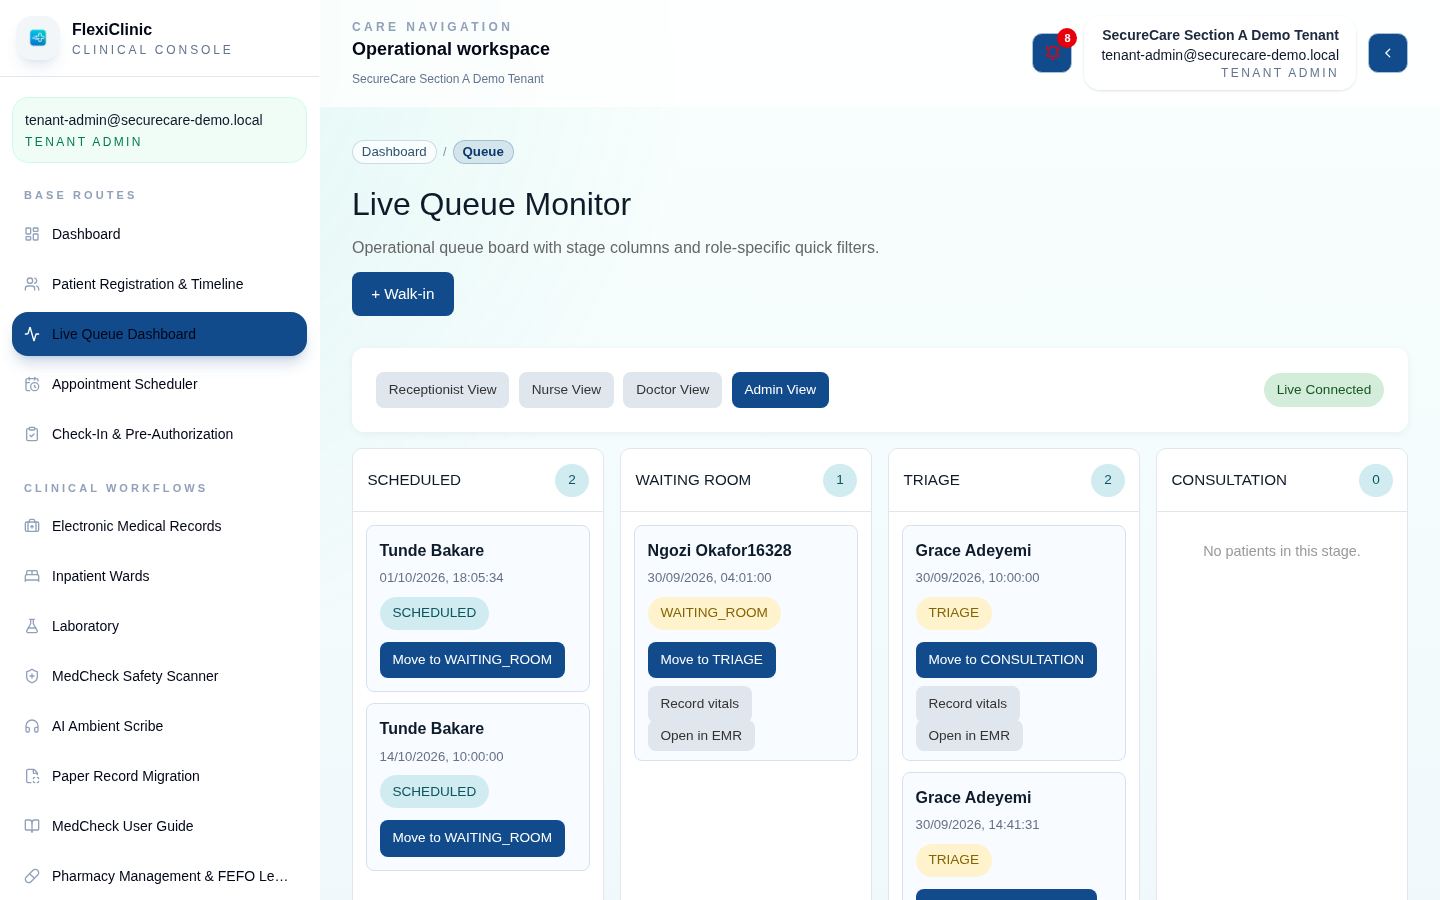
| Stage | Means | Moved on by |
|---|---|---|
| Scheduled | Booked, not yet arrived | Reception or a nurse, when the patient arrives (check-in) |
| Waiting room | Arrived and waiting | Nurse, when triage starts |
| Triage | Vitals and triage with the nurse | Doctor, when the consultation starts |
| Consultation | With the doctor | Doctor, when finished |
| Done | Visit complete | – |
Select Move to … on a patient's card to advance them. Doctors and nurses can open the patient's record straight from the card. A patient appears on the doctor's EMR worklist once checked in.
Walk-ins
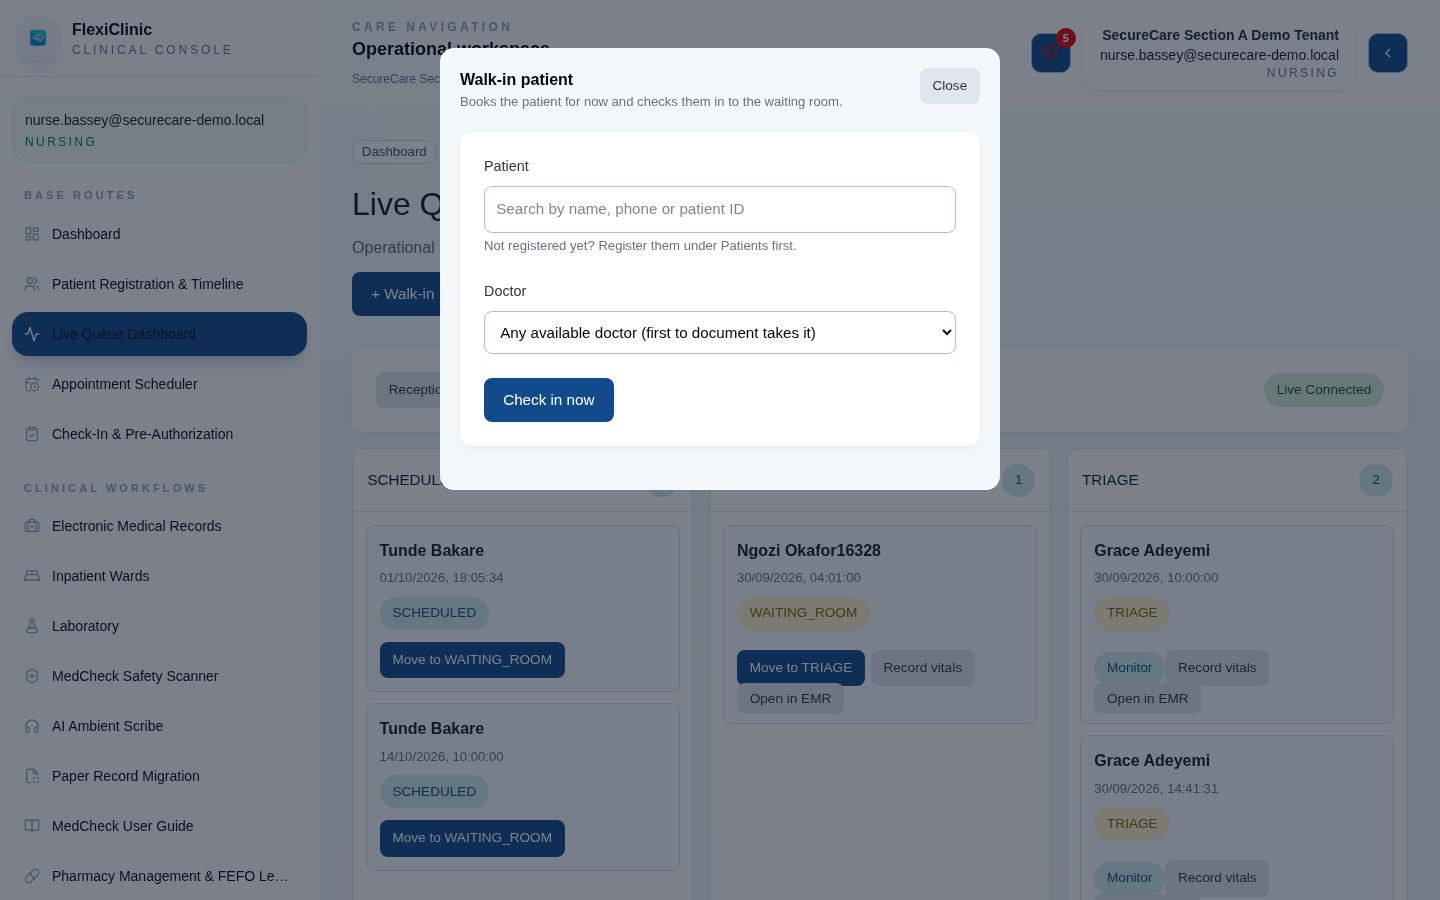
For a registered patient who arrives without an appointment, reception or a nurse selects + Walk-in, finds the patient, chooses the doctor (or Any available doctor) and selects Check in now. The visit is booked for now and goes straight to the waiting room.
Emergencies
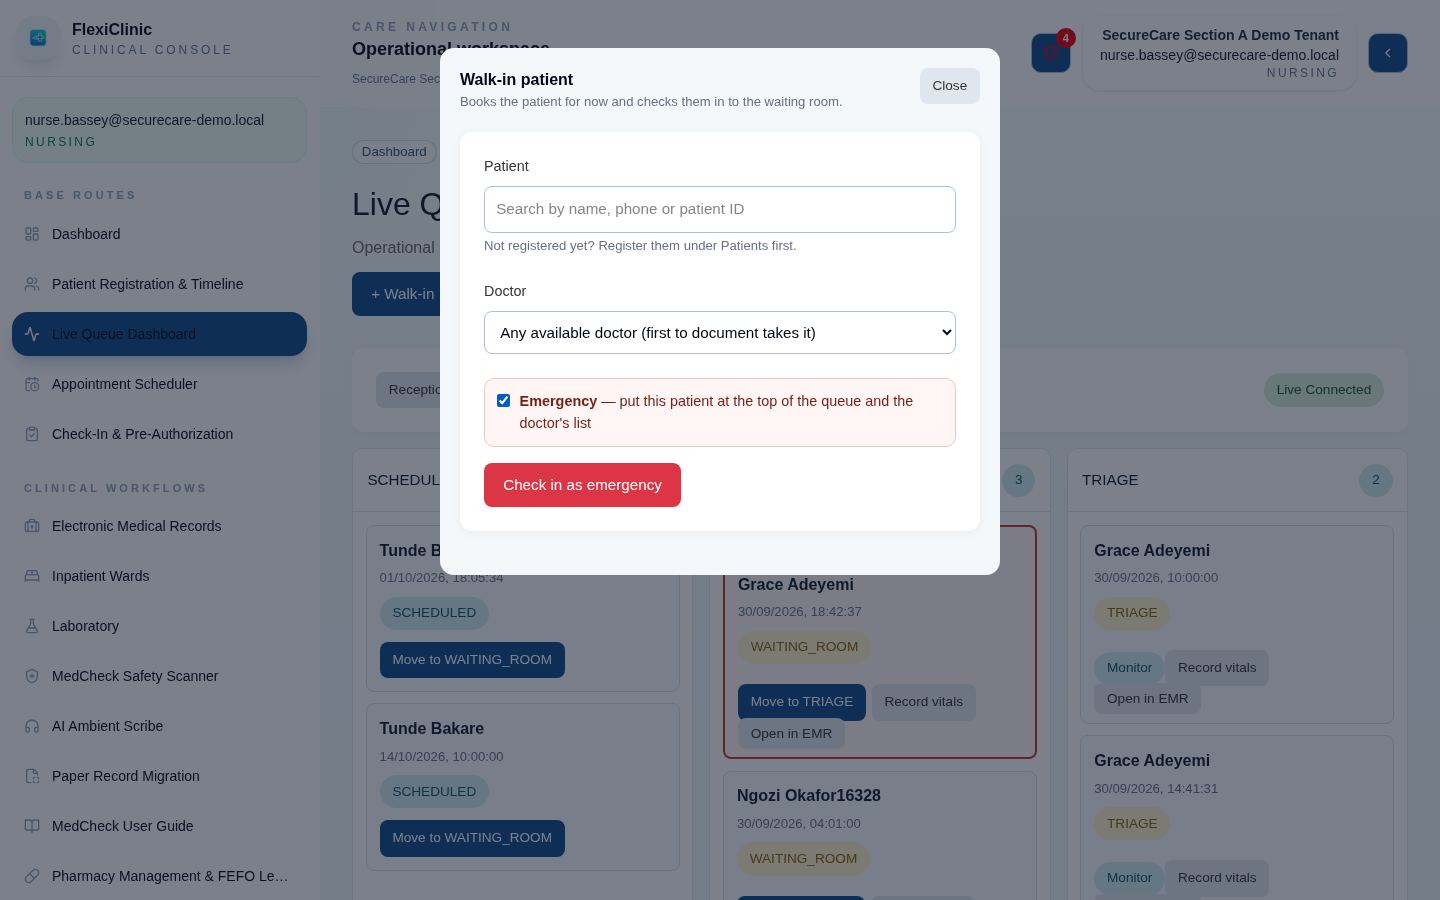
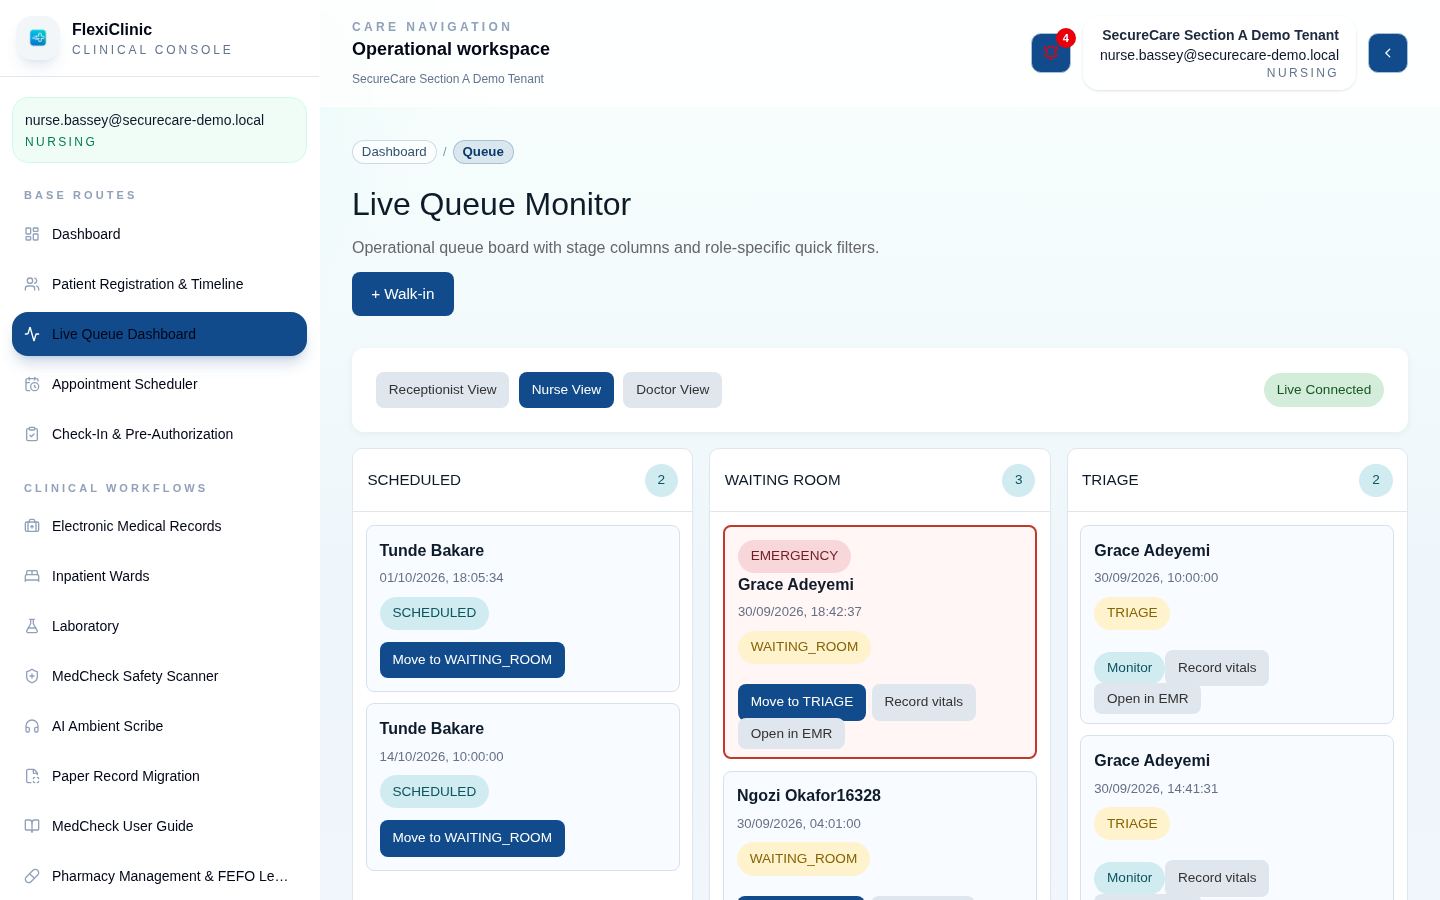
If the patient needs to be seen at once, tick Emergency in the walk-in dialog; the button changes to Check in as emergency. An emergency visit:
- goes to the top of its queue column, with a red border and an EMERGENCY badge;
- goes to the top of the doctor's EMR worklist, marked EMERGENCY, with an Emergency badge beside the patient's name while they are documented;
- keeps the flag on the patient's timeline.
Recording vital signs at triage
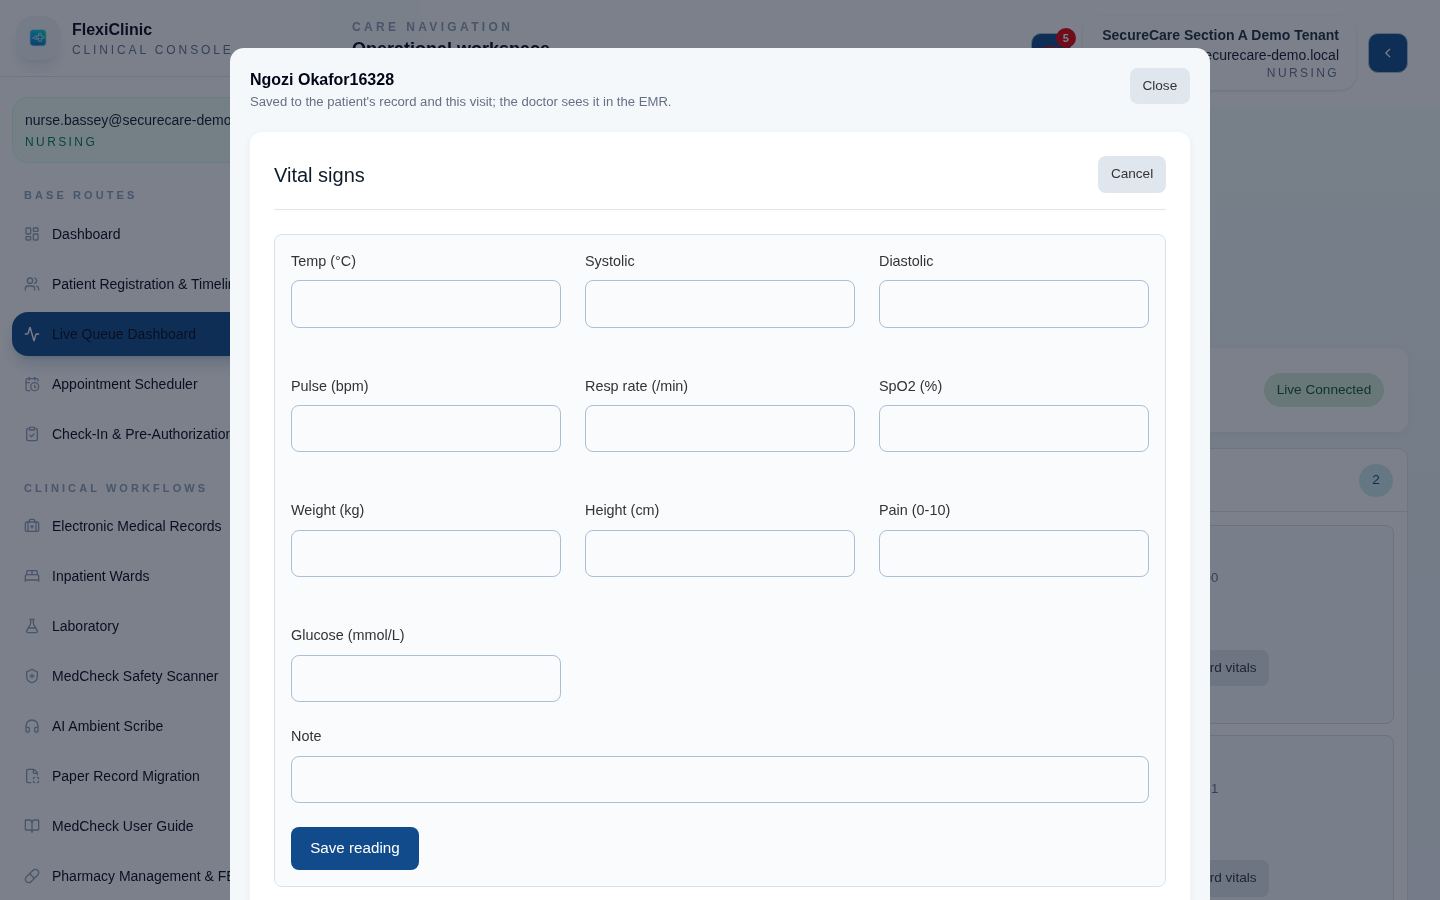
Nurses (and doctors or Tenant Admins) select Record vitals on a patient's card in the waiting-room, triage or consultation column. Enter the readings and select Save reading.
Every reading, wherever it is taken, is kept in one place on the patient's record: triage, the consultation and the ward. The doctor sees the triage reading in the EMR without retyping it, and every reading appears on the patient's timeline with who recorded it. See Vital signs.
Check-in & pre-authorisation
This screen deals with patients covered by a corporate client or HMO: which institution covers them, whether today's visit is covered, and pre-authorisation when it is not. Open Check-In & Pre-Authorization in the sidebar.
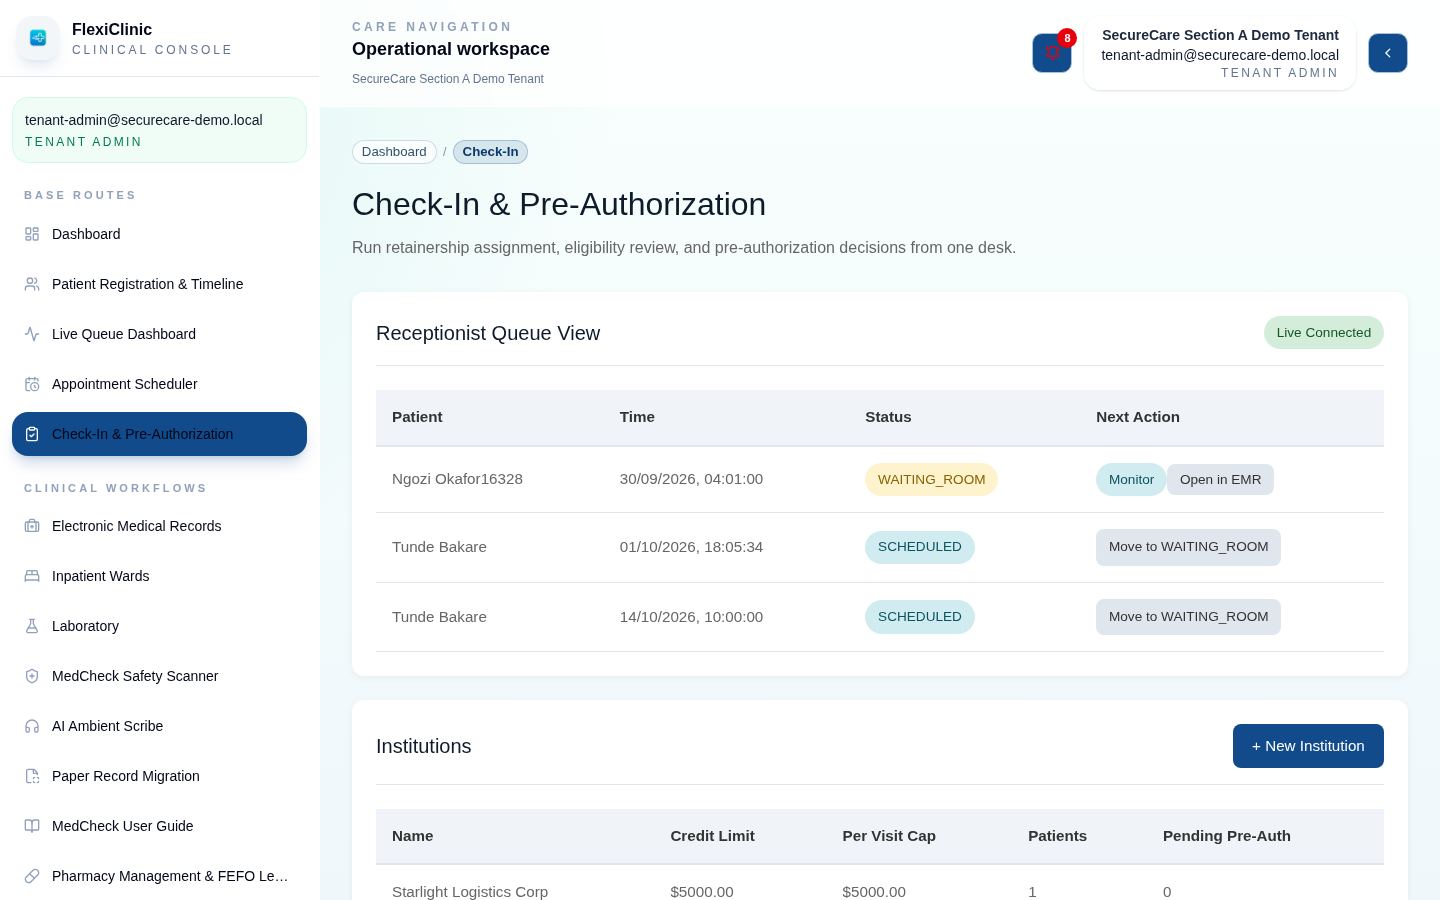
- Institutions: the corporate clients and HMOs, with credit limit, per-visit cap, inpatient cover per admission and pending pre-authorisations. Admins add them here or under Corporate clients.
- Retainership assignment: link a patient to their institution with their staff ID.
- Eligibility worklist: select Assess on a checked-in patient to see whether the estimated cost is covered by their institution's remaining balance and cap.
- Pre-authorisations: when a visit is not covered, select Create Pre-Auth (or request one with an amount and reason). An accountant, corporate coordinator or Tenant Admin then approves or denies it; an approval gets an authorisation code.
Medical records (EMR)
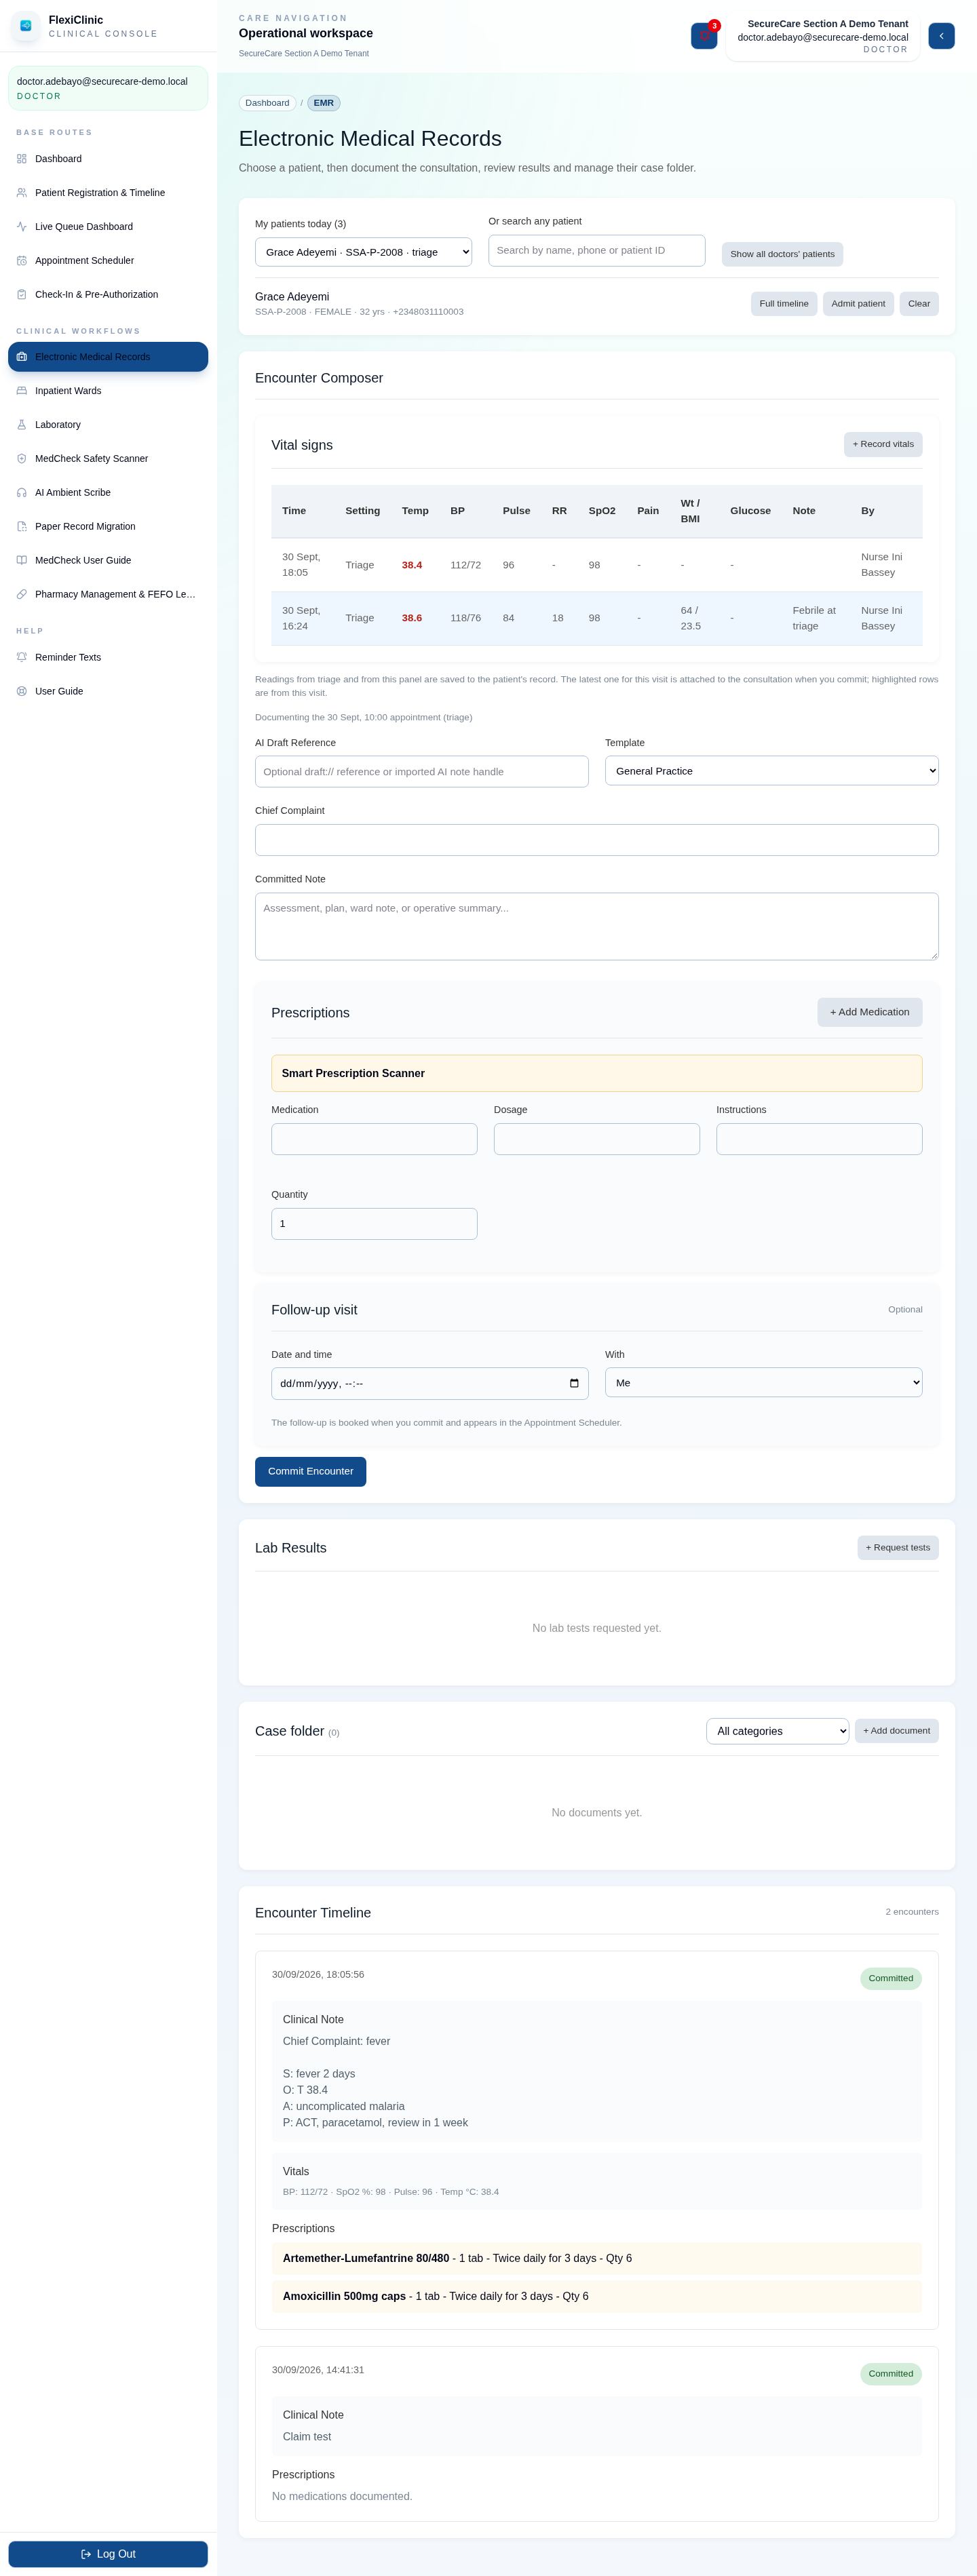
Electronic Medical Records is built around one patient at a time. Choose the patient, and everything about them is on one page: today's consultation, their lab results, their case folder of documents, and every past consultation.
1. Choose the patient
- My patients today lists the checked-in patients booked with you, plus any booked with no particular doctor (marked unassigned), with their queue stage, and marks the ones already documented. Select Show all doctors' patients to see the whole clinic's checked-in list.
- Or search any patient by name, phone or Patient ID to open anyone's record, checked in or not.
The patient bar then shows their Patient ID, sex, age, phone, blood group, genotype and institution, with an Allergies recorded badge when flagged and Admitted when they are on a ward. From here you can open the Full timeline, go to their Ward page, or Admit patient.
2. Write up the consultation
The Encounter Composer documents today's appointment. It appears when the patient is checked in and the visit is yours or unassigned; committing an unassigned visit makes it yours. A Tenant Admin can document any visit. If the patient has more than one open visit, choose which one at the top.
- Choose a Template (General Practice, Cardiology or Paediatrics) to fill the note with a SOAP outline, or write freely.
- Check the Vital signs panel at the top of the composer. It lists the patient's readings, newest first; rows from today's visit (usually triage) are highlighted. To add or update a reading, select + Record vitals. You don't retype what the nurse recorded.
- Enter the Chief Complaint.
- Write the Committed Note: assessment and plan.
- Add each medicine under Prescriptions with dose, instructions and quantity. The Smart Prescription Scanner checks them against the patient's allergies and known interactions as you type, and shows an amber alert beside any medicine that conflicts.
- To book a follow-up, fill Follow-up visit: the date and time, and who with (you by default).
- Select Commit Encounter. The note is final and cannot be edited; it appears in the encounter history and on the timeline, together with the latest vital signs recorded during this visit. Prescriptions go to the pharmacy's list, and the follow-up appears in the Appointment Scheduler.
3. Lab results
The Lab Results panel lists every test requested for the patient, with results and flags once the lab releases them. See Laboratory for requesting tests and reviewing results.
4. Case folder
The Case folder holds documents about the patient: referral letters, outside lab and imaging reports, consent forms, ID and insurance cards, discharge summaries, and any scanned paper records already approved. See Case folder & paper records.
5. Encounter history
At the bottom, Encounter Timeline shows every committed consultation for the patient with its note, vitals and prescriptions, newest first.
Laboratory
Tests move through four steps: the doctor requests, the sample is collected, the lab enters results, and the doctor reviews them.
Requesting tests (doctor)
- In the EMR (or on an admitted patient's Lab results tab), select + Request tests.
- Tick the tests; use the filter to find them. For a test that isn't in the list, type its name under Test not in the list?. The lab prices these when it enters the result.
- Set the priority (Routine or Urgent) and add clinical information, then select Request.
A doctor can Cancel a request, with a reason, until results are entered.
Working the lab worklist (lab scientist)
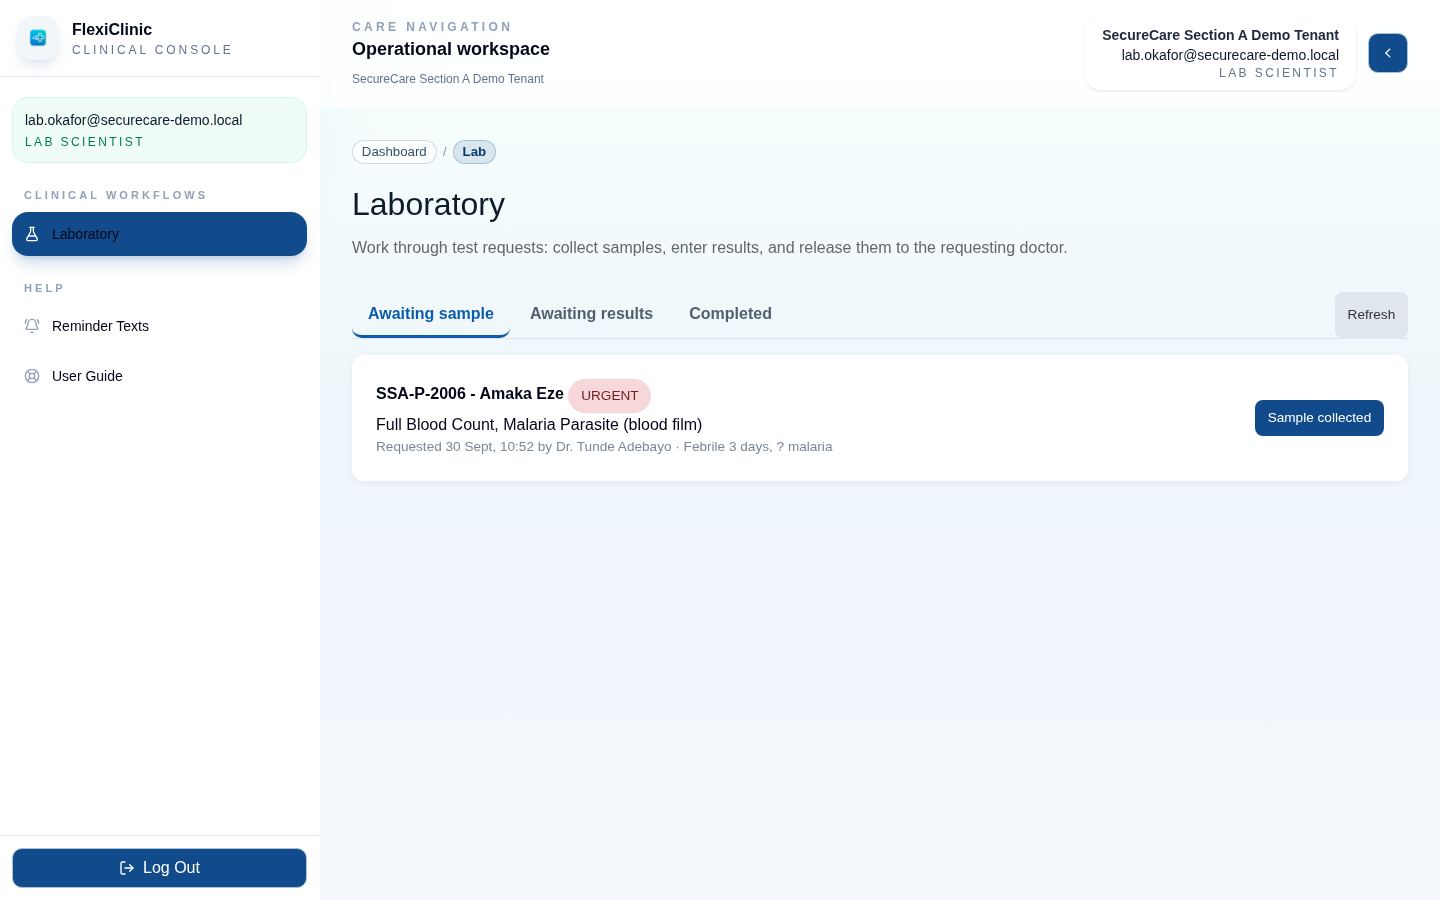
- Awaiting sample: when the sample is taken, select Sample collected. Nurses can do this on the ward too. For an admitted patient, this is when the test is added to their bill.
- Awaiting results: select Enter results. Catalogue tests show their parameters with units and reference ranges, and values outside the range are flagged automatically. For a free-text test, enter each result line, tick Abnormal where needed, and set the Price to bill. Attach the analyser printout if you have one, then select Save results.
- Results can be corrected with Correct results until the doctor has reviewed them.
Reviewing results (doctor)
The requesting doctor gets an alert when results are ready, marked when any value is abnormal. Open the patient's Lab Results panel, read the results, and select Mark reviewed. The panel shows how many are waiting for review.
MedCheck safety scanner
MedCheck checks prescriptions for allergy conflicts, interactions and contraindications, and warns when treatment would exceed a patient's cover. It runs automatically in the EMR's prescription section; the MedCheck Safety Scanner page shows its status and how it hands off to pharmacy.
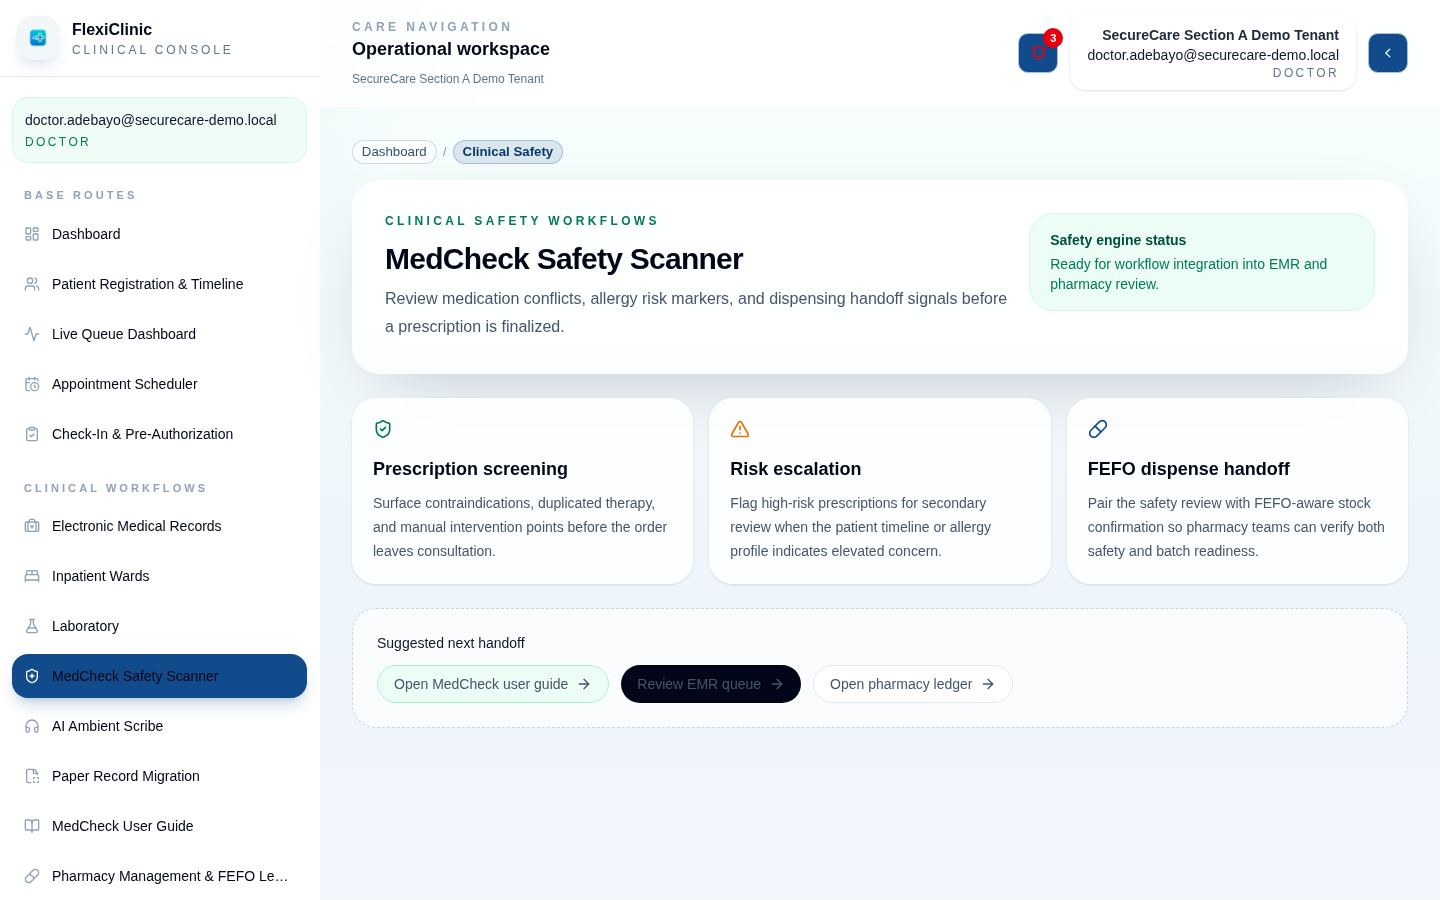
For the full walkthrough, open MedCheck User Guide in the sidebar.
AI ambient scribe
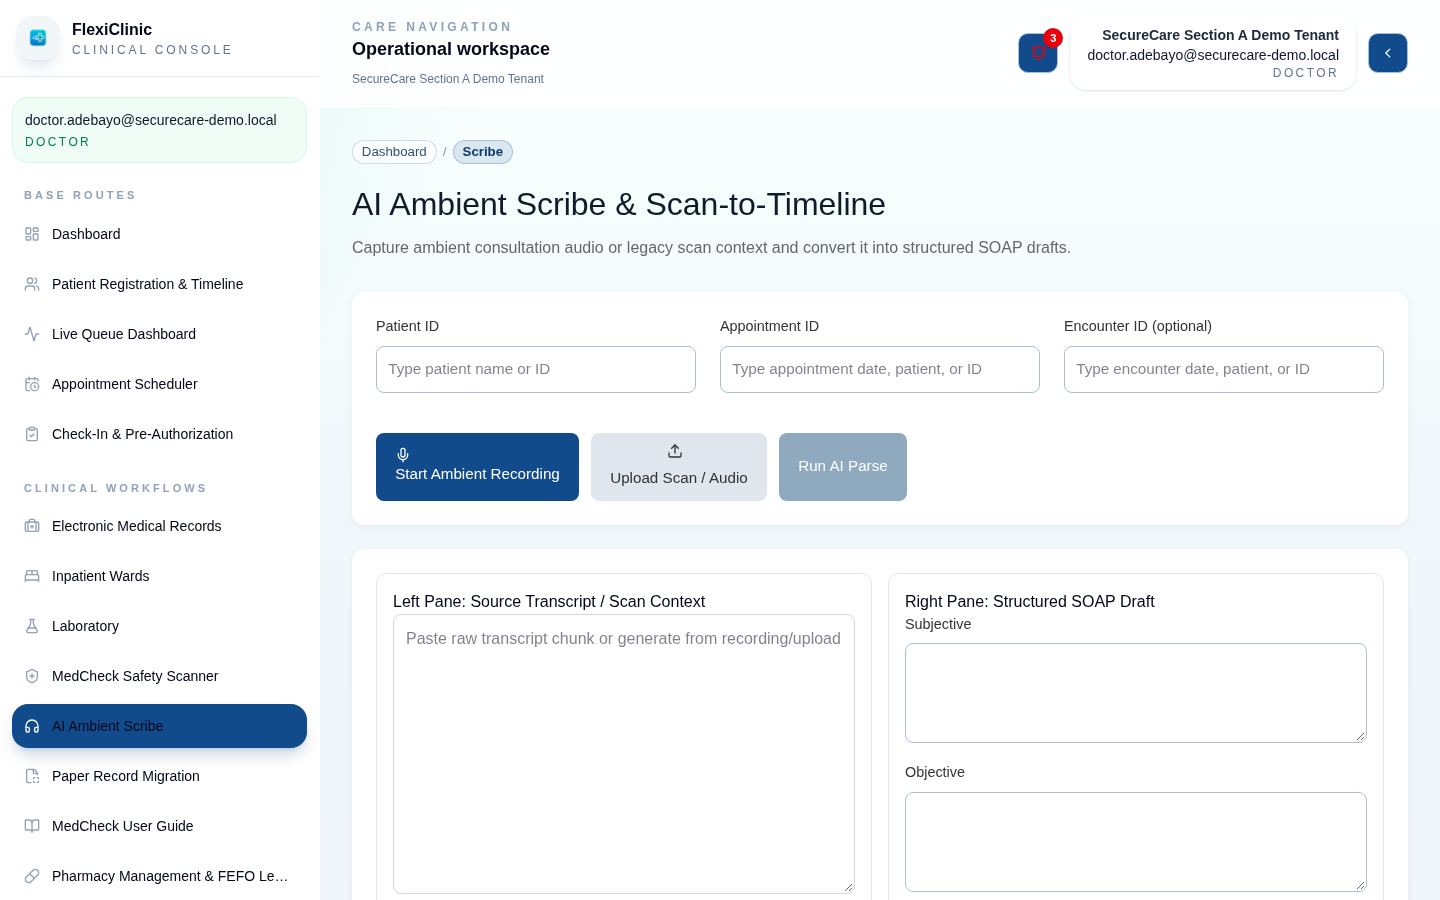
AI Ambient Scribe turns a consultation into a structured SOAP draft (subjective, objective, assessment, plan). Record the conversation with the microphone, upload a recording or scan, or paste a transcript. The draft appears beside the source for you to check.
Case folder & paper records
Adding documents to the case folder
- In the patient's Case folder (EMR, or the admission's Documents tab), select + Add document.
- Choose the file (PDF or image, up to 15 MB), its category, a title and the date on the document.
- Upload. Select a document's name to view it without downloading.
Documents added from an admission or a lab request stay linked to it. Doctors and Tenant Admins can remove a document, giving a reason; it stays in the audit trail. Doctors and nurses can send a scanned document for AI extraction, which drafts its history into Paper Record Migration for review.
Paper Record Migration
Used to bring old paper records into the patient's timeline. Staff upload scans; flexiCLINIC drafts the dated history; a clinician checks it against the scan and approves it.
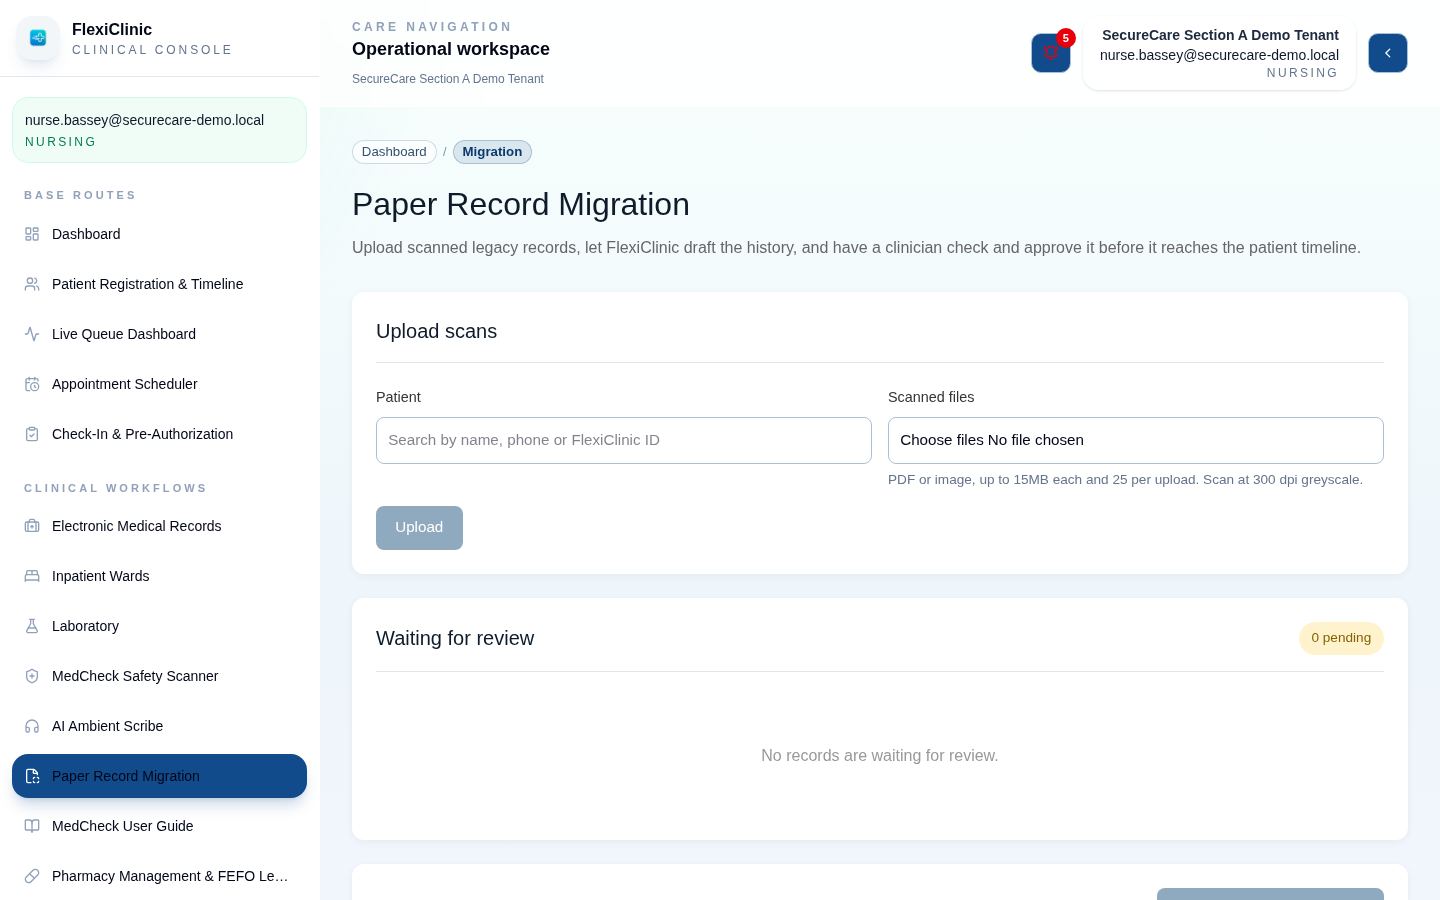
- Upload scans: find the patient, attach the scanned files (PDF or image, up to 15 MB each, 25 per upload) and upload. Reception, nurses, doctors and admins can upload.
- Extraction in progress: each file is read and drafted. If a file fails (for example an unreadable page), choose Retry, or Enter by hand to transcribe it yourself.
- Waiting for review: a nurse or doctor opens the record, sees the scan beside the drafted events, corrects dates and wording, removes anything the scan doesn't support, adds anything missed, and approves. Only what is on the review form reaches the timeline. Receptionists cannot approve.
Vital signs
Every vital-signs reading is saved to the patient's record, whoever takes it and wherever they are, and appears on the patient's timeline. There is one form, used in four places:
| Where | When | Linked to |
|---|---|---|
| Live queue → Record vitals on the patient's card | Triage, before the consultation | Today's visit |
| EMR → Vital signs panel in the Encounter Composer | During the consultation | Today's visit |
| Admission → Observations tab | On the ward | The admission |
| Patient → Full timeline → Vital Signs | Any other time | The patient |
Readings: temperature, blood pressure, pulse, respiratory rate, SpO2, pain score (0–10), weight, height and blood glucose, with a note. Enter at least one. BMI is worked out from weight and height, and values outside the normal range are shown in red. Each reading records who took it; receptionists can't record vitals.
When the doctor commits a consultation, the latest reading from that visit is attached to it, so the consultation note always shows the vitals it was based on.
Wards & admissions
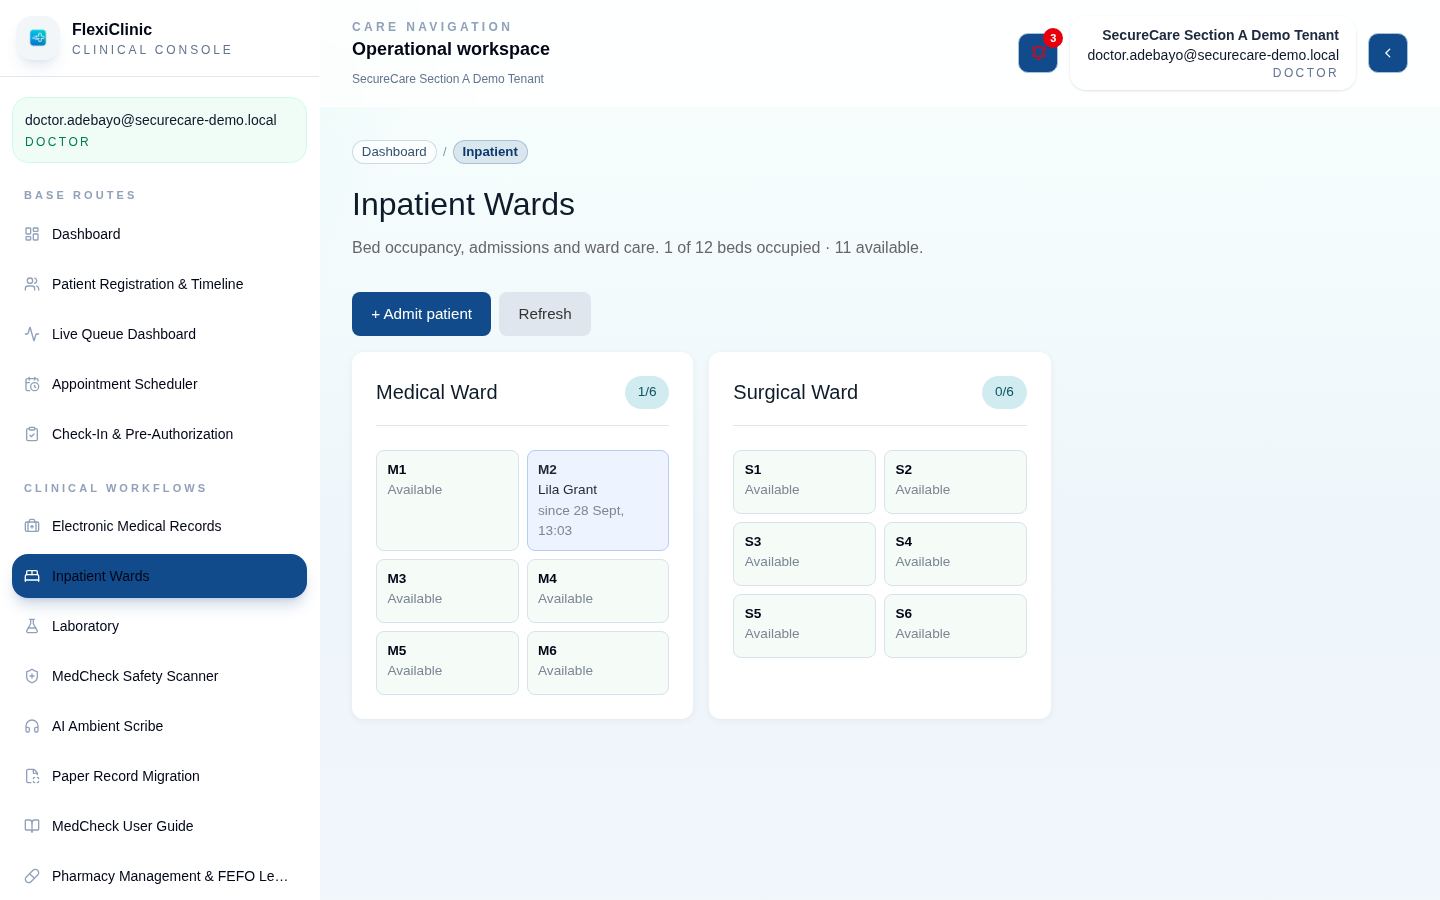
Inpatient Wards is the bed board: every ward with its beds, who is in each bed and since when, and a count of occupied and free beds. Select an occupied bed to open that admission.
Admitting a patient (doctor)
- Select + Admit patient on the bed board, or Admit patient on the patient's EMR page (which links the admission to today's consultation).
- Choose the patient and an available bed, and enter the provisional diagnosis and reason for admission.
- Admit. The bed shows as occupied and the admission page opens.
The admission page
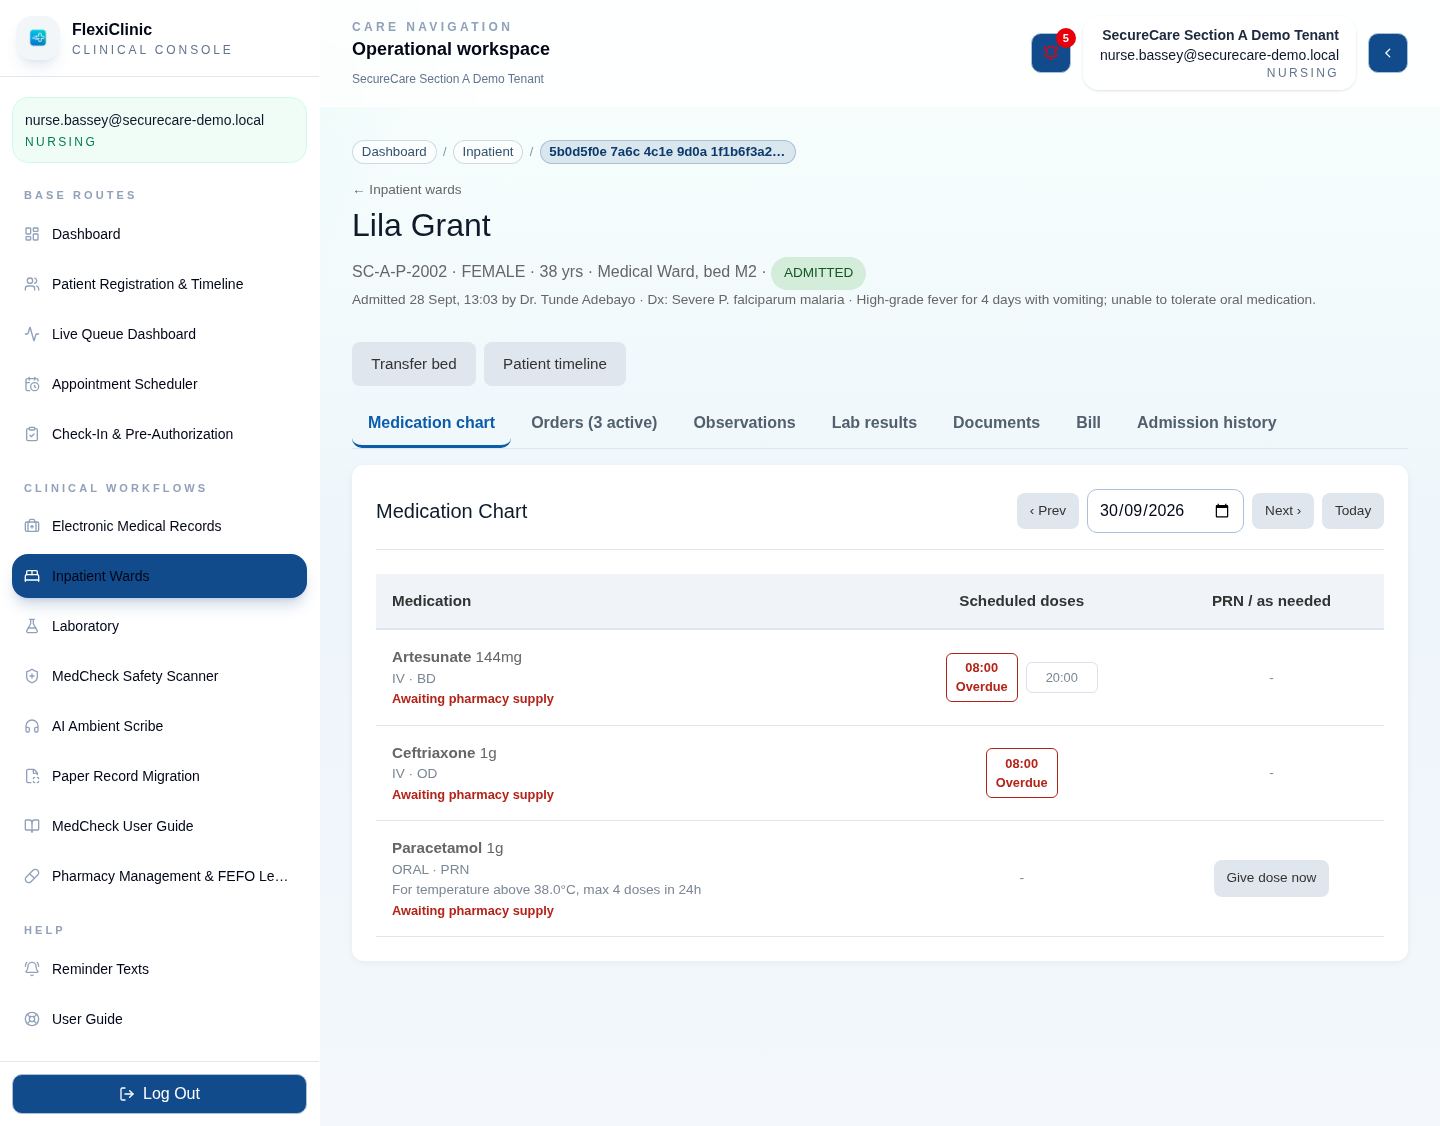
Everything about the stay is on one page, with tabs:
| Tab | What it holds |
|---|---|
| Medication chart | Each day's scheduled and as-needed doses, with what was given, held or refused |
| Orders | Medication orders, with prescriber, route, frequency, start and end |
| Progress notes | Ward-round notes by doctors and nursing notes, newest first |
| Observations | Ward vitals over time |
| Lab results | Tests requested during the stay |
| Documents | Documents for this admission, such as consent forms |
| Bill | The running inpatient bill (see Inpatient bills) |
| Admission history | Every bed move |
Transferring and discharging
- Transfer bed: a nurse, doctor or admin chooses an available bed and selects Move. Bed charges follow the ward the patient is in each night.
- Discharge: the doctor writes the discharge summary and selects Confirm discharge. Active medication orders stop, the bed is freed, and the bill can then be finalised.
Ward care
Medication orders (doctor)
On the Orders tab, add a medication order:
- Pick the medicine from the pharmacy list, or type a name that isn't stocked.
- Enter the dose, route (oral, IV, IM, SC, sublingual, rectal, topical, inhaled or other) and frequency: once daily, twice daily, three or four times daily, every 6 or 8 hours, at night, once now (STAT) or as needed (PRN).
- Adjust the administration times (24-hour clock) if the ward's usual times don't suit, set the start and optional end, and add instructions.
- Save. The order appears on the medication chart and goes to the pharmacy as a ward request.
Select Stop on an order to end it early.
Charting doses (nurse)
The Medication chart shows one day at a time; use ‹ Prev, Next › and Today to move between days. Each scheduled dose shows its time and whether it is due or overdue.
- Select the dose time.
- Choose the outcome: Given, Held or Refused by patient. Enter the dose given; a reason is required for held and refused doses.
- Save. For as-needed medicines, chart each dose when you give it.
Observations
On the Observations tab, select the button to add a set of readings: temperature, blood pressure, pulse, respiratory rate, SpO2, pain score (0–10), weight, height and blood glucose (mmol/L), with a note. Enter at least one reading. Readings are listed newest first.
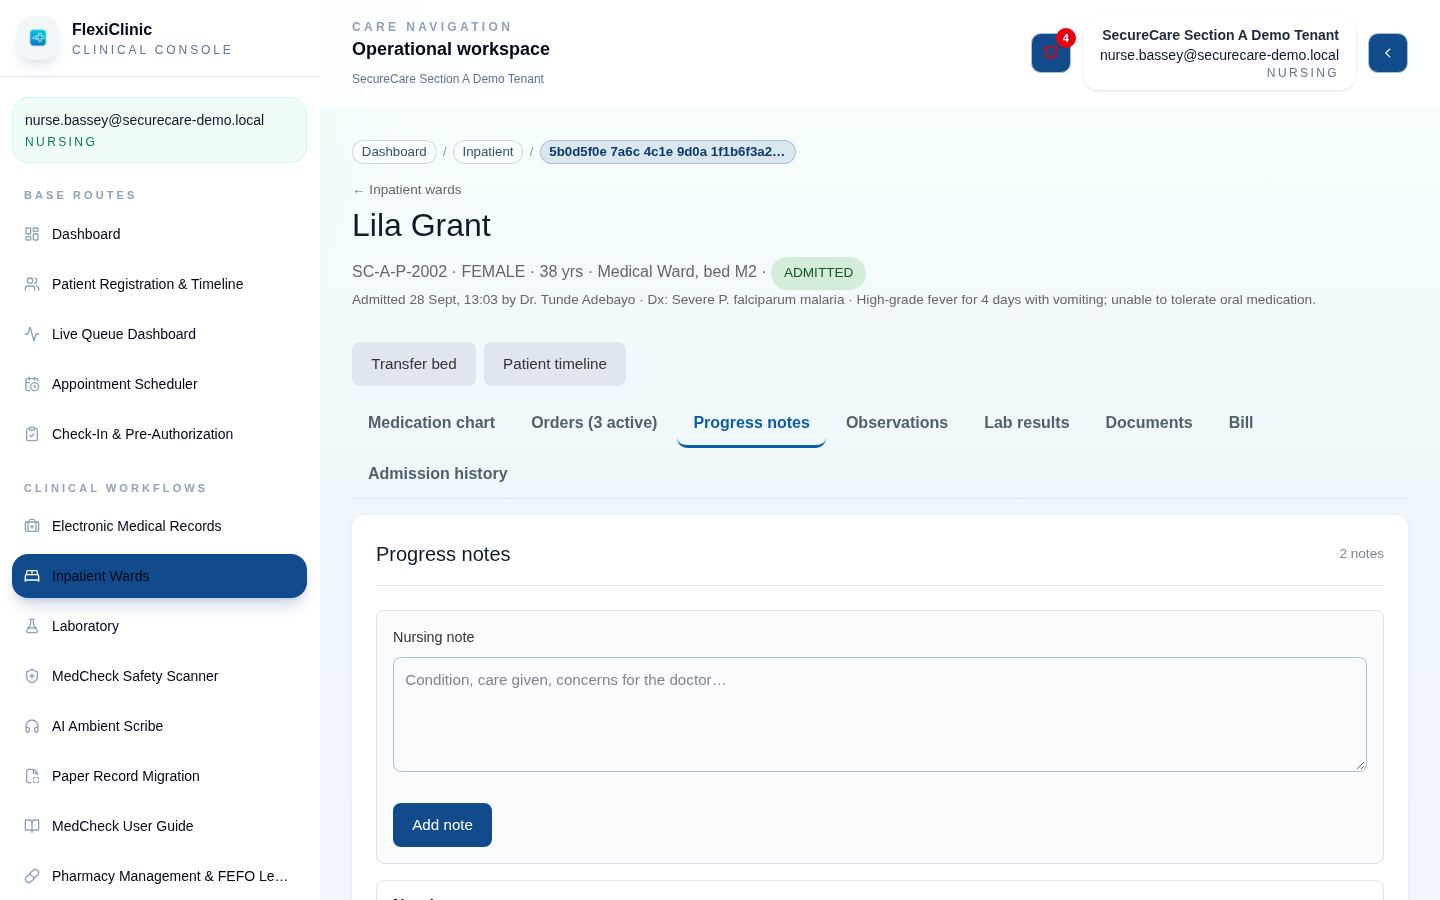
Progress notes
The Progress notes tab is where the stay is written up day by day. A doctor's note is labelled Ward round; a nurse's is labelled Nursing note. Type the note and select Add note. Each note shows who wrote it and when, and also appears on the patient's timeline.
Ward pharmacy requests
Ward Pharmacy Requests lists every active ward medication order and how well supplied it is: Supplied, Running low or No supply.
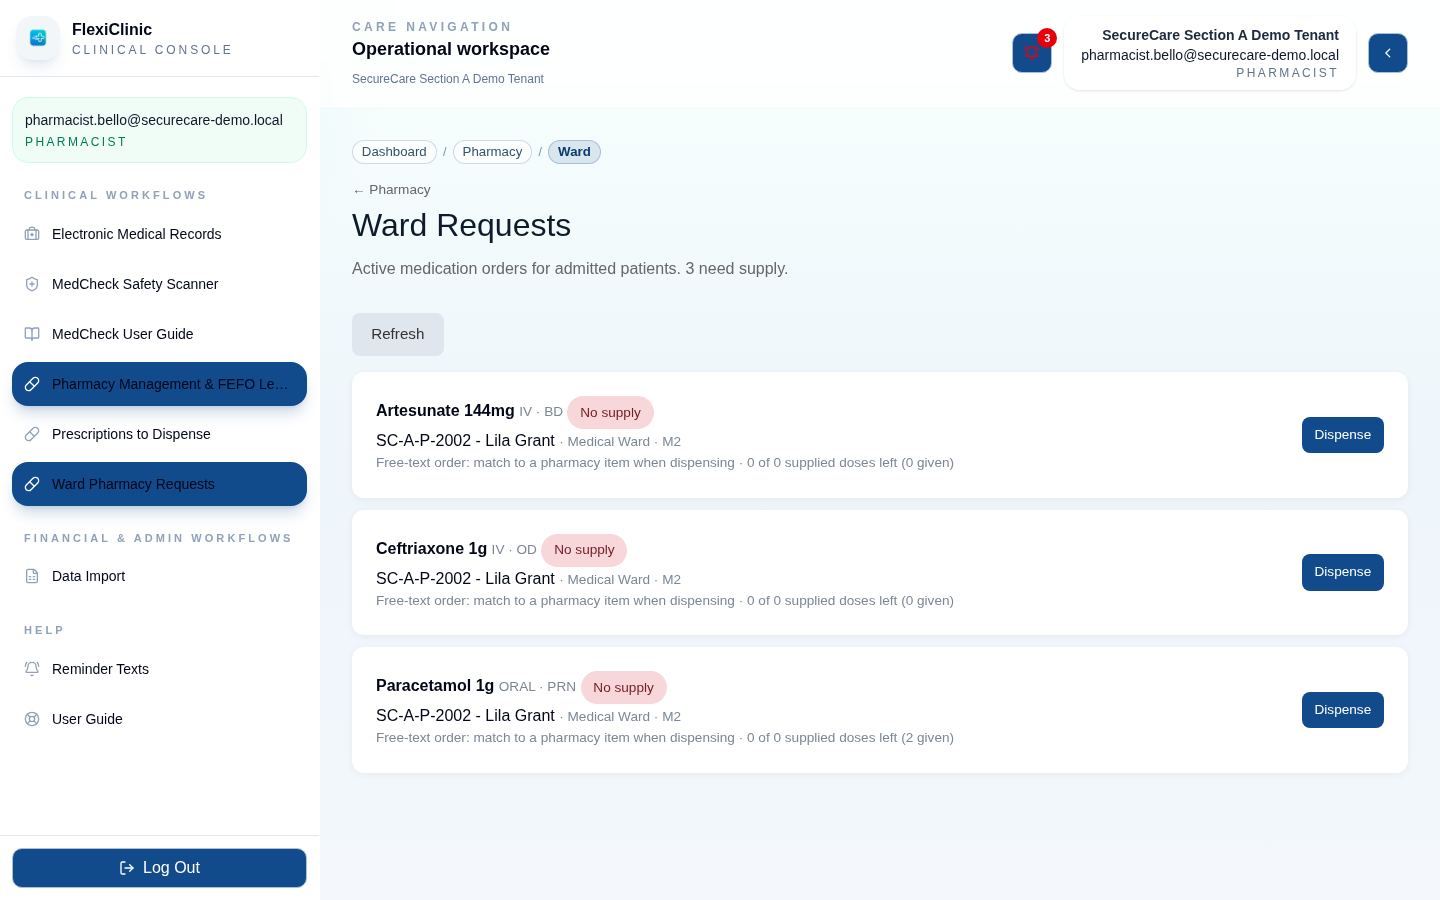
- Open a request.
- If the doctor typed a medicine name, choose the matching pharmacy stock item.
- Enter the quantity to issue (in stock units) and the number of doses it covers.
- Supply. Stock is taken from the batch that expires first, the medicine is added to the patient's inpatient bill, and the nurse's chart shows the supply.
Stock & dispensing
Pharmacy Management & FEFO Ledger tracks stock by batch and always dispenses from the batch that expires first (FEFO: first expiry, first out).
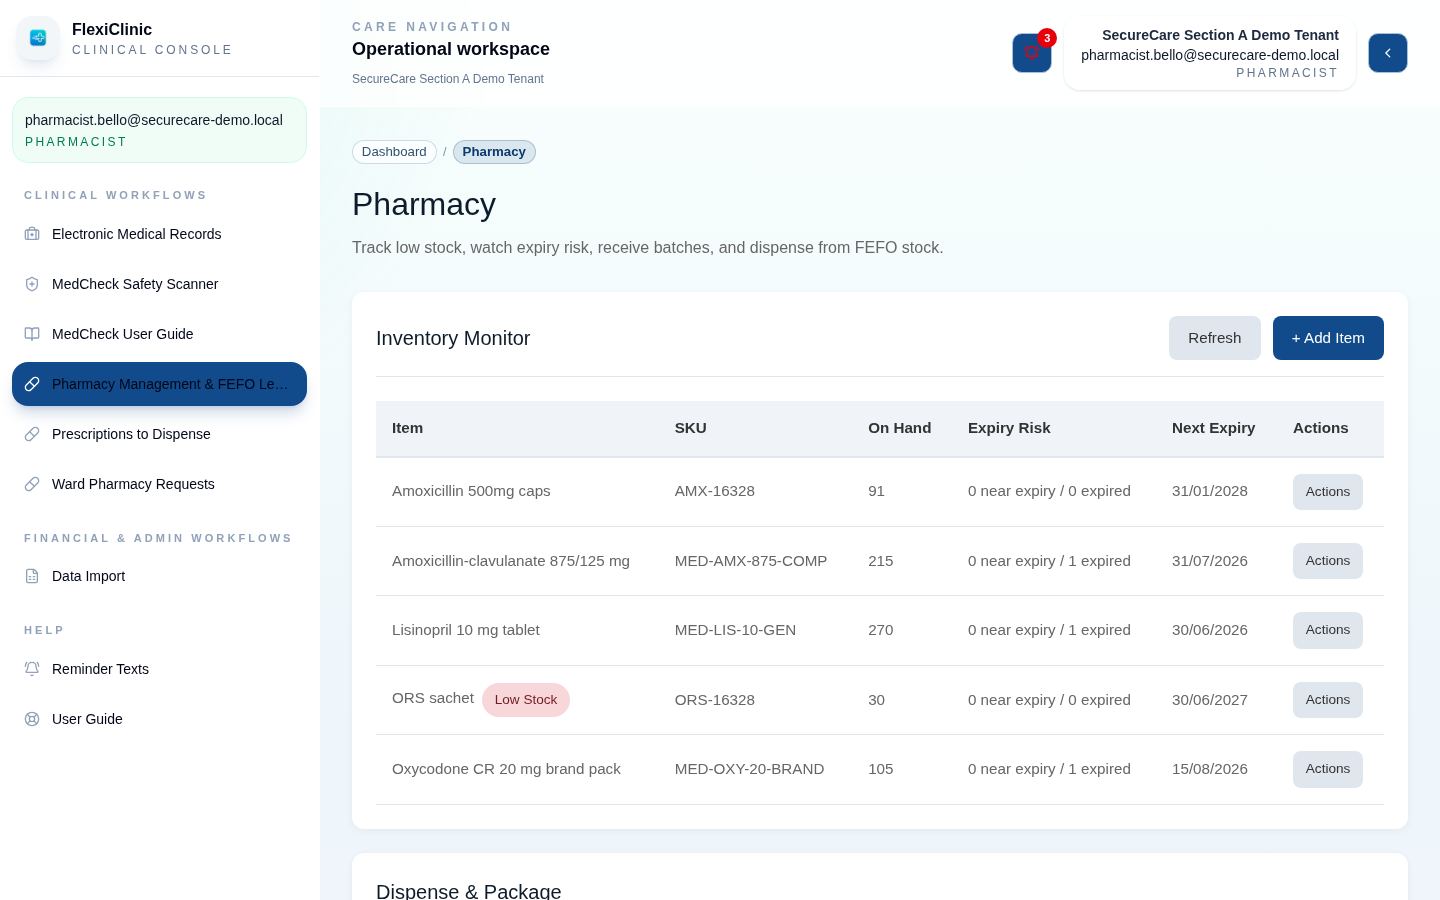
- Inventory monitor: each medicine with stock on hand, expiry risk and next expiry date. Add an item with its name, SKU, and optional barcode and service code. The service code should match your price list.
- Batch intake: select an item, then receive a batch with batch number, expiry date, quantity, unit cost and selling price. The batch list shows each batch as in date, near expiry or expired.
- Dispense & package: choose the medicine, the patient and the quantity. Stock comes from the earliest-expiring batch automatically.
Opening stock is usually loaded in bulk through Data import.
Prescriptions to dispense
Prescriptions to Dispense lists every prescription doctors have committed in the EMR, oldest first, with the patient, medicine, dose, instructions, quantity and prescribing doctor.
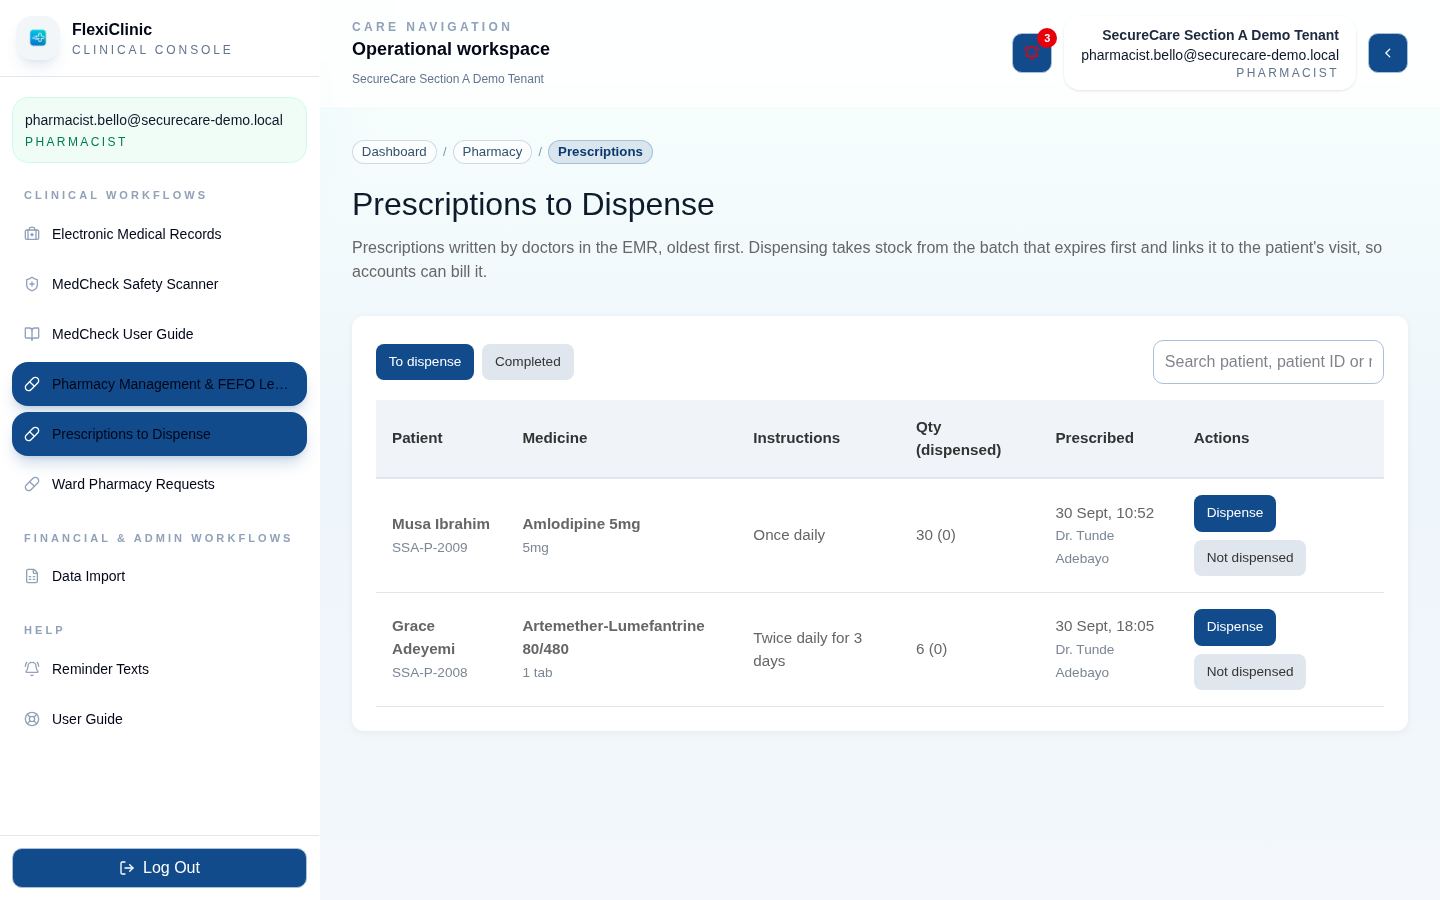
- Find the patient's prescription (search by patient, Patient ID or medicine).
- Select Dispense. The matching stock item is suggested; check it, and the quantity (it fills in what is still to dispense).
- Confirm. Stock comes from the earliest-expiring batch, and the medicine is linked to the patient's visit so accounts can bill it. A part quantity leaves the rest to dispense later.
- If a medicine won't be dispensed (out of stock, bought elsewhere), select Not dispensed and give the reason.
Completed prescriptions move to the Completed tab. Prescriptions written before this feature was switched on were marked completed automatically.
Billing & split invoicing
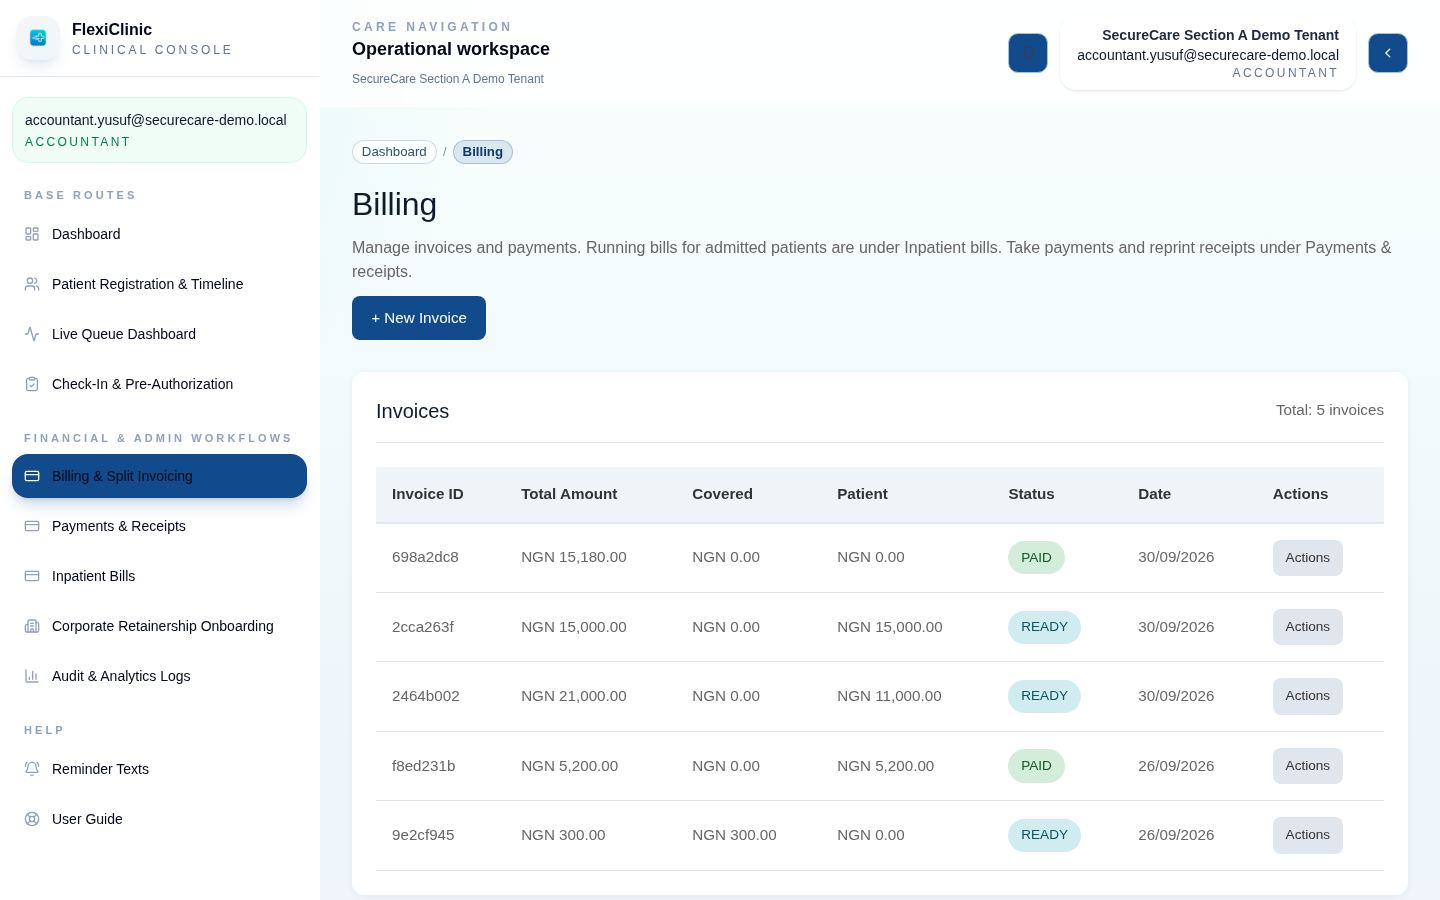
Billing & Split Invoicing lists every invoice with its total, the amount an institution covers, the patient's share and its status, plus a daily reconciliation of the day's invoices and payments. Corporate coordinators can view invoices.
Creating an invoice
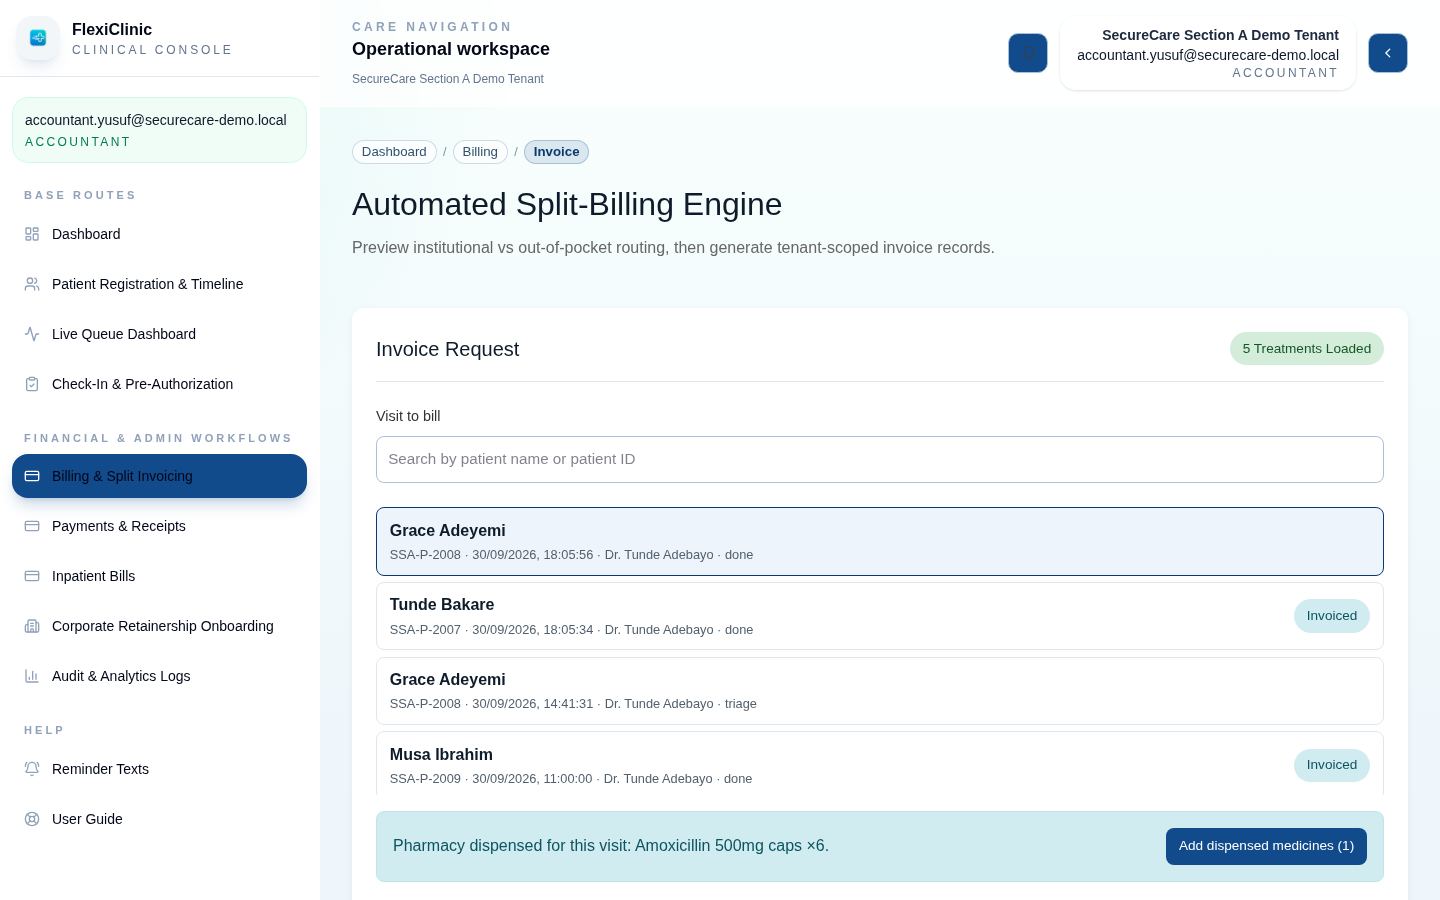
- On Billing, select + New Invoice.
- Under Visit to bill, search by patient name or Patient ID and select the visit. The list shows checked-in visits from the last 30 days, newest first, with the doctor, and marks visits that already have an invoice.
- If the pharmacy has dispensed for this visit, select Add dispensed medicines to add each one with its price. Add other items (consultation fee, procedures) with their code, description and price; picking from the catalogue fills in the code and description.
- Check the Live Split Preview: what the patient's institution covers, what the patient pays, and anything excluded from cover. It uses the institution's remaining balance, per-visit cap and excluded service codes.
- Select Generate Invoice Split. (Medicines dispensed for the visit after this are added to its invoice automatically.) An institution-covered patient gets an institutional invoice and, if anything falls to them, a patient invoice; a private patient gets one invoice.
Invoice actions
Each invoice's Actions menu has:
- Collect Payment (when the patient owes something): opens Payments & receipts with the invoice selected.
- View Details and Edit (status, payment status, method, lock reason).
- Disable / Enable: a disabled invoice can't take payments.
- Override (Tenant Admin): unlocks a locked invoice when care must go ahead; it is recorded in the audit log.
- Delete (Tenant Admin).
End of day
The Daily Reconciliation Ledger shows a chosen day's invoices, what patients paid and each payment status. Select Export Line Items (CSV) for your accounting system.
Payments & receipts
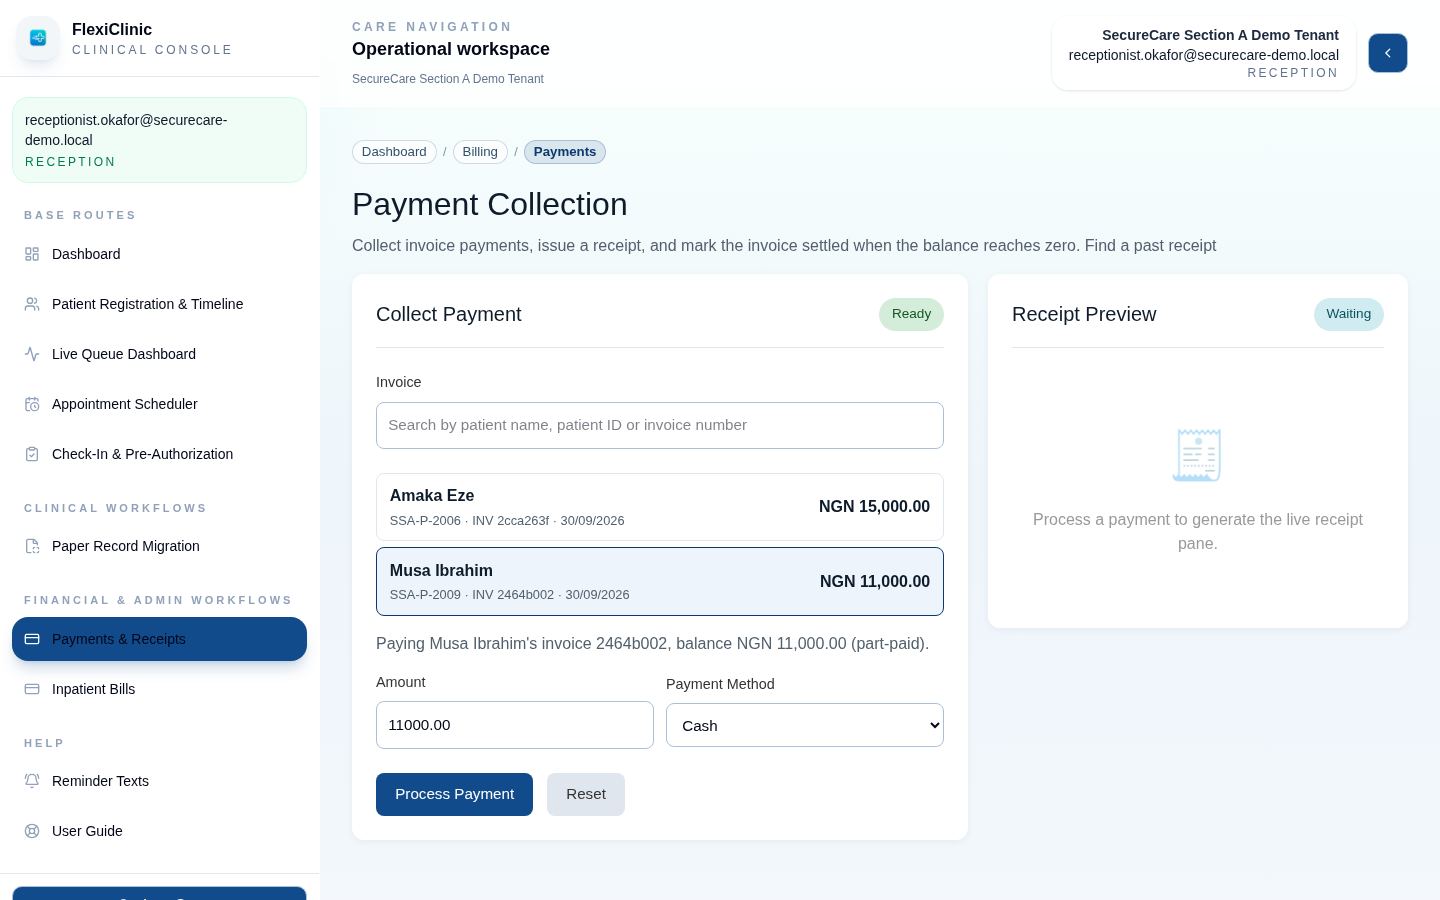
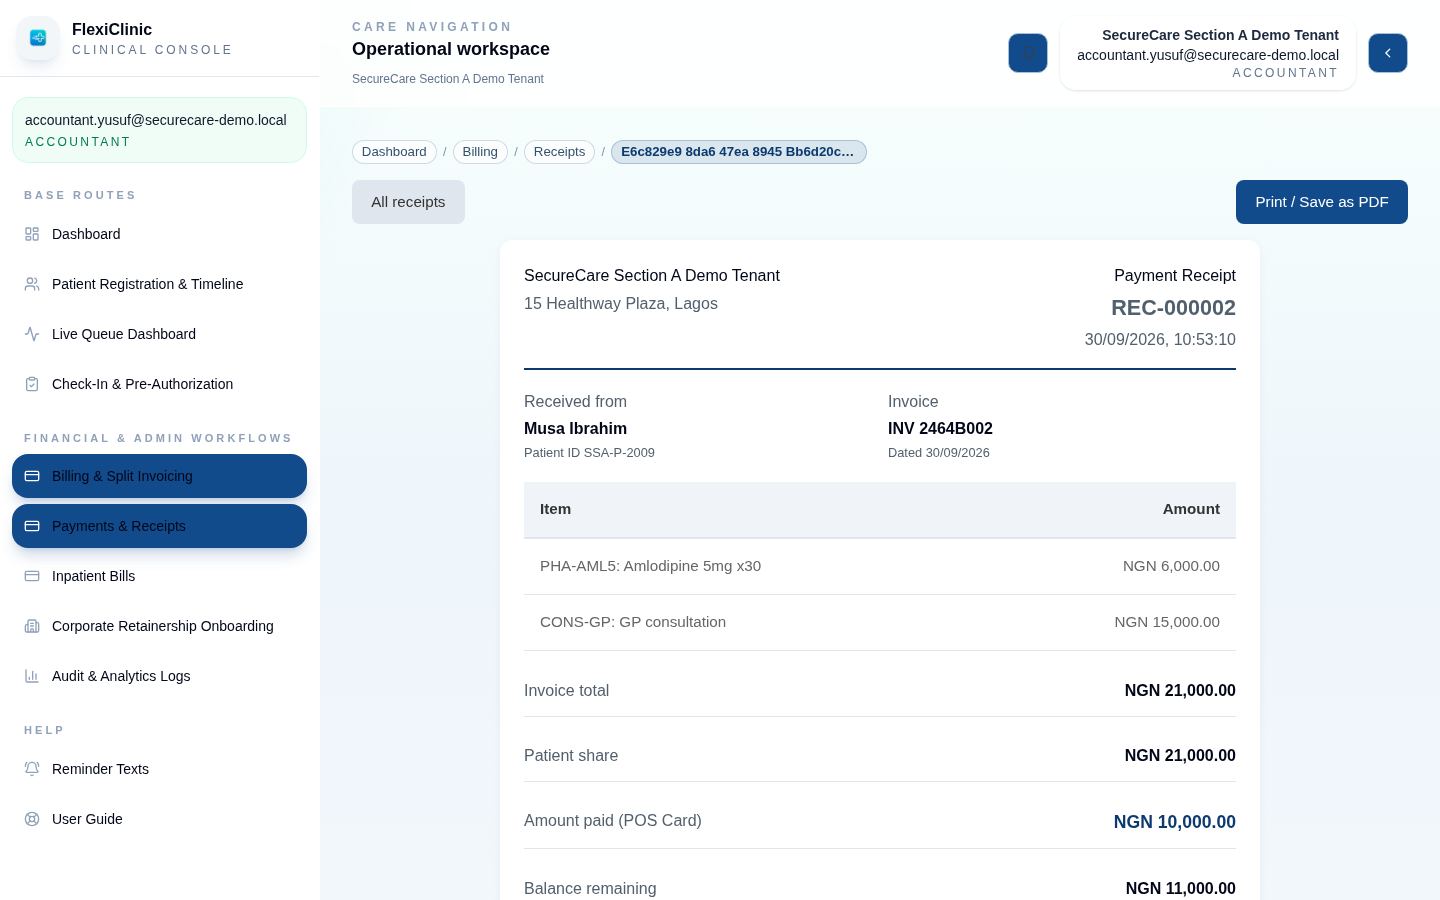
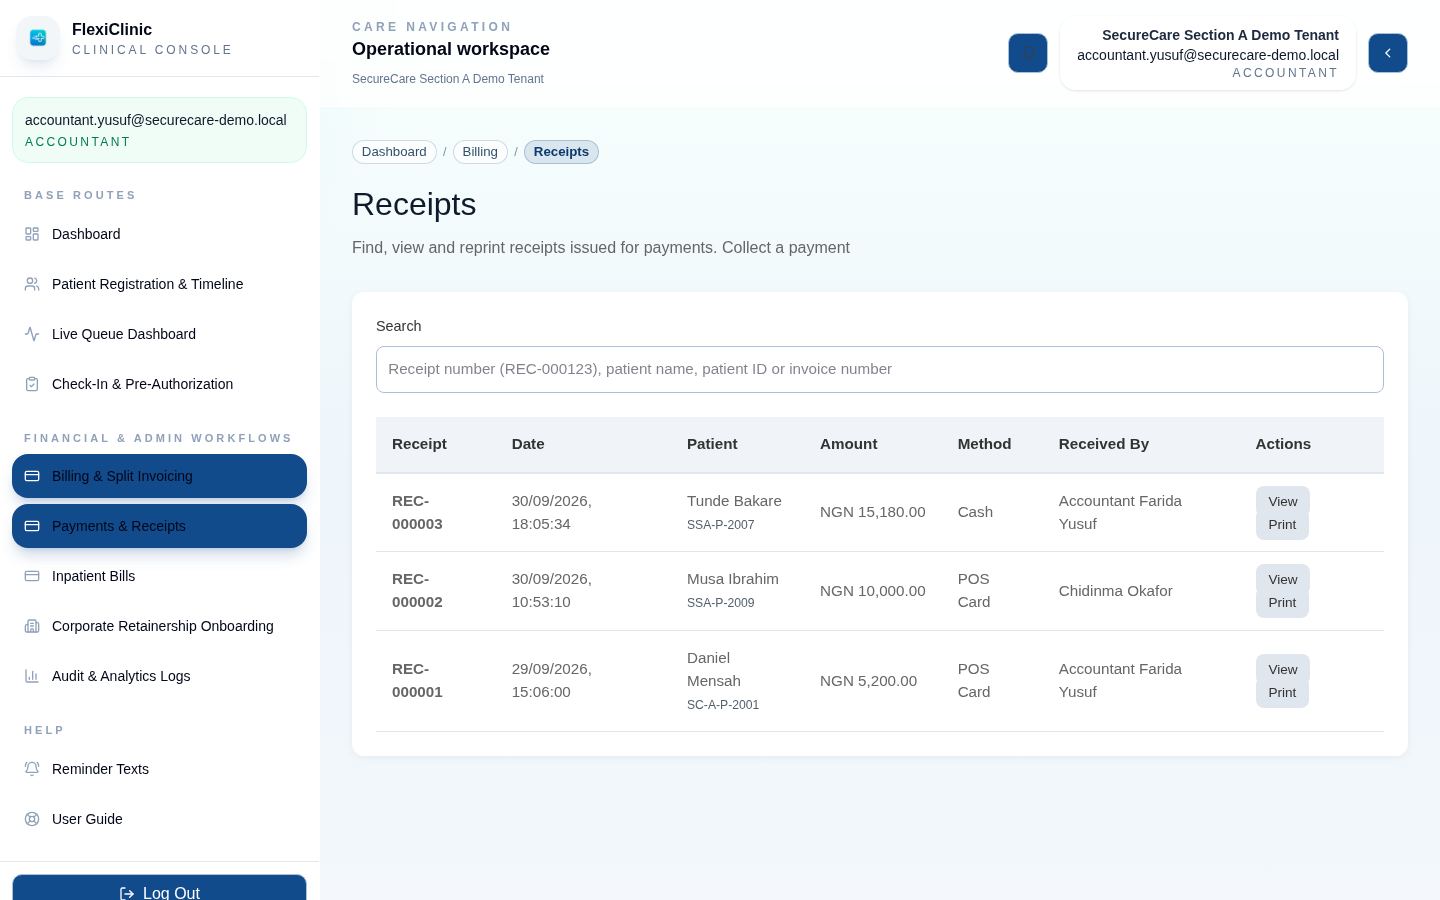
Patients pay at the desk and staff record it here. Full and part payments are allowed, and every payment issues a numbered receipt: REC-000001, REC-000002 and so on, in one sequence for your clinic.
Taking a payment
- Open Payments & Receipts, or Collect Payment on an invoice in Billing.
- Search by patient name, Patient ID or invoice number. Only invoices with something left to pay are listed.
- Select the invoice. The amount fills in with the full balance; lower it for a part payment.
- Choose the method: cash, POS card, bank transfer or institution credit.
- Select Process Payment. The receipt appears on the right. The invoice is marked paid once the balance reaches zero.
- Select Print Receipt for the patient.
Finding and reprinting a receipt
Select Find a past receipt, or open Billing → Receipts. Search by receipt number (REC-000123 or just 123), patient name, Patient ID or invoice number, then View or Print. To email a receipt, choose Save as PDF in the print dialog.
Inpatient bills
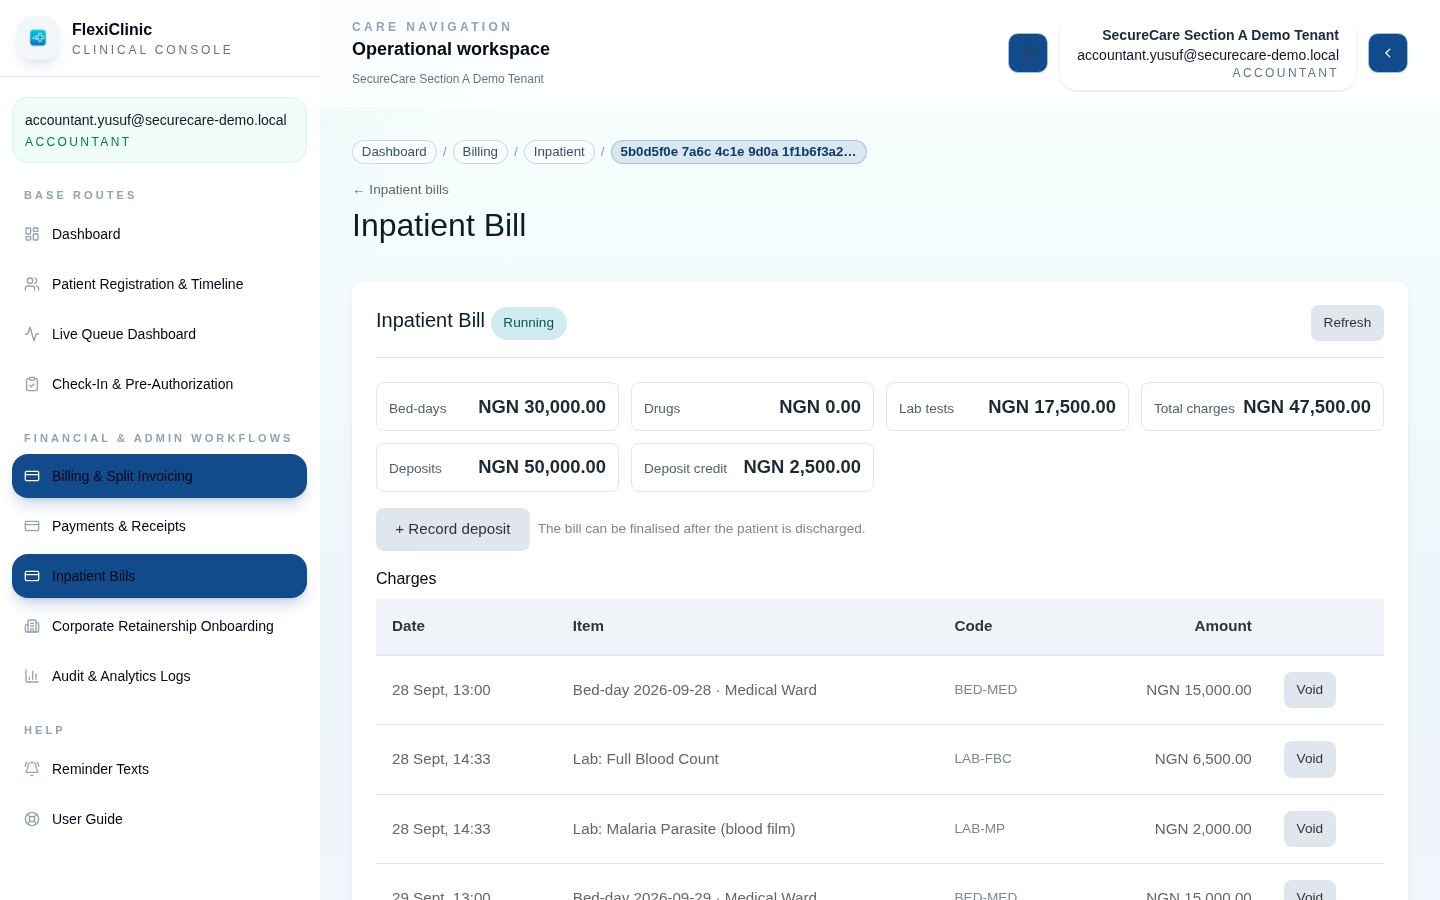
Inpatient Bills lists running bills for admitted patients (Open) and bills already closed (Finalised). Each bill builds itself during the stay:
- Bed-days: one night at a time, at the nightly rate of the ward the patient was in.
- Lab tests: when the sample is collected, at the catalogue price (or the lab's price for a free-text test).
- Drugs: when the pharmacy supplies a ward request.
During the stay
- Record deposit: amount, method and reference. Each deposit gets its own acknowledgement number (
IP-DEP-000001), which you can print. - Void a wrong charge (accountant or Tenant Admin), with a reason.
After discharge: finalising
- Once the doctor has discharged the patient, select Finalise bill. Every charge needs a price first; the bill tells you what is missing.
- The charges become invoices, split with the patient's institution using its inpatient cover per admission.
- Deposits are applied to the patient's share as payments, each with a normal receipt. Anything still owed is collected in Payments & receipts.
After finalising, charges and deposits can no longer be changed.
Refunding unused deposits
- If deposits exceed what the patient owes, an accountant or Tenant Admin selects Request refund with the amount and reason.
- A different Tenant Admin approves or rejects it (a reason is needed to reject).
- An accountant or Tenant Admin pays it out and selects Confirm payout & print voucher. The refund voucher has spaces for signatures.
Corporate clients
Corporate Retainership Onboarding manages companies and HMOs that pay for their staff's care.
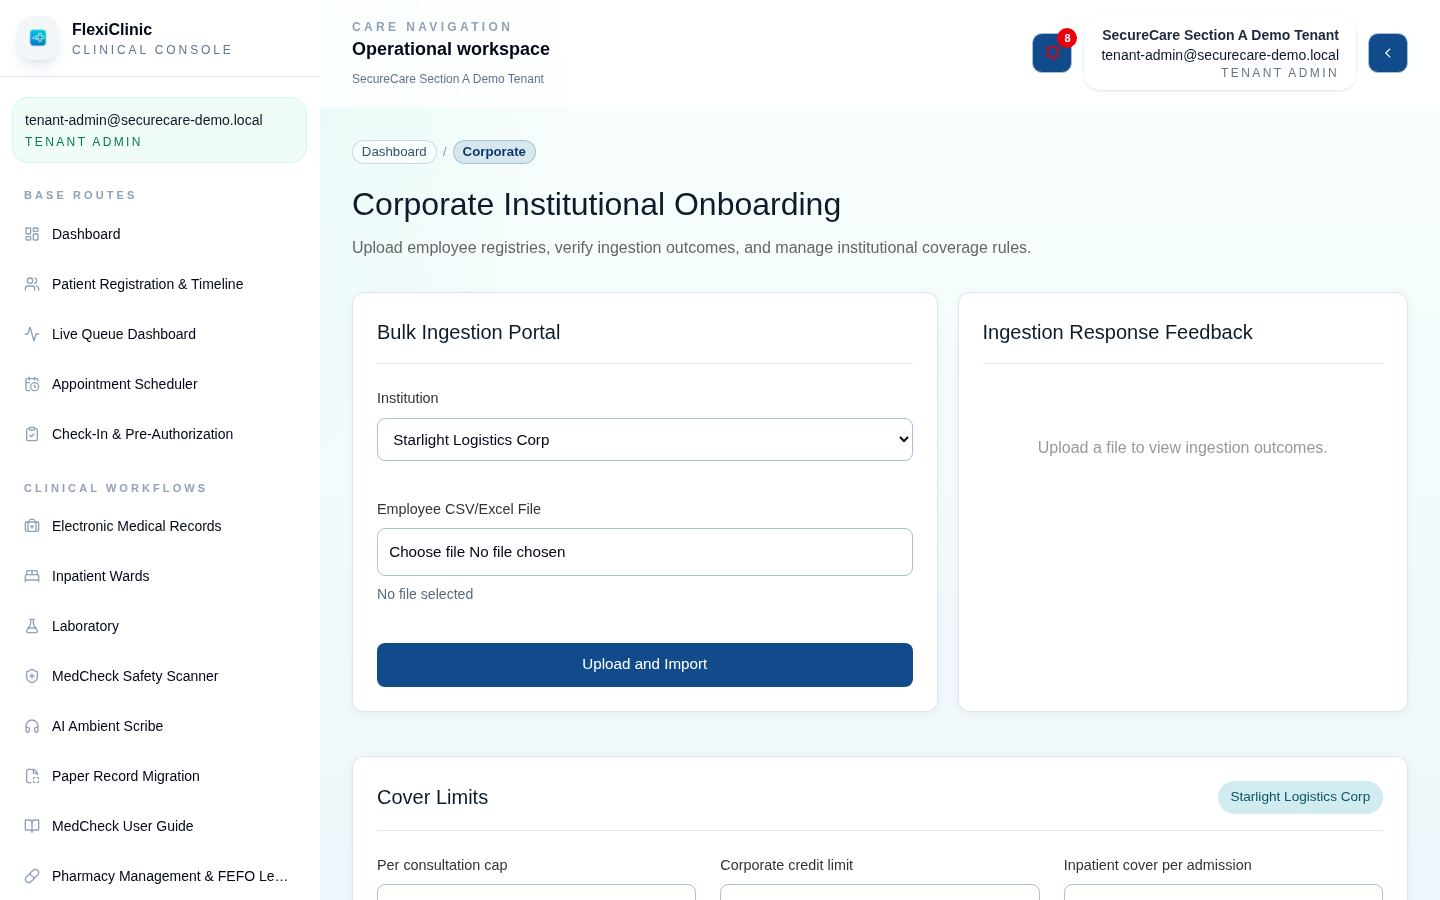
- Cover limits: corporate credit limit, per-consultation cap, and inpatient cover per admission (leave it empty and the institution pays nothing for a stay without pre-authorisation). Excluded service codes are never covered.
- Employee roster: upload a CSV or Excel list of the institution's staff to link them in bulk; the results show what was matched or skipped.
Institutions are created on Check-in & pre-authorisation, where individual patients can also be linked.
Company accounts
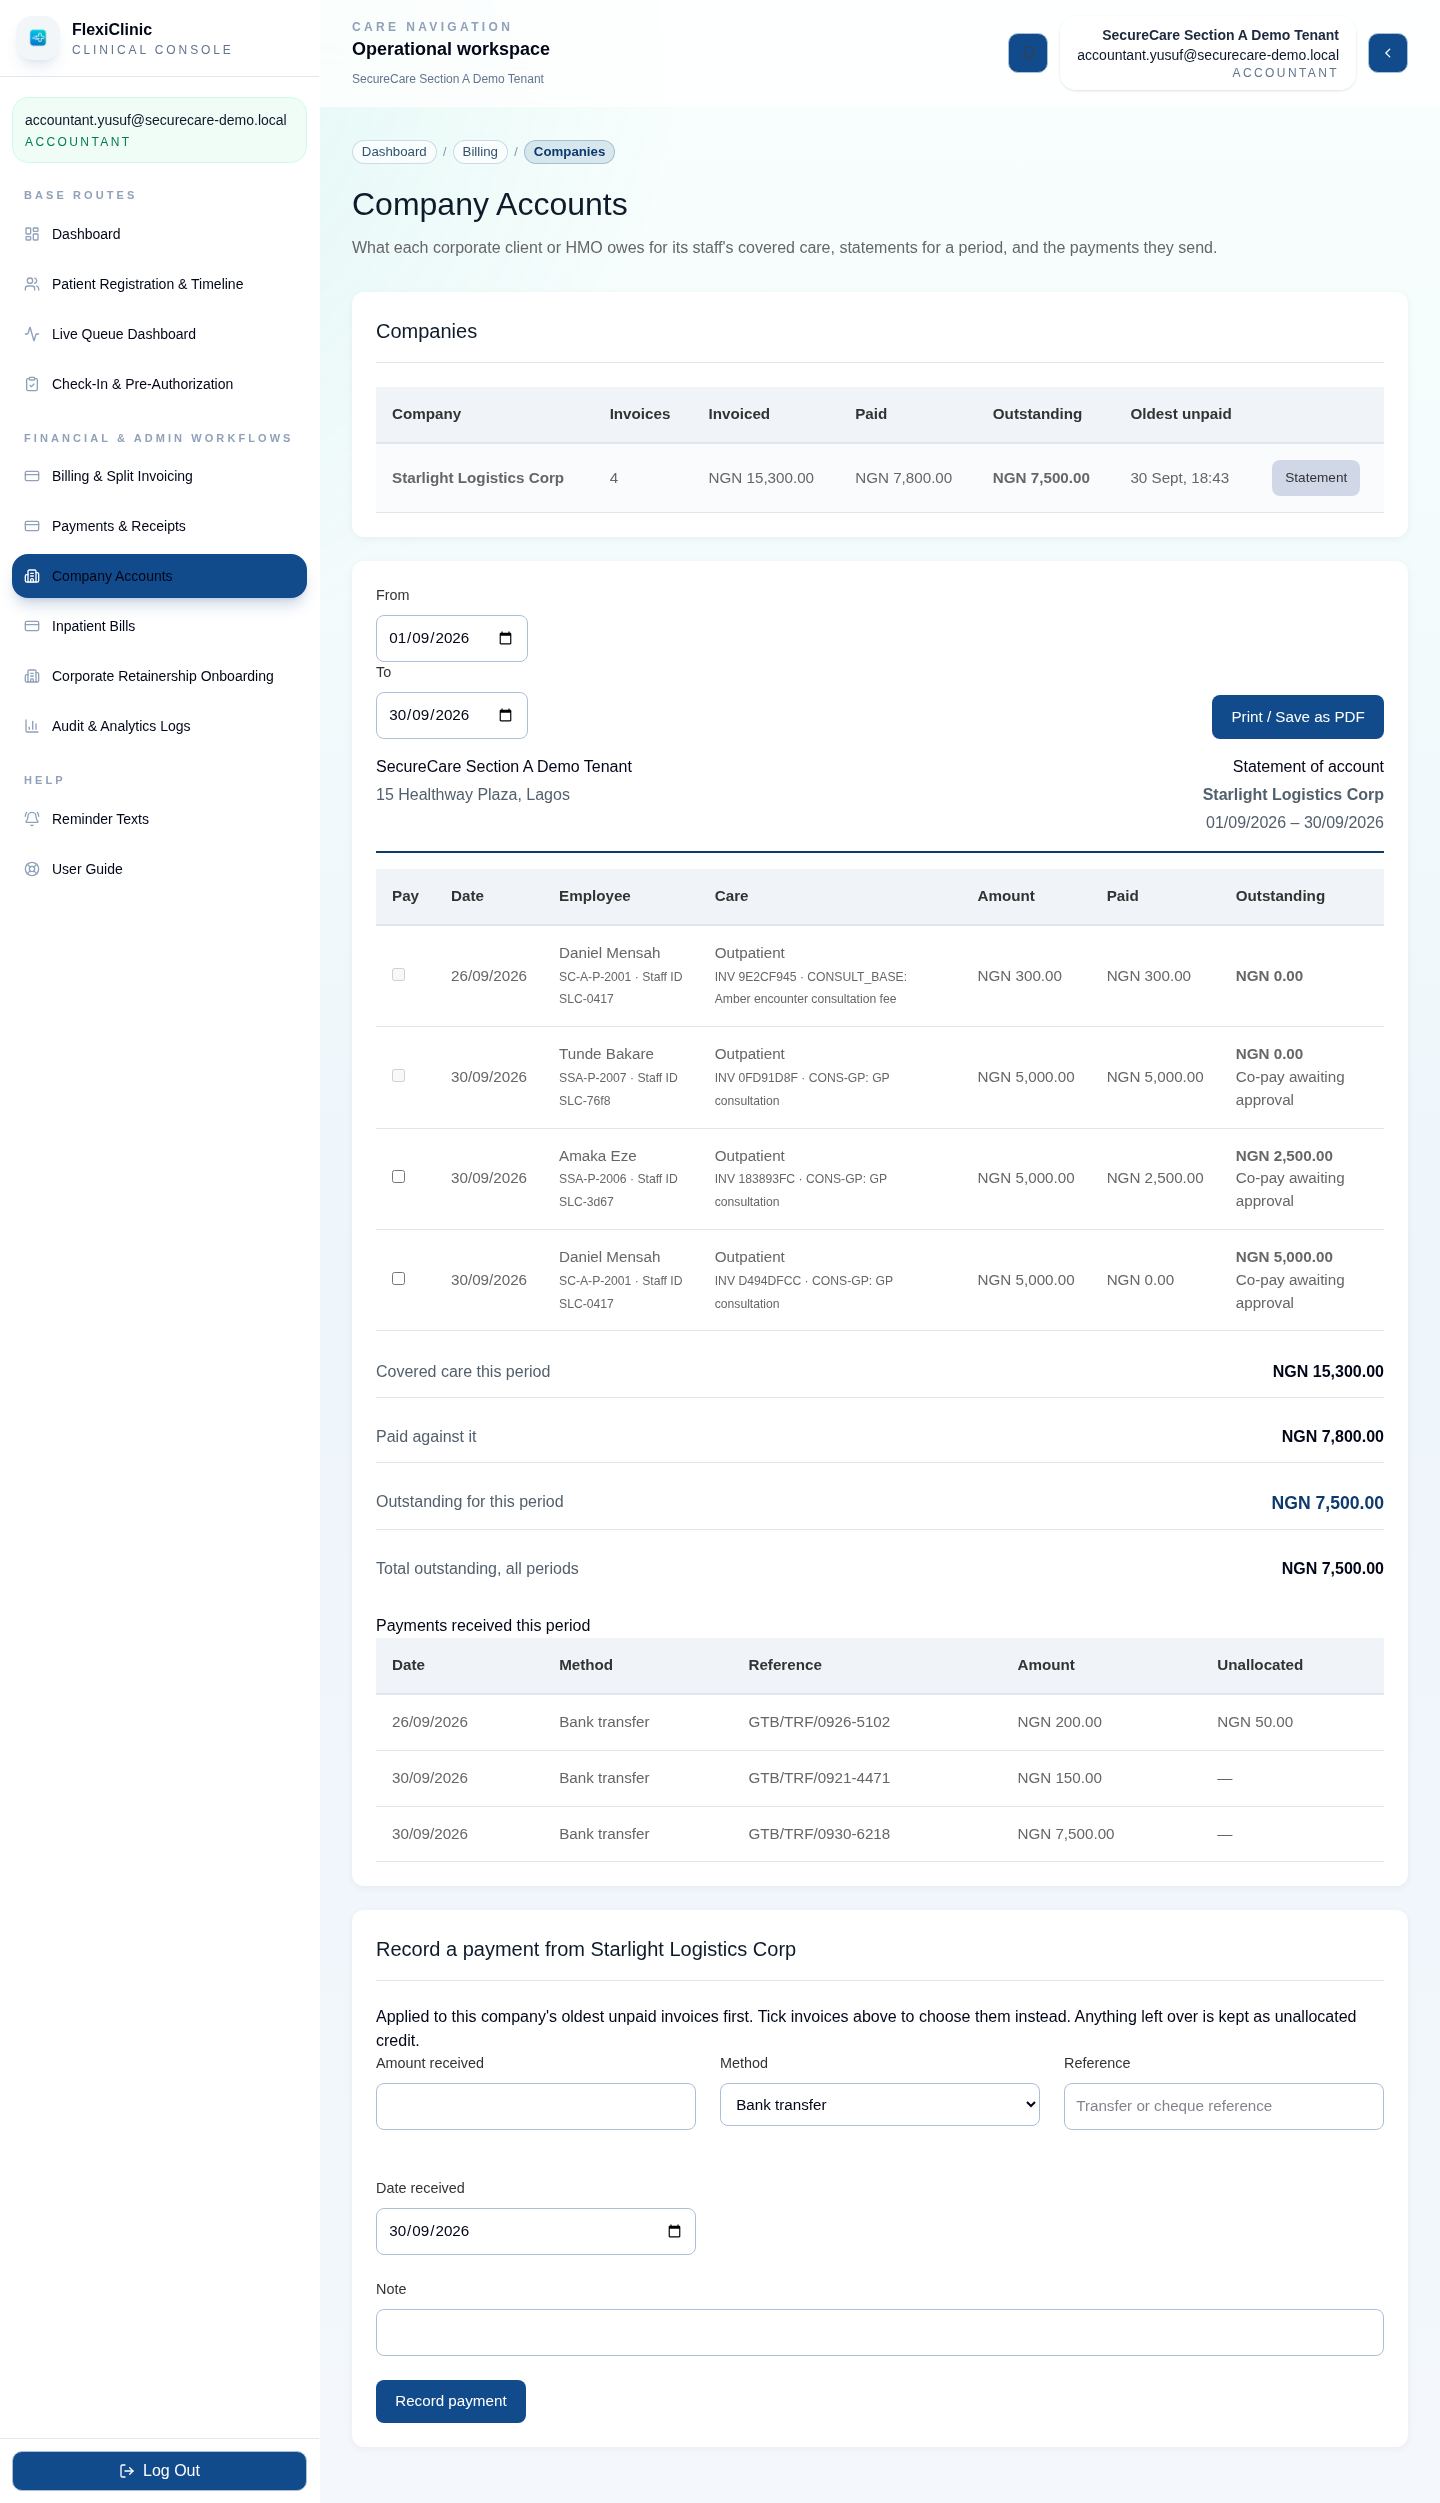
When a covered employee is billed, flexiCLINIC splits the bill: the company's share goes on a company invoice and anything above the cover goes on the patient's co-pay invoice. Company Accounts is where you see what each company owes, send it a statement, and record the money it pays.
What each company owes
The list shows, for every company, the number of covered invoices, the total invoiced, what it has paid, what is outstanding and the date of its oldest unpaid invoice. Select Statement to open one company.
Sending a statement
- Choose the period with From and To (it starts on this month).
- The statement lists each covered visit in the period: date, employee (with patient ID and staff ID), the care given and the invoice number, the amount, what has been paid and what is outstanding. Below are the totals for the period, the company's total outstanding for all periods, and the payments received in the period.
- Select Print / Save as PDF and send it to the company.
Recording a company payment
Accountants and Tenant Admins record the money when it arrives:
- Enter the amount received, the method (bank transfer by default), the transfer or cheque reference, the date received and an optional note.
- Leave the invoices unticked to pay the company's oldest unpaid invoices first, or tick the invoices the company says the payment is for.
- Select Record payment. The message confirms how much was applied, and each invoice shows as part-paid or paid.
If the company pays more than the invoices owe, the extra is kept on the payment as unallocated credit and shown on the statement.
A covered visit, from start to payment
| Step | Who | What happens in flexiCLINIC |
|---|---|---|
| 1 | Reception | The employee is linked to the company (Check-in or the employee roster) and booked or walked in. |
| 2 | Reception | Check-in confirms the visit is covered; a pre-authorisation is requested if it isn't. |
| 3 | Nurse, doctor | Triage, consultation, lab and prescriptions as for any patient. |
| 4 | Accountant | Creates the invoice. The company's share and any co-pay are split automatically. |
| 5 | Reception | Takes any co-pay from the patient and gives a receipt. |
| 6 | Accountant | At month end, prints the company's statement and sends it. |
| 7 | Accountant | Records the company's payment when it arrives; the invoices show as paid. |
Analytics & operations
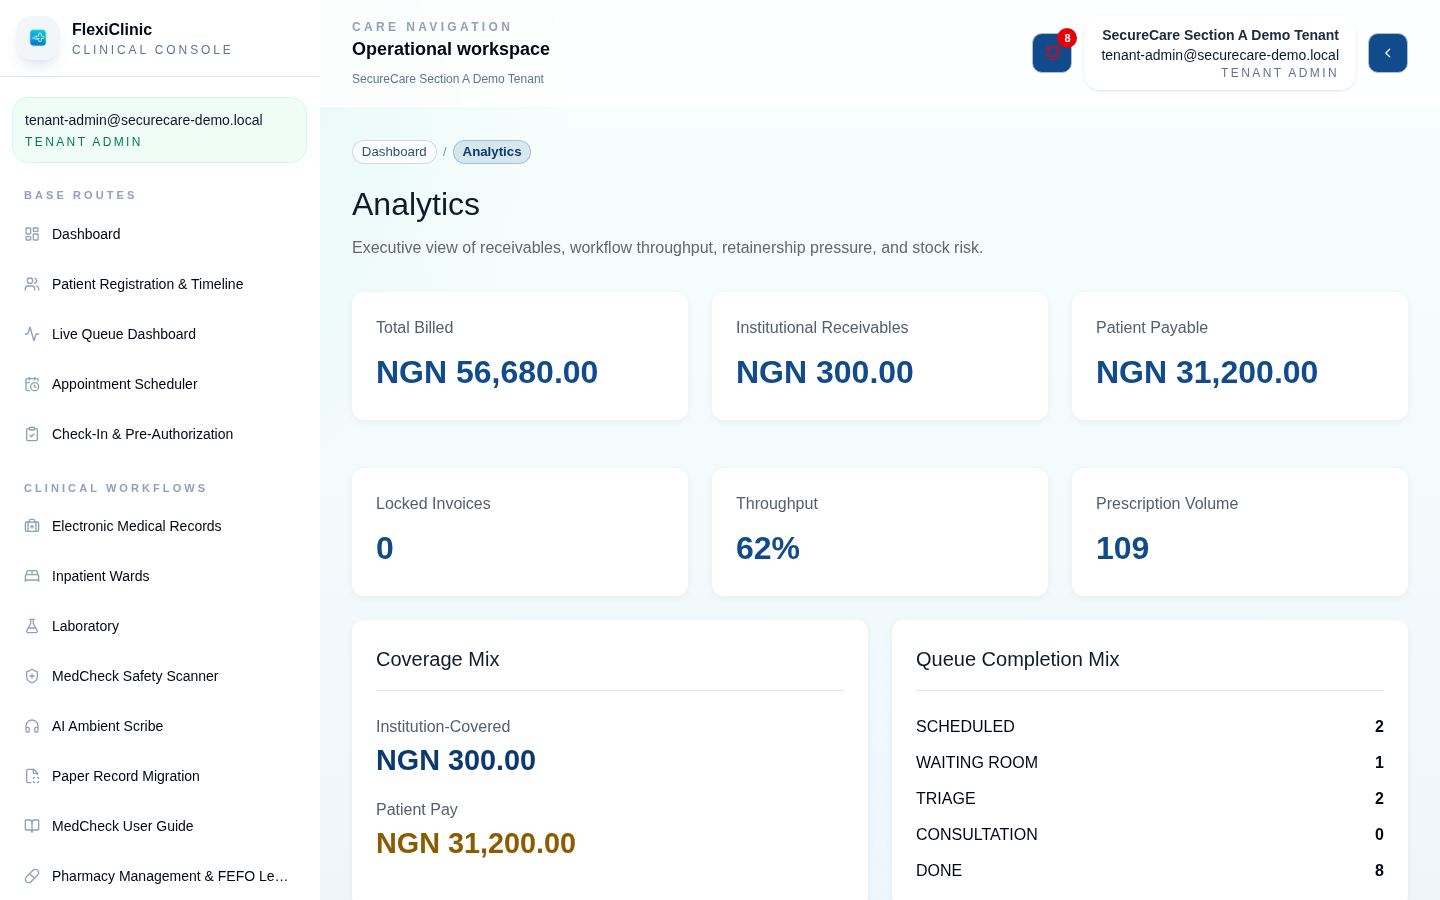
Audit & Analytics Logs gives managers the clinic at a glance: how visits are paid for (cash, co-pay, corporate), how far through the queue today's visits got, how close each corporate client is to its credit limit, and medicines low on stock or near expiry.
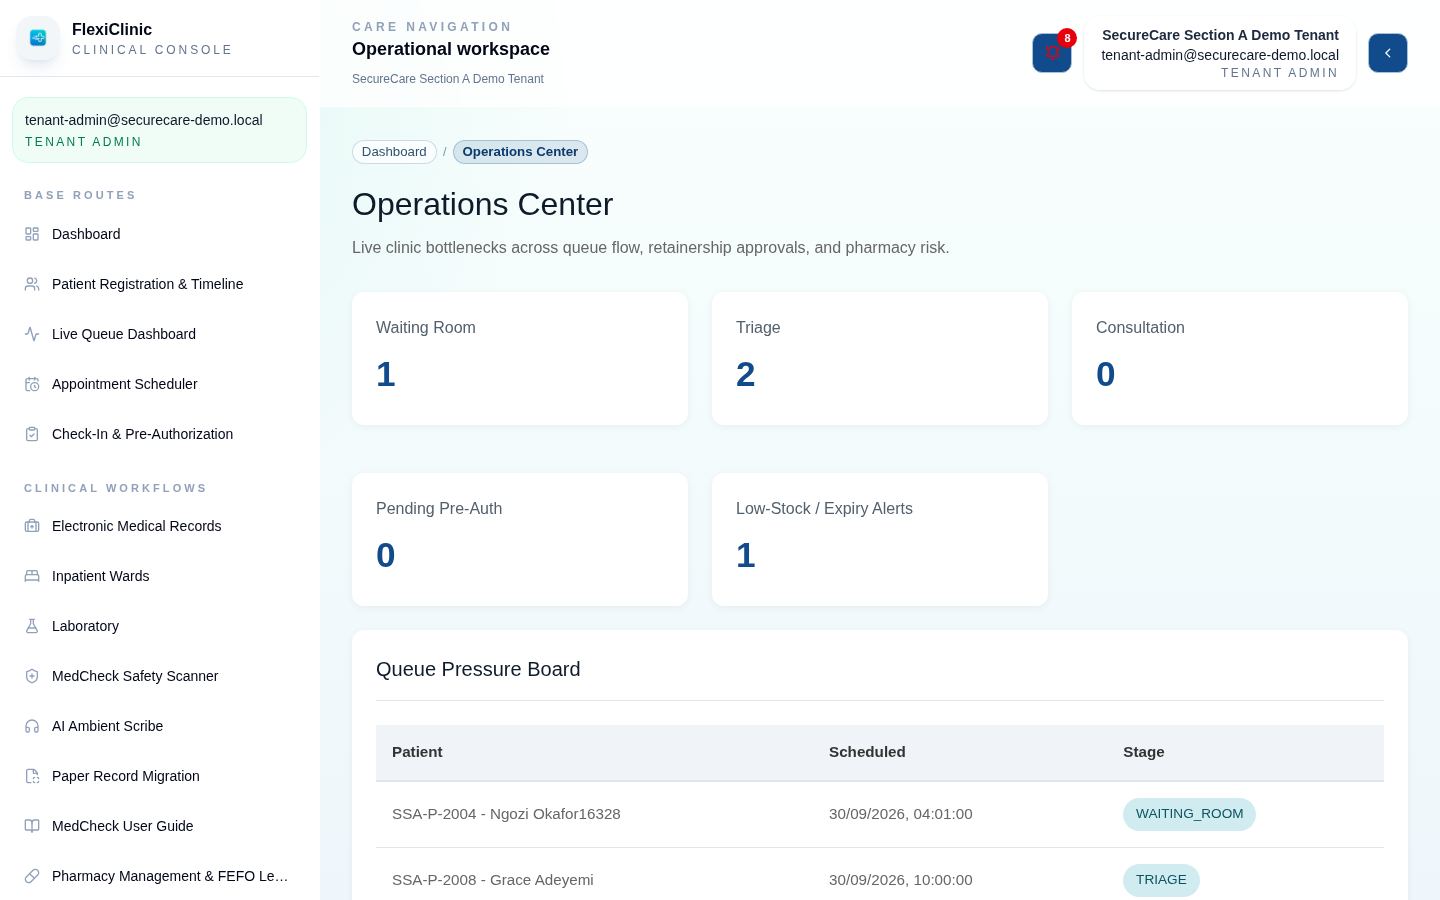
The Operations Center (from the dashboard) shows live bottlenecks: the queue, pre-authorisations waiting for a decision, corporate load and pharmacy risk.
Team & access
Inviting staff
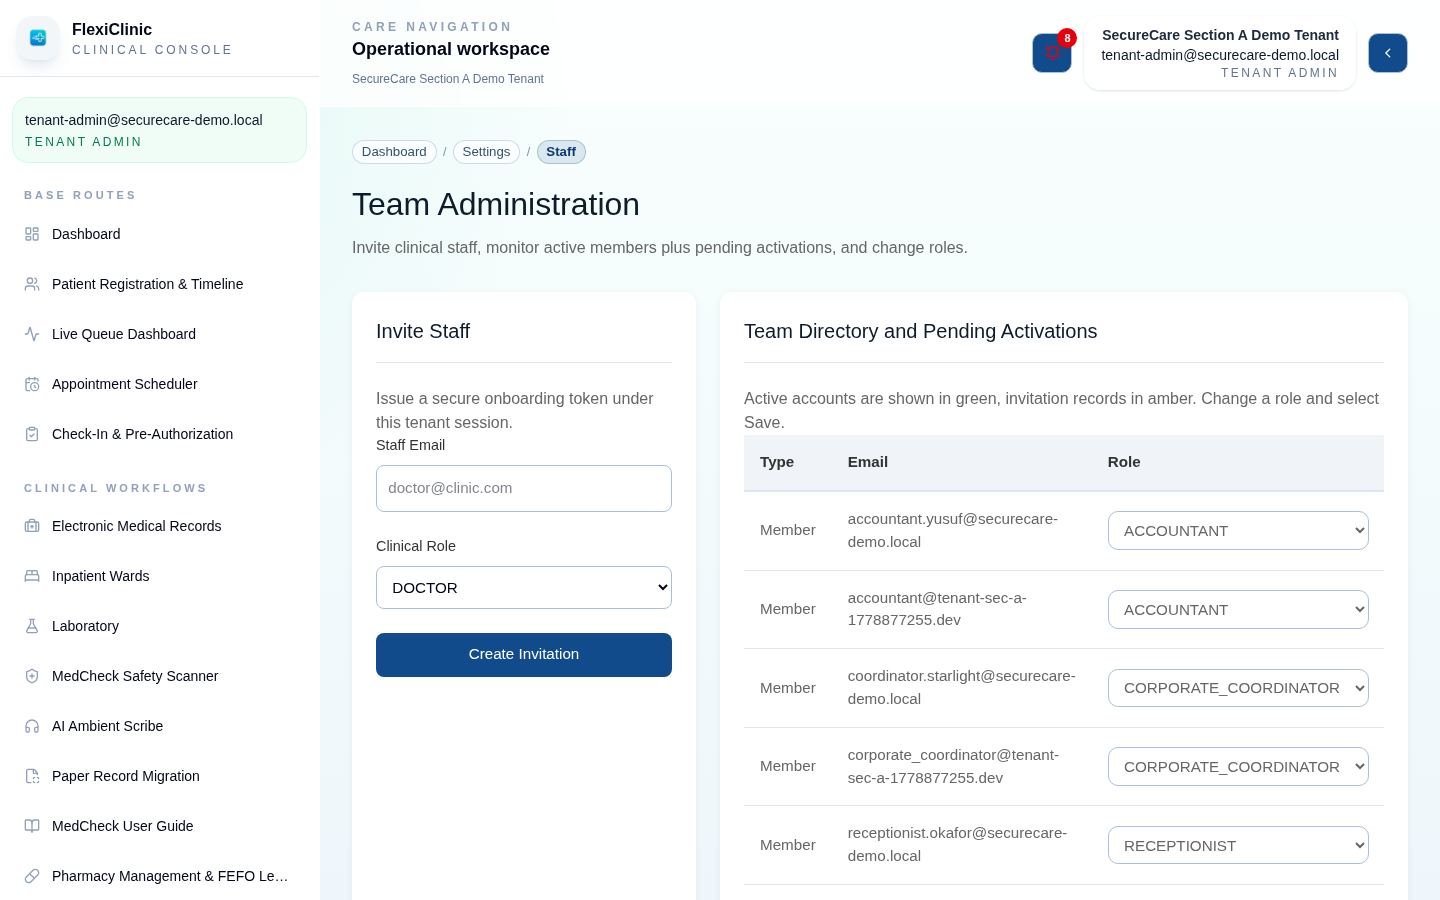
- Open Team Administration, enter the person's work email and choose their role: Doctor, Nurse, Receptionist, Pharmacist, Lab Scientist, Accountant or Corporate Coordinator.
- Select Create Invitation. They get an email with an activation link that lasts 48 hours, and appear as a pending invitation until they activate.
Change someone's role from the directory, or Deactivate them when they leave; they can't sign in again until reactivated. Tenant Admin accounts and your own account can't be deactivated here.
Role Access Matrix
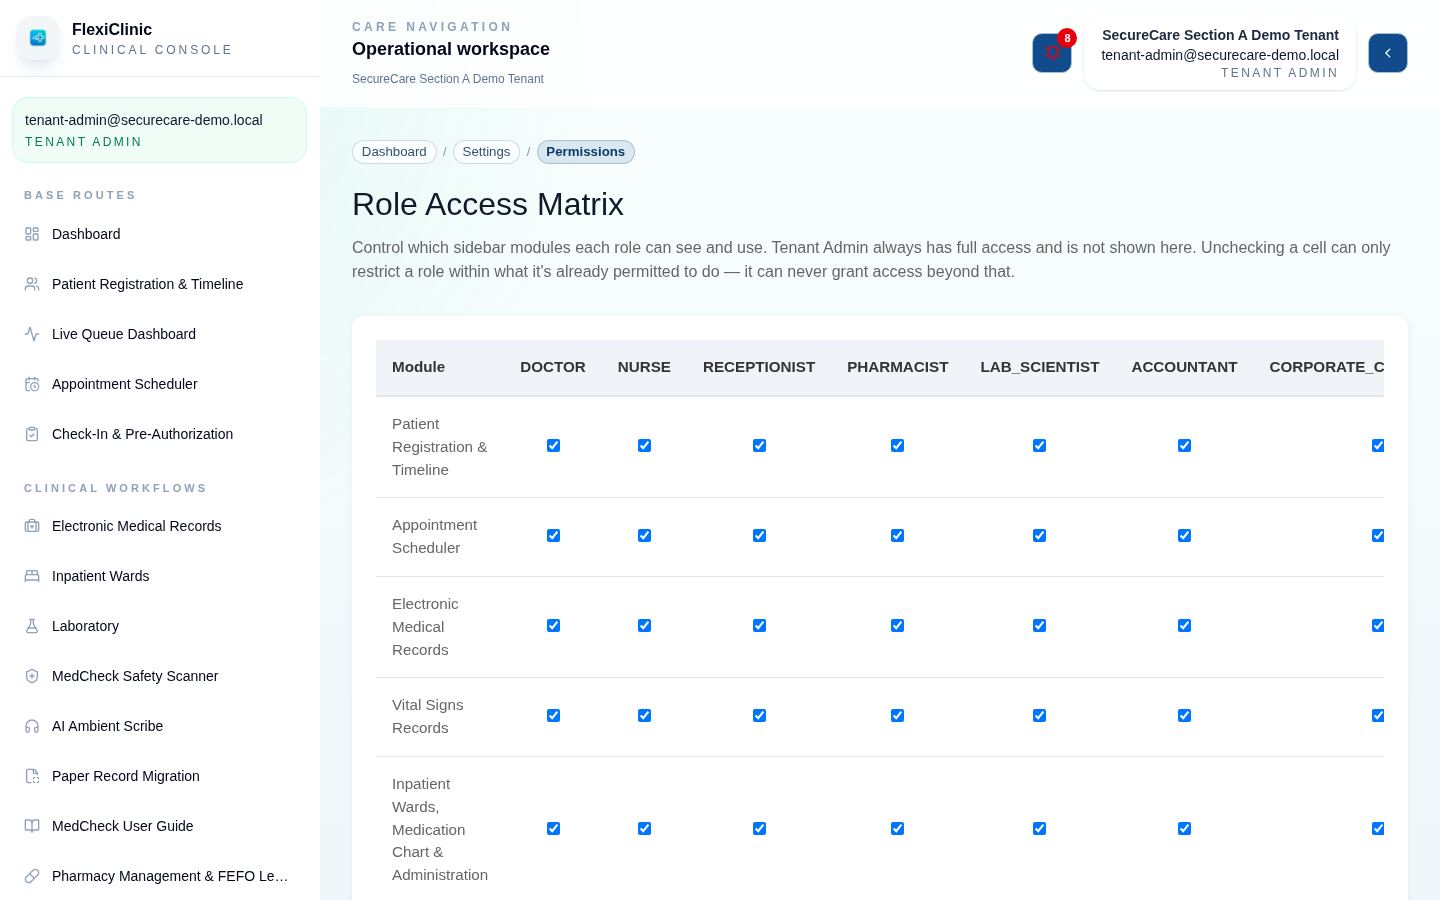
Untick a module for a role to hide it from everyone with that role in your clinic, then select Save Changes. You can only take access away from a role's defaults, never add to them, and the Tenant Admin always keeps full access. A module your plan doesn't include stays hidden whatever is ticked.
Wards & beds setup
Wards & Beds Setup creates the wards and beds shown on the bed board.
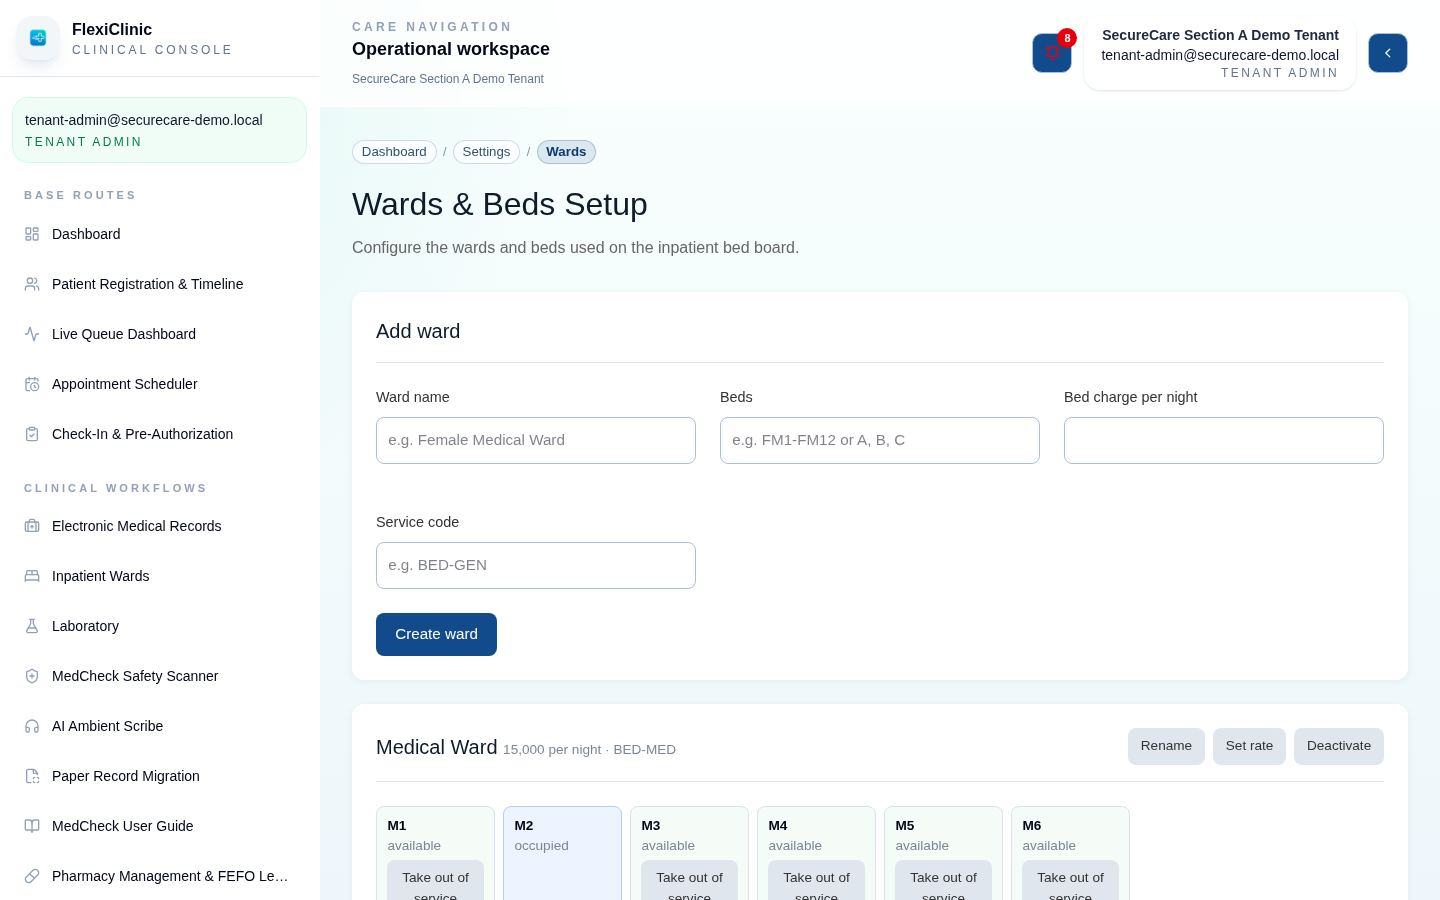
- Under Add ward, enter the ward name and its beds, as a range (
FM1-FM12) or a list (A, B, C). - Enter the bed charge per night and a service code (for example
BED-GEN). Corporate cover rules use the service code, so match it to your price list. - Select Create ward.
Later, add beds to a ward (for example 13-16), take a bed out of service for repairs and return it, or deactivate a whole ward.
Lab tests setup
Lab Tests Setup is the list of tests doctors can request, with their prices and reference ranges.
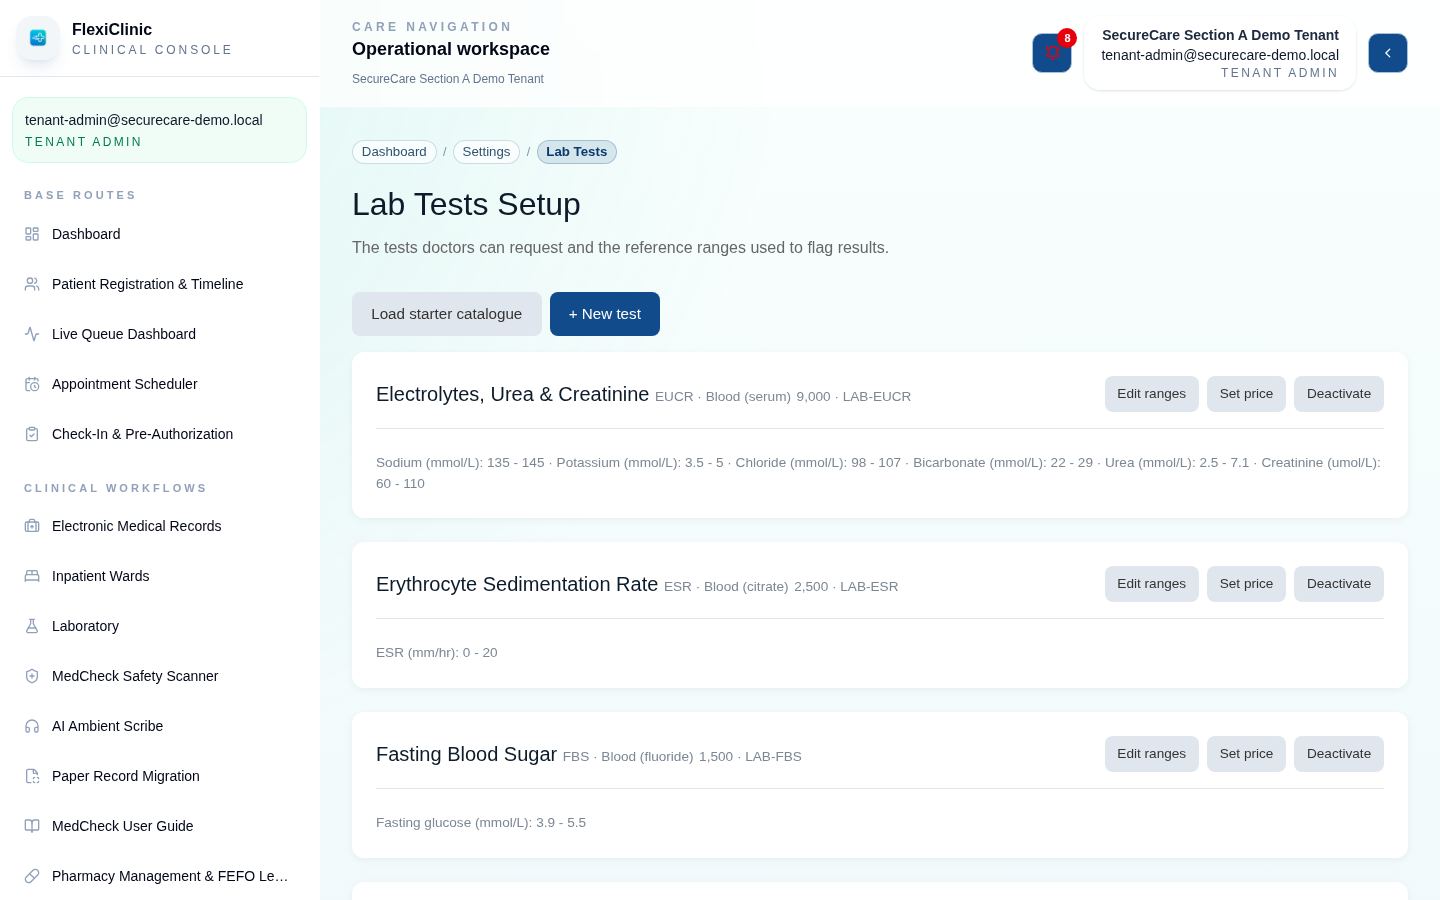
- Load starter catalogue adds a set of common tests to begin with. Running it again only adds tests you don't have.
- Add a test with a code (for example
TFT), name, specimen, price and service code, then its parameters. Each parameter is a number (with unit and low/high reference range) or text (with the expected result). Results outside the range are flagged automatically. - Edit a test to change its price or ranges. Results already reported keep the ranges they were reported with.
Institution & currency
Institution Setup Settings changes anything entered in the setup wizard: practice address, registration or licence number, currency, tax percentage, logo, departments and opening shifts. The address and logo appear on printed receipts.
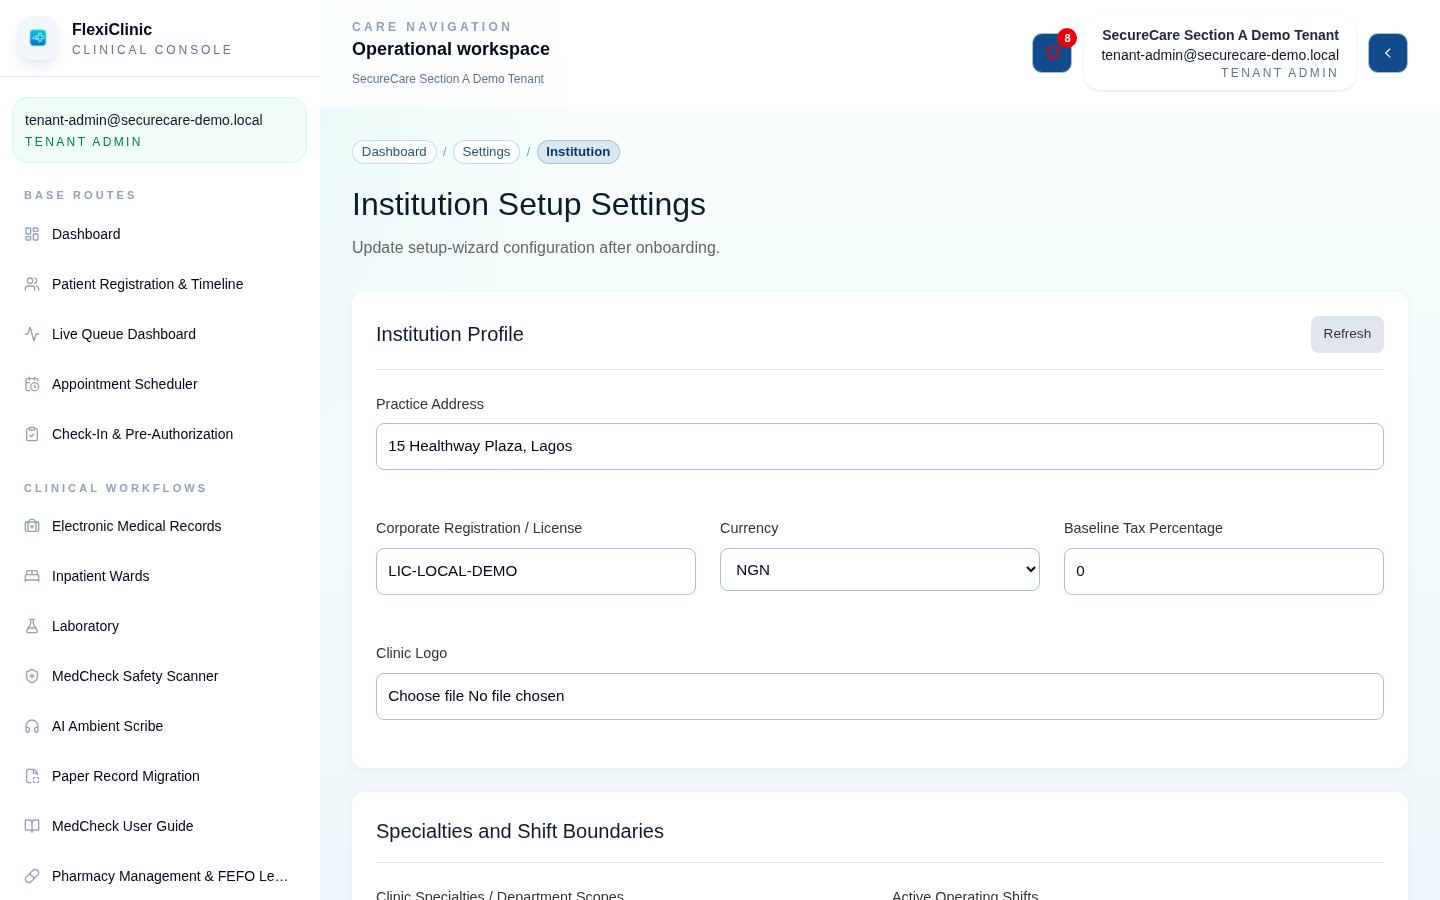
Billing Currency Settings sets the currency used on invoices, receipts and reports.
Security logs
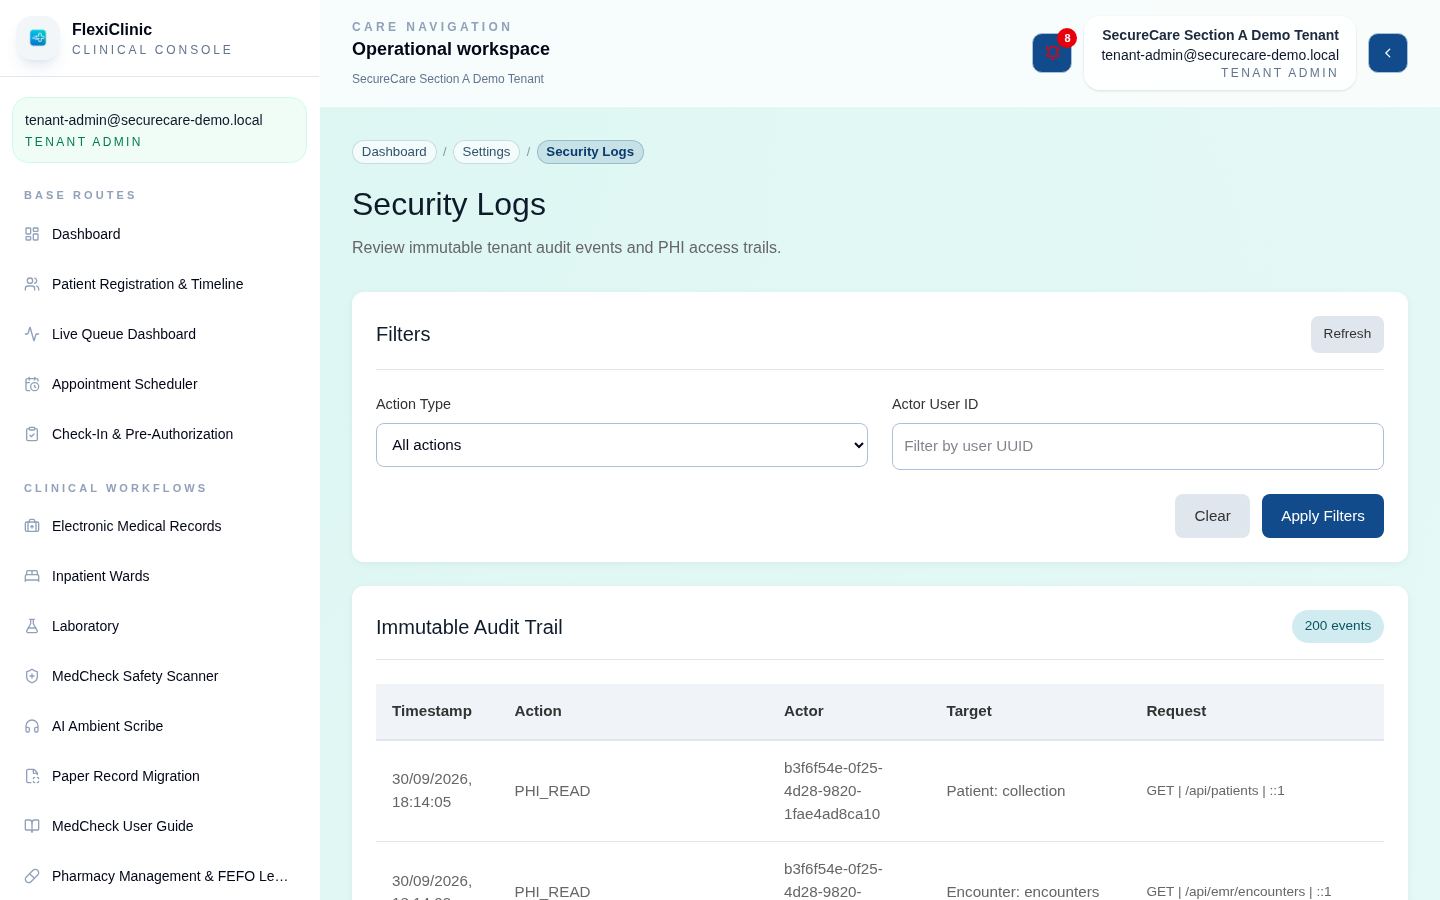
Security Logs is your clinic's audit trail: who viewed or changed patient records, invoices, documents and settings, and when. Entries can't be edited or deleted. Filter by action type or by user and select Refresh. Actions taken by flexiCLINIC support on your clinic are listed here too.
Data import
Data Import loads patient lists and opening pharmacy stock from CSV or Excel files of up to 5,000 rows. Every file is checked before anything is saved.
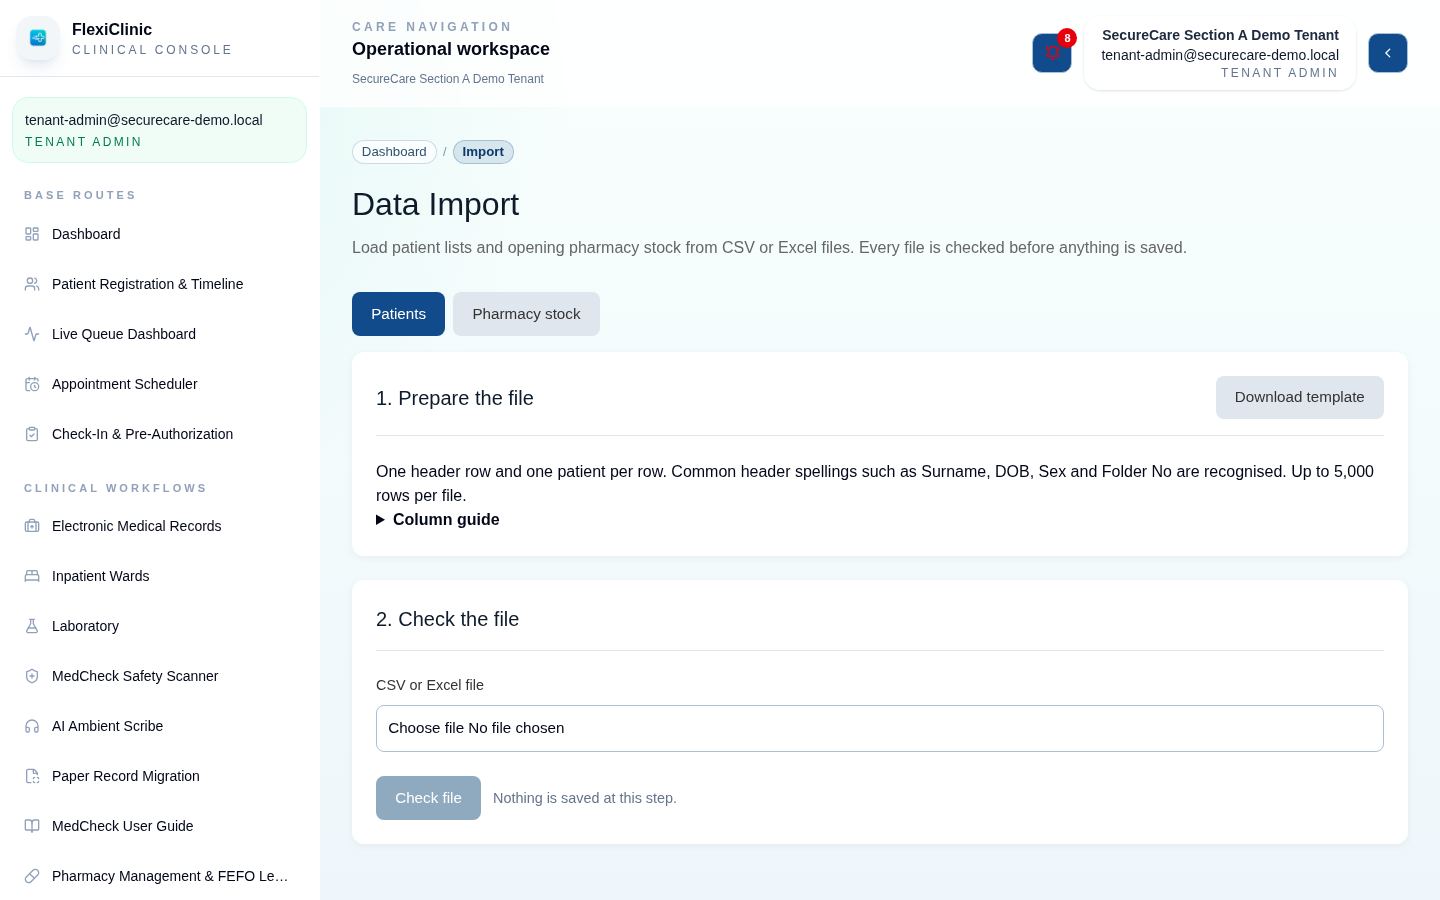
- Choose Patients or Pharmacy stock. The page lists every column, which are required, and what each accepts; download the blank template to start from.
- Choose the file and select Check file. Nothing is saved yet. Each row is marked Ready or Needs fixing, with the reason.
- Fix rows in your file and check again, or select Import to load only the ready rows.
- Select Download crosswalk after a patient import: it lists each old folder number beside the new flexiCLINIC Patient ID. Keep it safe.
Patients already registered with the same name and date of birth are not imported twice. For stock, an existing SKU gets the new batch added.
Subscription & plan
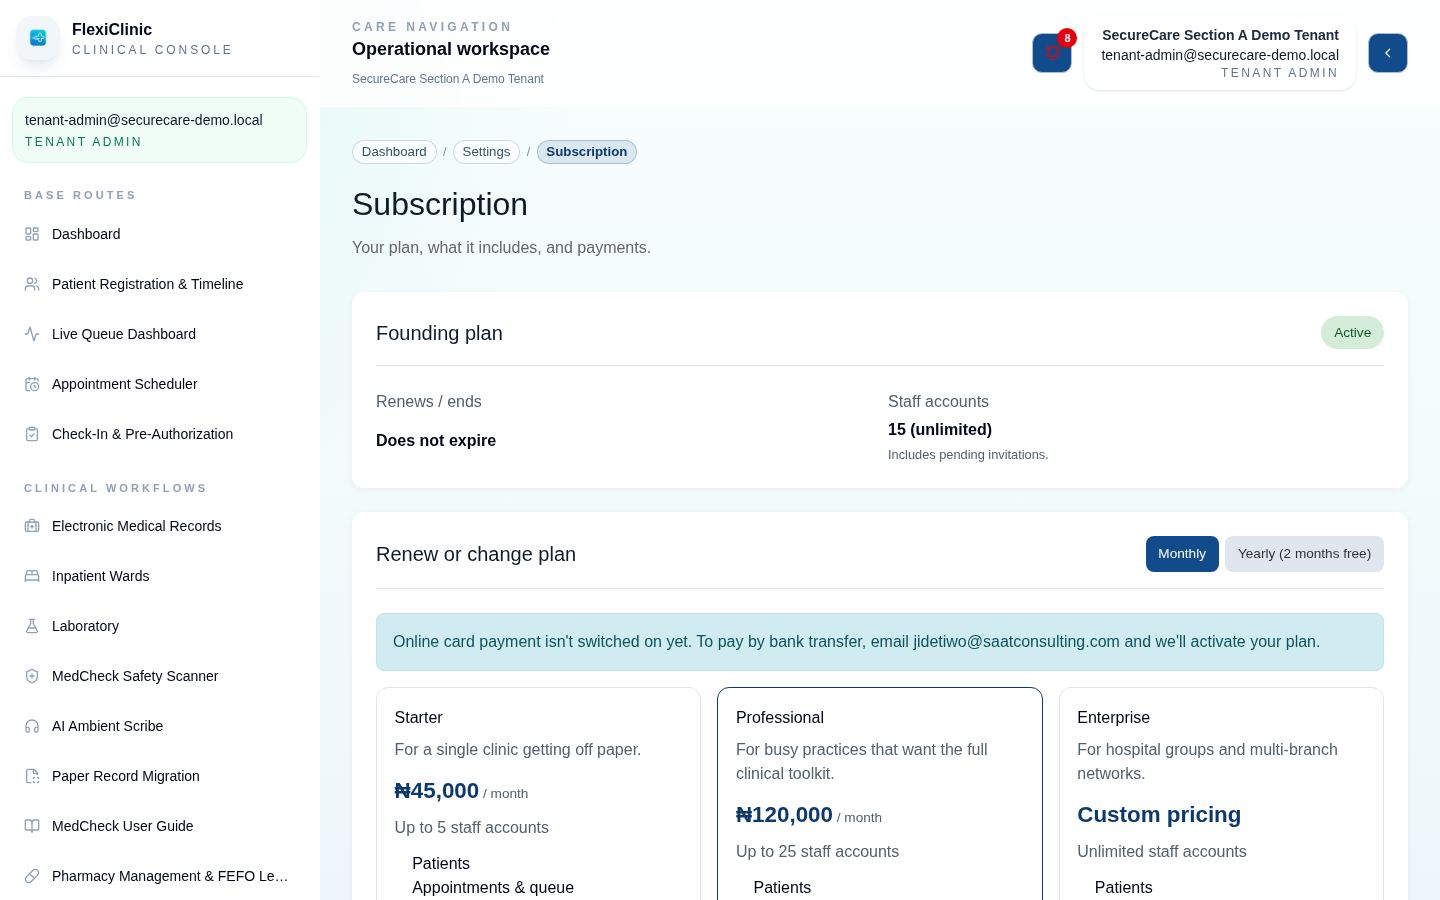
Subscription & Plan shows your plan, when the trial or paid period ends, how many staff accounts are in use, and your payments. It is also where you pay.
Paying
- Choose Monthly or Yearly (yearly shows the months you get free).
- Compare plans: price, staff limit and modules. A plan whose staff limit is below your current number of accounts shows a warning.
- Select Pay with Paystack or Pay with Flutterwave and complete the payment on their page.
- You come back to this page, which confirms the payment with the provider before updating your plan.
Enterprise is priced by quote: select Talk to sales. To pay by bank transfer, email the address shown; the payment appears in your history once flexiCLINIC records it. Paying early adds the new period to the end of the current one.
If the subscription lapses
| Status | When | What staff can do |
|---|---|---|
| Free trial | First 14 days | Everything, in every module |
| Active | Paid period | Everything in the plan's modules |
| Payment due | Up to 7 days after the trial or paid period ends | Everything in the plan's modules; amber banner on every page |
| Read-only | After that | View all records but not add or change anything. The admin can still pay; full access returns as soon as the payment is confirmed |
Messaging
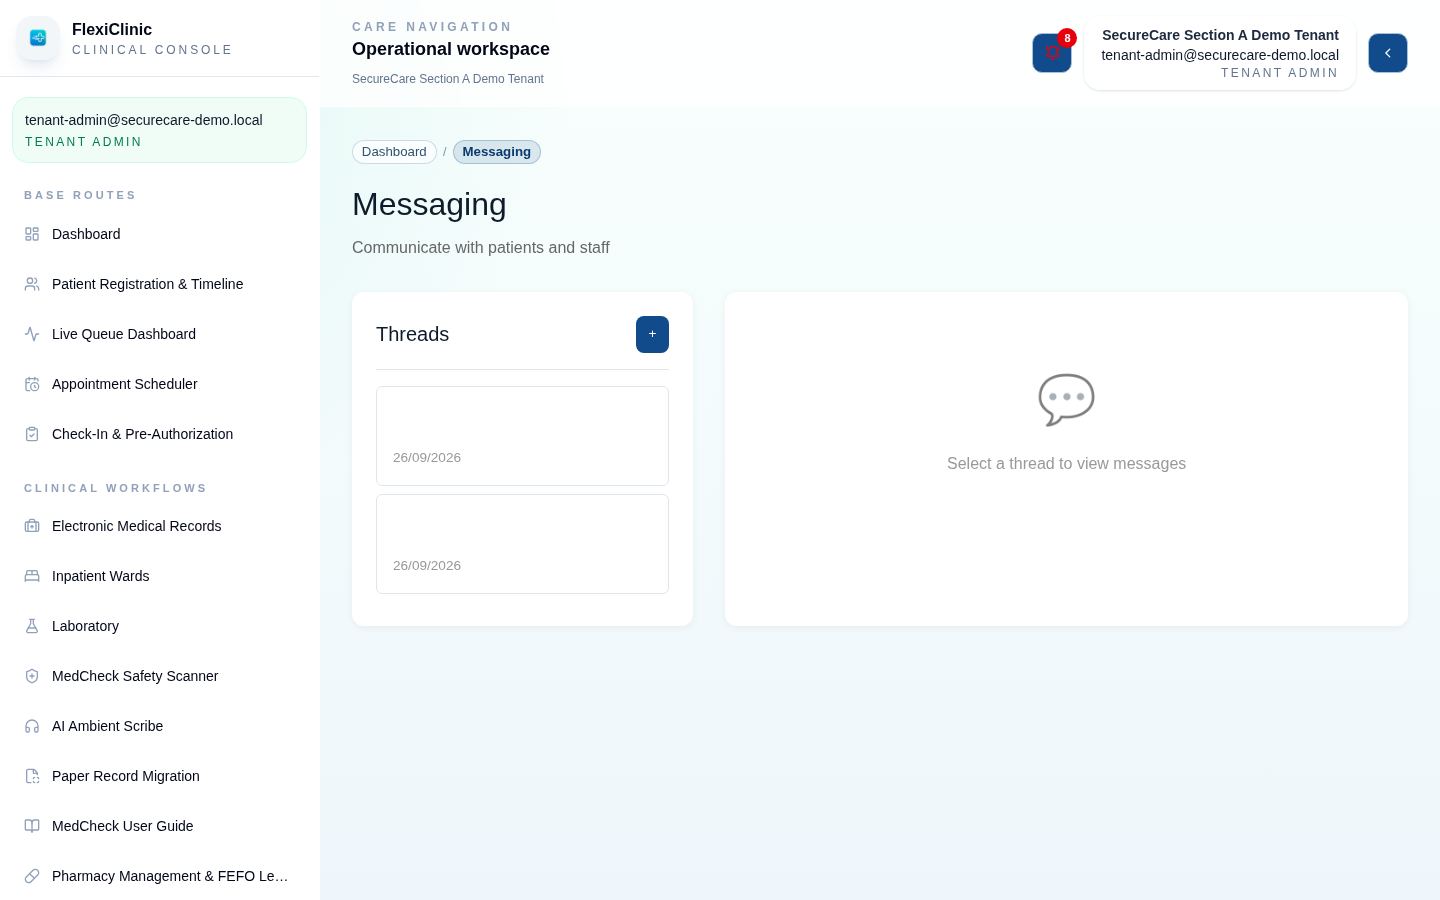
Messaging (from the dashboard) holds conversation threads, either internal between staff or with a patient. Start a thread with a subject, then send messages; new messages appear as they arrive.
Reminder texts
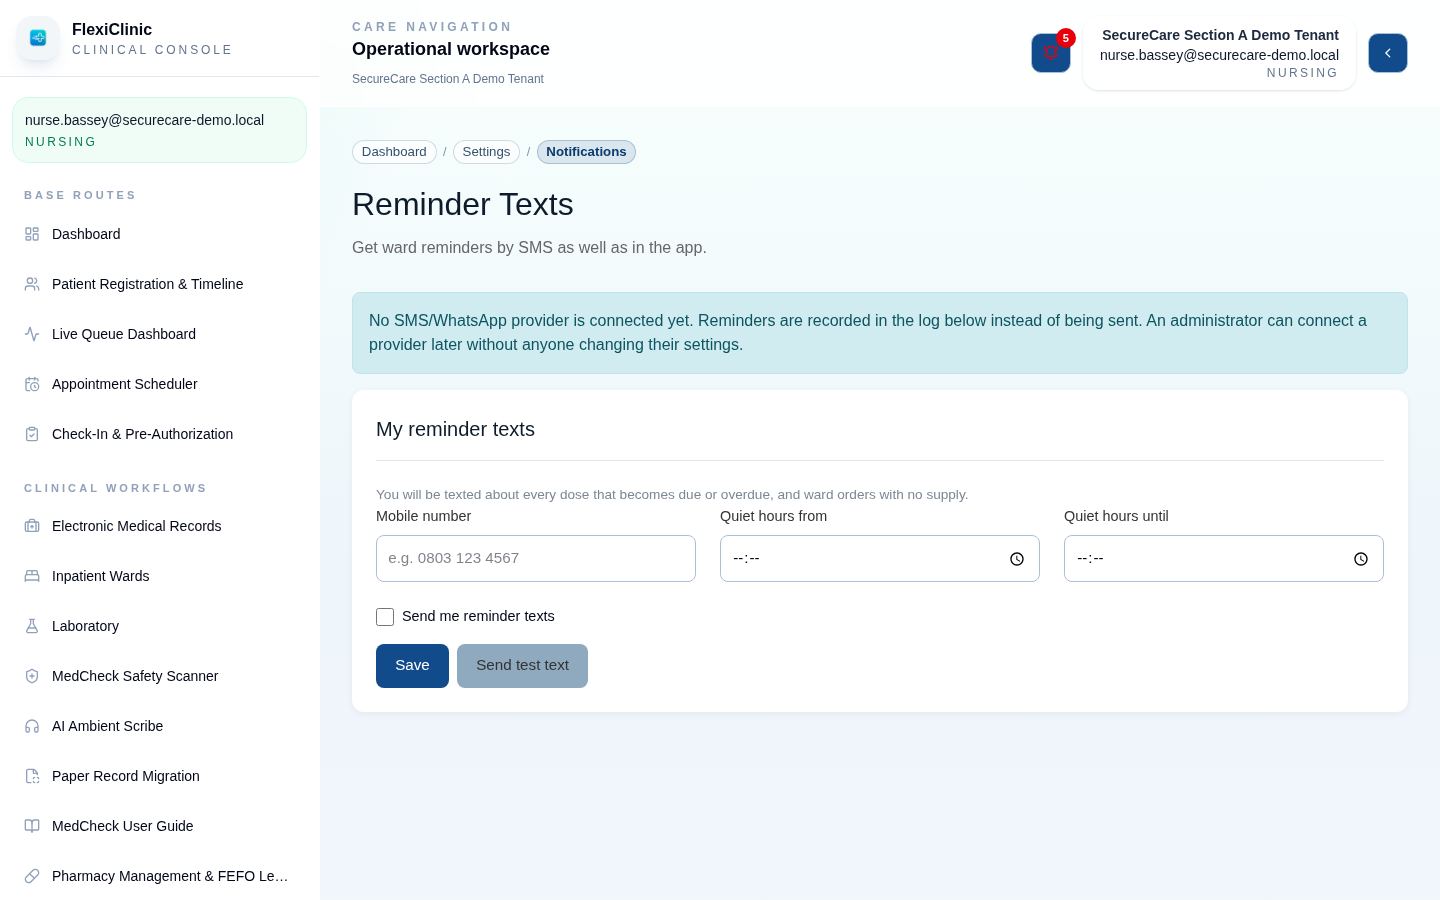
Reminder Texts lets ward staff get their most urgent alerts by text as well as in the app:
- Nurses: every dose that becomes due or overdue, and ward orders with no supply.
- Doctors: doses for their patients more than 2 hours late.
- Pharmacists: ward orders that need supply.
Other roles get reminders in the app only. Enter your mobile number, set quiet hours when you don't want texts, and select the test button to check it works.
Troubleshooting
"Too many attempts" when signing in
Sign-in pauses after 10 failed attempts in 15 minutes. Wait for the time shown, check the clinic short name and email, or use Forgot password.
I can't see a screen a colleague has
The sidebar depends on your role, your clinic's Role Access Matrix, and the clinic's plan. Ask your Tenant Admin to check all three.
"Only the assigned doctor can document this consultation"
The visit was booked with another doctor, or another doctor has already taken it. If it should be yours, a Tenant Admin can document it or the other doctor can see the patient.
"No active appointment for this patient"
The patient hasn't been checked in. Reception moves them to the waiting room on the live queue.
An invoice is locked
It exceeds the institution's cap or balance without an approved pre-authorisation. Approve one on Check-in, or ask a Tenant Admin to override.
An inpatient bill won't finalise
The patient must be discharged first, and every charge needs a price. The message names what is missing: usually a ward with no nightly charge, or a free-text lab test the lab hasn't priced.
"… isn't included in your plan"
That module is outside your plan. A Tenant Admin can upgrade under Subscription & Plan.
"The workspace is read-only"
The subscription ended more than 7 days ago. Records can still be viewed; a Tenant Admin can renew under Subscription & Plan.
"This clinic's account is suspended"
flexiCLINIC has suspended the clinic's account. Your Tenant Admin should contact flexiCLINIC support.
A page shows "Failed to load"
Refresh the page. If it keeps happening, sign out and back in, and tell your Tenant Admin.